
Main Courses
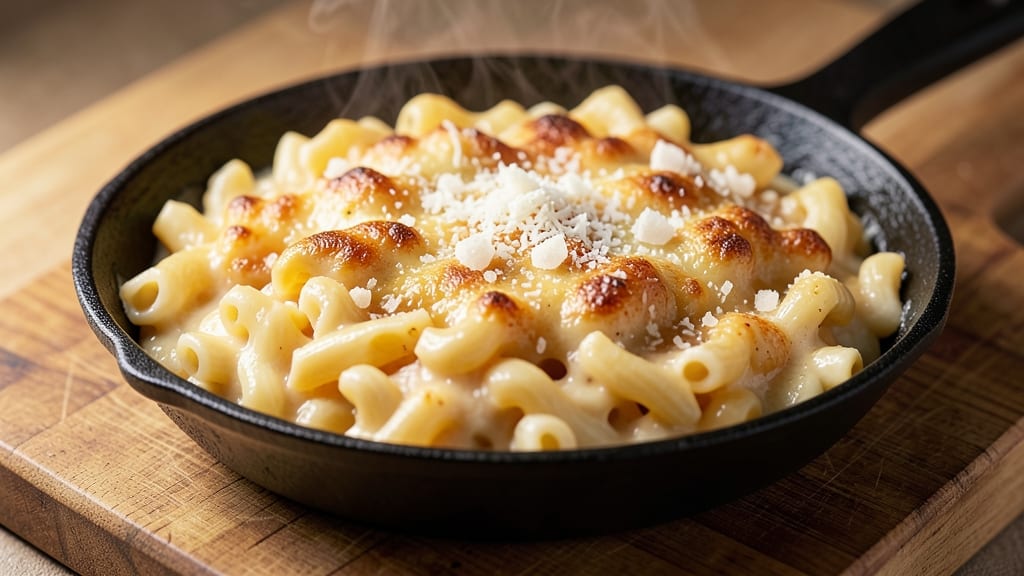
This American style mac n cheese recipe delivers the ultimate comfort food experience with triple-cheese pull-apart layers and a crispy breadcrumb topping. The secret lies in blending sharp cheddar, creamy Gruyère, and tangy Parmesan for a sauce that's rich yet balanced—never grainy or separated.
I've perfected this over years of testing, ensuring every bite has that signature gooey texture and bold flavor that makes it a family favorite.
The recipe starts with a classic roux base cooked to perfection, then enriched with heavy cream and melted cheeses for a velvety sauce. Elbow macaroni cooks al dente before being tossed in the cheese mixture, creating those coveted stretchy strands.
For the crunch, a simple breadcrumb topping gets toasted until golden, adding texture contrast that keeps every bite exciting. This version works equally well stovetop or baked—your choice for how crispy you want the edges.
What sets this apart is the pull-apart layers that form when baked, creating pockets of melted cheese that pull cleanly from the casserole. The breadcrumb topping stays crisp even after cooling, while the interior remains creamy and warm.
It's the kind of dish that transforms a simple weeknight dinner into a restaurant-worthy meal without the fuss. The aroma alone will have everyone gathering at the table.
Customize it with add-ins like crispy bacon, steamed broccoli, or jalapeños for heat lovers—this recipe adapts to your preferences while keeping that authentic American mac and cheese soul. Serve with a simple green salad for balance, or enjoy straight from the oven with a spoon.
Here's how to make it perfectly every time.
Ingredients for american style mac n cheese
Six servings of ultimate comfort—creamy, gooey, and crispy all in one dish.
| Ingredient | Amount | Notes |
|---|---|---|
| Elbow Macaroni 🍝 | 1 ½ lb | Cooked al dente, drained |
| Sharp White Cheddar Cheese 🧀 | 4 oz | Freshly grated from block |
| Gruyère Cheese 🧀 | 4 oz | Freshly grated from block |
| Parmesan Cheese 🧀 | 2 oz | Freshly grated from block |
| Unsalted Butter 🧈 | ½ cup | Cold, cubed for roux |
| All-Purpose Flour 🌾 | ¼ cup | For roux base |
| Heavy Cream 🥛 | 1 cup | Full-fat for richness |
| Whole Milk 🥛 | ½ cup | Warmed for smooth sauce |
| Panko Breadcrumbs 🍞 | ½ cup | For crispy topping |
| Extra-Virgin Olive Oil 🫒 | 2 tbsp | For breadcrumb crispiness |
| Kosher Salt 🧂 | 1 ½ tsp | Adjust to taste |
| Ground Black Pepper 🌶️ | ½ tsp | Freshly cracked |
| Garlic Powder 🧄 | ½ tsp | For subtle depth |
| Mustard Powder 🌶️ | ¼ tsp | Brightens flavor |
The cheeses are non-negotiable here. Sharp white cheddar brings the tang, Gruyère adds creaminess, and Parmesan gives that umami kick. Grab them pre-shredded if you're in a hurry, but freshly grated from blocks makes all the difference—no clumps, just pure melt. I always buy my cheddar from Whole Foods or the deli counter at Kroger; they keep it cold and fresh. For the Gruyère, check the specialty cheese section—it's worth the extra dollar. The macaroni? Barilla or De Cecco are my go-tos—they hold up best to the cheese sauce without getting mushy.
No Gruyère? Swiss cheese works in a pinch, though it won't be as creamy. Pre-shredded cheddar? Toss it in a food processor to break up the clumps—it's a game-changer. Out of heavy cream? Half-and-half or whole milk will work, but the sauce won't be quite as rich. For the breadcrumb topping, Panko is a must—it stays crispy longer than regular breadcrumbs. No Panko? Toast regular breadcrumbs in the oven first to get that crunch. And if you're feeling fancy, add a sprinkle of smoked paprika to the breadcrumbs for extra depth.
This keeps beautifully—3-4 days in the fridge if you can resist eating it all at once. The breadcrumb topping stays crisp for about 2 days, but the cheese layers stay gooey the whole time. For leftovers, reheat covered in the oven at 350°F until bubbly. Freezes for up to 3 months, though the texture changes slightly after thawing. I always make a double batch because it disappears faster than you'd think—perfect for meal prep or feeding a crowd.
Why You'll Love This Recipe
- One-Pot Magic: I swear by this recipe because it’s actually one-pot—no strainers, no extra bowls, just elbow macaroni simmering in a buttery Gruyère-cheddar-Parmesan bath until it’s creamy perfection. The butter melts right into the cheese, so you don’t even need to whisk like a maniac.
- Cheese Overload: Between the sharp white cheddar’s tang, Gruyère’s nutty depth, and Parmesan’s salty punch, this isn’t just mac and cheese—it’s a flavor explosion. I’ll be real: I’ve burned toast just to eat this straight from the pan.
- Weeknight & Potluck Hero: This feeds a crowd (or my hungry teens) without stress—double the batch, bake it ahead, and reheat it later. Honestly, it’s my go-to for game days, book club dinners, or when I’m too tired to care about "fancy" meals.
- Budget-Friendly Luxury: Elbow mac, butter, and store-brand cheddar still taste ridiculously good here—no need to splurge. Leftovers? Even better cold the next day, sliced into crispy-edged triangles. My wallet and taste buds thank me every time.
Step-by-step instructions for American style mac and cheese
Follow these simple steps to create the ultimate triple-cheese mac and cheese with crispy, pull-apart layers.
Cook the Elbow Macaroni to Al Dente Perfection
Bring a large pot of water to a rolling boil and add 1.5 pounds of elbow macaroni. Stir immediately to prevent sticking. Cook until the pasta is al dente—about 1 minute less than the package instructions specify. This ensures the pasta stays firm enough to hold its shape when baked.
Drain the pasta in a colander and rinse briefly with cold water to stop the cooking process. Shake off any excess water and transfer the drained macaroni to a large mixing bowl. You'll want to work quickly now to keep the pasta hot and prevent it from drying out.
Make the Creamy Triple-Cheese Sauce
In a separate large saucepan, melt the 0.5 cup of unsalted butter over medium heat. Once melted, whisk in the 0.25 cup of all-purpose flour to create a roux. Cook for 2-3 minutes, stirring constantly, until the mixture turns a light golden color and smells nutty—this ensures a rich, flavorful base for your sauce.
Gradually whisk in the 1 cup of heavy cream and 0.5 cup of warmed whole milk, making sure to combine them smoothly. Let the mixture simmer gently for 3-4 minutes until it begins to thicken. Then, reduce the heat to low and slowly stir in the 4 ounces of freshly grated sharp white cheddar cheese, 4 ounces of freshly grated gruyère cheese, and 2 ounces of freshly grated parmesan cheese until completely melted and smooth.
Season the sauce with 1.5 teaspoons of kosher salt, 0.5 teaspoon of freshly cracked ground black pepper, 0.5 teaspoon of garlic powder, and 0.25 teaspoon of mustard powder. The mustard powder brightens the flavor and balances the richness of the cheese. Taste and adjust the seasoning if needed—this is where the magic happens.
Combine Pasta and Sauce for Maximum Gooeyness
Pour the creamy cheese sauce over the drained macaroni in the mixing bowl. Use a large spoon or spatula to toss everything together until every strand of pasta is fully coated in the sauce. The mixture should look glossy and well-combined, with no dry spots. If the sauce seems too thick, add a splash of warm milk to loosen it.
Transfer the macaroni and cheese mixture to a 9x13-inch baking dish, spreading it out evenly. The dish should be about ¾ full—this allows room for the mac and cheese to rise and develop that perfect pull-apart texture. Use a spatula to smooth the top, making sure it's level.
Add the Crispy Panko Topping
In a small bowl, mix the 0.5 cup of panko breadcrumbs with 2 tablespoons of extra-virgin olive oil. The oil helps create a crispy, golden-brown topping that contrasts beautifully with the creamy mac and cheese underneath. Sprinkle the breadcrumb mixture evenly over the top of the mac and cheese, pressing down gently to help it adhere.
For extra flavor, you can also sprinkle a pinch more of kosher salt and ground black pepper over the breadcrumbs. This step is what sets this mac and cheese apart—it adds a delightful crunch and texture that everyone will love.
Bake Until Golden and Bubbly
Preheat your oven to 375°F. Place the baking dish on the middle rack and bake for 20-25 minutes, until the top is golden brown and the edges are bubbling. You'll know it's ready when the cheese is fully melted and the breadcrumbs have turned a beautiful golden color.
For the best results, avoid opening the oven door during baking—this can cause the mac and cheese to sink or lose its crispy topping. If you're unsure whether it's done, check at the 20-minute mark. Once it's out of the oven, let it rest for 5-10 minutes before serving. This resting time allows the mac and cheese to set slightly, making it easier to slice and serve.
Pro Tips For Making American Style Mac N Cheese
- Cook Pasta Al Dente: DESCRIPTION:
- Shred Cheese Fresh: DESCRIPTION:
- Melt Butter Slow: DESCRIPTION:
- Strain the Sauce: DESCRIPTION:
Pro cooking tips for perfect results
Roux Perfection
The roux is where the magic begins—don’t rush this step! Cook your 0.5 cup butter and 0.25 cup flour over medium heat for exactly 2-3 minutes until it turns a light golden color and smells nutty.
This ensures a rich, flavorful base without burning. I’ve learned the hard way that pushing it too long turns the sauce bitter, so keep your eye on it. 🌡️
For extra insurance, use a thermometer—the roux should hit 160°F before adding liquids. This consistency prevents lumps and guarantees a silky sauce. If you’re nervous, whisk constantly and keep the heat steady. Trust me, this small effort makes all the difference in the final texture.
Cheese Melting Secrets
When adding cheese, lower the heat to low and stir constantly until fully melted. Sharp cheddar and Gruyère are temperamental—if they clump, strain the sauce through a fine-mesh sieve for a velvety finish. I always add the cheddar first, then Gruyère, and finish with Parmesan for that umami punch. 🧀
Pro tip: Warm your milk slightly (just enough to steam) before adding it to the roux. This helps emulsify the sauce and prevents separation later. If your sauce looks too thick, add 1-2 tablespoons of warm milk to loosen it—just don’t overdo it, or it’ll turn watery.
Pasta Timing Tricks
Cook your pasta 1 minute less than the package says for al dente perfection. Overcooked pasta turns mushy when baked, and nobody wants that. Drain it well, rinse with cold water, and shake off excess moisture.
This step prevents a soggy final dish. I like to toss the drained pasta with a tiny bit of olive oil right after draining to keep it from sticking while I finish the sauce. 🍝
Work quickly when combining pasta and sauce—hot pasta absorbs the cheese sauce faster, so toss everything together in a large bowl and get it into the baking dish within 5 minutes. The faster you act, the creamier the result.
Baking Like a Pro
Preheat your oven to 375°F and place the baking dish on the middle rack for even heat distribution. Avoid opening the oven door during baking—this causes the mac and cheese to sink. If you’re unsure it’s done, check at the 20-minute mark for golden-brown breadcrumbs and bubbling cheese. 🔥
For extra crispiness, broil the dish for 1-2 minutes at the very end. Just watch it like a hawk—broiling can happen fast, and you don’t want to burn the breadcrumbs. Let it rest for 5-10 minutes before serving; this helps the layers set and makes slicing easier.
Stovetop Shortcut
Skip baking entirely and serve this stovetop! After combining the pasta and sauce, transfer everything to a large skillet and heat over low heat for 5-7 minutes, stirring occasionally.
Top with extra breadcrumbs and toast them in the skillet for 1-2 minutes until golden. It’s just as delicious—no oven required! ⚡
This method works great for weeknight dinners when you’re short on time. Just be sure to keep the heat low to avoid scrambling the cheese. Serve immediately with a sprinkle of fresh parsley or extra black pepper for a pop of color.
Nutrition facts
Frequently asked questions
Can I make this mac and cheese without baking it?
For a stovetop version, combine the cooked pasta and cheese sauce in a large skillet over low heat for 5-7 minutes, stirring occasionally. Top with extra panko breadcrumbs and toast for 1-2 minutes until golden. This method works perfectly for quick weeknight dinners and still delivers that creamy, cheesy goodness without the oven.
What if my cheese sauce gets too thick or grainy?
If the sauce is too thick, stir in 1-2 tablespoons of warm milk to loosen it. For graininess, strain the sauce through a fine-mesh sieve to remove any cheese clumps. Always melt cheese over low heat while stirring constantly—this prevents clumping. If you're in a hurry, pre-shredded cheeses work fine, but freshly grated always gives the best results.
How do I keep the breadcrumb topping extra crispy?
Mix the panko with 2 tablespoons of olive oil before sprinkling it on top—this creates a crispy barrier. For extra crunch, broil the mac and cheese for 1-2 minutes at the very end, watching closely to avoid burning. Press the breadcrumbs down gently so they stick, and avoid opening the oven door during baking to maintain that perfect texture.
Can I add other ingredients like bacon or broccoli?
Yes! Cook bacon separately and crumble it into the sauce, or steam broccoli until tender-crisp and mix it in before baking. For best results, add ingredients that won't make the dish soggy—like crispy bacon or sautéed mushrooms. Just be mindful of the extra moisture they might add. Try adding a pinch of smoked paprika to the breadcrumbs for extra depth if you're feeling adventurous.
How long can I store leftovers?
This mac and cheese keeps well in the fridge for 3-4 days in an airtight container. The breadcrumb topping stays crisp for about 2 days, but the cheese layers remain gooey the whole time. Reheat covered in the oven at 350°F until bubbly. It also freezes beautifully for up to 3 months, though the texture may change slightly after thawing.