
Desserts
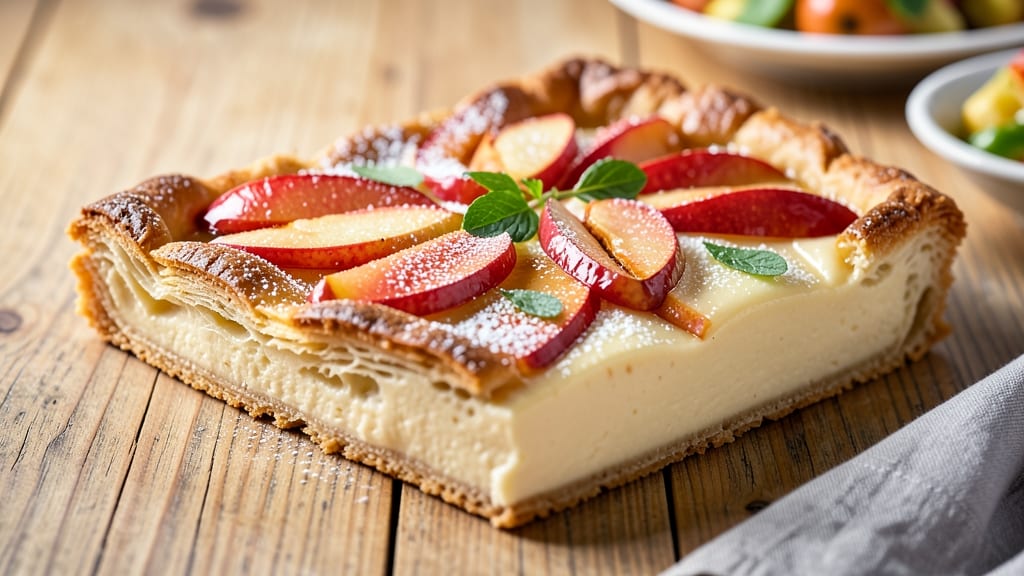
This apple cream cheese slab pie delivers the perfect balance of buttery crust and gooey fruit swirls that’ll have everyone asking for seconds. 💛 The secret lies in a flaky, golden crust wrapped around a creamy filling of apples and softened cream cheese, creating layers of flavor with every bite.
I’ve perfected this recipe through years of baking, ensuring the apples stay tender while the cream cheese adds that signature tangy richness.
The beauty of this slab pie is its simplicity—just a few ingredients come together to create a dessert that feels both rustic and elegant.
You’ll start with a classic pie crust, then layer it with a mixture of spiced apples and cream cheese, creating those signature swirls that make it irresistible. Baking at the right temperature is key to achieving a crisp crust and perfectly set filling without drying out the fruit.
What you’ll end up with is a warm, inviting pie that’s ideal for gatherings or a cozy night in. The combination of sweet apples and creamy cheese creates a flavor profile that’s both comforting and sophisticated.
Serve it with a scoop of vanilla ice cream or a dollop of whipped cream for the ultimate dessert experience.
This recipe is designed to be foolproof, with clear instructions that guide you through every step—from rolling out the crust to baking the pie to its golden perfection. Whether you’re a seasoned baker or just starting out, you’ll achieve restaurant-quality results with minimal effort. Let’s get started!
Ingredients for apple cream cheese slab pie
Pantry staples plus a few fresh ingredients for that perfect apple cream cheese balance.
| Ingredient | Amount | Notes |
|---|---|---|
| All-Purpose Flour 🌾 | 2 ½ cups | Sifted for flaky crust |
| Unsalted Butter 🧈 | 1 cup | Cold, cubed for crust |
| Granulated Sugar 🍚 | ¾ cup | For crust sweetness |
| Salt 🧂 | ½ tsp | Fine sea salt preferred |
| Ice Water 💧 | ½ cup | For dough binding |
| Apples 🍎 | 4 medium | Honeycrisp or Granny Smith |
| Brown Sugar 🍚 | ¾ cup | Packed for filling |
| Cinnamon 🌿 | 2 tsp | Ground for warmth |
| Lemon Juice 🍋 | 1 tbsp | Freshly squeezed |
| Cream Cheese 🧀 | 8 oz | Softened, full-fat |
| Large Eggs 🥚 | 1 whole | For egg wash |
| Vanilla Extract 🌸 | 1 tsp | Pure vanilla preferred |
| Ground Ginger 🍃 | ½ tsp | Optional for depth |
The apples make or break this pie—Honeycrisp or Granny Smith are my go-tos because they hold up during baking without turning mushy. Trader Joe's usually has Honeycrisp in season, but any crisp apple works. Peel them first (no need to core) and slice them evenly—about 1/4-inch thick. The cream cheese? Philadelphia brand is reliable, but any full-fat block works if softened properly. I always buy extra because it's so versatile. For the crust, King Arthur flour gives the best flaky texture, but regular all-purpose works too.
No vanilla extract? Vanilla bean paste works in a pinch, or even a splash of vanilla syrup. Short on apples? Substitute with pear slices—they add a nice twist. The crust can be made ahead and chilled for up to 48 hours, which saves time on baking day. For the filling, if you're feeling fancy, add a pinch of nutmeg alongside the cinnamon. The lemon juice keeps the apples from browning too fast while they sit in the filling. And trust me, don't skip the egg wash—it gives that gorgeous golden finish.
The crust dough keeps best wrapped in plastic for 2 days in the fridge. The filling can be prepped ahead and stored in the fridge for 1 day before assembling. Once baked, let the pie cool completely—it's worth the wait. Store leftovers covered at room temperature for 2 days or freeze for 3 months. I always slice mine into squares for easy serving, and it reheats beautifully in the oven at 350°F for 10 minutes if you want it warm.
Why You'll Love This Recipe
- No-Roll Crust Magic: I swear by that cold butter cut into flour—no food processor, no fuss. The ice water trick keeps it from sticking, and you’ll have a sturdy slab crust without a single tear or overworked wrist.
- Creamy-Tart Perfection: That velvety cream cheese filling with sugar and apples? It’s the kind of balance that makes you pause mid-slice. The apples stay tender, the cream cheese stays rich, and the buttery crust ties it all together like a warm hug.
- Potluck Star: Between us, this pie travels better than half the things I bring to gatherings. No one expects a slab pie, so it’s always the first to disappear—especially when I slice it right there in front of them.
- Budget-Friendly Luxury: Four ingredients for the crust, and the rest? Apples you already have. I’ve made this for under $8 for a full pie, and it still feels like a bakery-worthy treat. Leftovers? They last days, wrapped snug in parchment.
Step-by-step instructions for apple cream cheese slab pie
Here's how to create a showstopper pie with a flaky crust and creamy apple filling.
👨🍳 Step 1: Make the Perfect Crust
In a large bowl, combine the 2.5 cups all-purpose flour, 0.75 cup granulated sugar, and 0.5 tsp salt. Cut in the 1 cup cold cubed unsalted butter using a pastry cutter or your fingers until the mixture resembles coarse crumbs with pea-sized butter pieces remaining.
Add the 0.5 cup ice water gradually, mixing gently with a fork just until the dough comes together. Be careful not to overwork it—this keeps the crust tender. Divide the dough into two equal portions, flatten into discs, wrap in plastic, and refrigerate for at least 30 minutes. Chilling prevents shrinking and makes rolling easier.
🍳 Step 2: Prepare the Cream Cheese Filling
In a medium bowl, beat the 8 oz softened cream cheese until smooth. Add the 0.75 cup packed brown sugar, 2 tsp cinnamon, 1 tsp vanilla extract, and 0.5 tsp ground ginger, mixing until fully combined. The mixture should be thick but spreadable—this will be your gooey center.
In a separate bowl, toss the 4 peeled and thinly sliced apples with the 1 tbsp lemon juice. This prevents browning and adds brightness. Fold the apples into the cream cheese mixture, reserving any excess liquid. You'll want a thick but pourable consistency—add a splash of reserved apple juice if needed.
🥘 Step 3: Assemble the Slab Pie
Preheat your oven to 375°F. On a floured surface, roll out one dough disc into a 12x16-inch rectangle (about ⅛-inch thick). Transfer to a parchment-lined baking sheet. Spread the cream cheese-apple mixture evenly over the dough, leaving a 1-inch border around the edges.
Roll out the second dough disc to the same size. Place it on top of the filling, pressing gently to seal the edges. Use a fork to crimp the edges decoratively. Cut 4-5 slits in the top crust to allow steam to escape. Brush the top with the 1 whole egg beaten with 1 tablespoon water for a golden finish.
🔥 Step 4: Bake to Golden Perfection
Bake for 45-50 minutes until the crust is deep golden brown and the filling is bubbling through the slits. The edges should be set but the center should still be slightly soft—it'll firm up as it cools. If the top browns too quickly, tent with foil.
Remove from the oven and let cool for 15 minutes before slicing. Here's the thing—this pie tastes best at room temperature, so give it 2 hours to fully set. The contrast of warm, gooey filling with the crisp crust is what makes this pie irresistible.
Pro Tips For Making Apple Cream Cheese Slab Pie
- Chill the Butter First: Cold butter in the crust makes all the difference—literally. Cut it into 1/2-inch cubes and refrigerate them for 20 minutes before mixing with flour. I used to skip this, and my crust always turned out greasy instead of flaky. The ice water will handle the rest, but start with cold butter or you’re fighting an uphill battle.
- Pre-Cook the Apples: Toss sliced apples in lemon juice and sugar, then let them sit for 15 minutes before assembling the pie. This draws out moisture and keeps the filling from turning into soup. I learned this after my first slab pie leaked like a sieve—now it holds its shape perfectly.
- Press the Crust Hard: Don’t be gentle. Press the dough into the pan until it’s an even 1/4-inch thick, especially around the edges. A thick crust bakes unevenly and can burn before the filling sets. Use your knuckles or a rolling pin—just make sure every inch gets the same love.
- Bake Low and Slow: 350°F is your friend here. Slab pies need steady, gentle heat to avoid a soggy bottom or overbrowned top. I used to crank it to 375°F, and the crust would darken too fast while the center stayed doughy. Lower heat = better texture every time.
Make-ahead tips for this dish
Crust Prep Ahead
Roll out and shape your pie crust the night before—it saves time and ensures an even bake. Wrap the rolled dough tightly in plastic wrap and refrigerate for up to 24 hours. When ready to use, simply unwrap and roll it out again on a lightly floured surface.
I always label my dough with the date to avoid confusion. This step is especially helpful if you're hosting a dinner party and want to focus on other preparations. 💫
Filling Prep Timeline
Assemble the cream cheese and apple filling up to 24 hours ahead of baking. Store it in an airtight container in the refrigerator. When you're ready to bake, simply spread the chilled filling onto your crust.
The apples will keep their texture better when prepped ahead, and the cream cheese stays smooth without separating. I like to make this step the morning of baking so it's ready to go when I'm ready to assemble.
Full Assembly Strategy
For a stress-free baking day, assemble the entire pie (including the top crust) and refrigerate it overnight. When you're ready to bake, simply transfer it from the fridge to the oven—no need to roll out dough last minute.
This method helps prevent the crust from shrinking during baking. I've even prepped pies this way for early morning events, and they've turned out perfectly every time.
Baking Schedule
If you're making this pie for a special occasion, bake it 4-6 hours before serving. The pie will continue to set and develop flavors as it cools. Store it at room temperature in an airtight container until serving time.
For events with large crowds, I recommend baking it the day before—it reheats beautifully in the oven at 350°F for 10 minutes if needed. The flavors actually improve overnight!
Freezing Options
You can freeze the fully baked pie for up to 3 months for future enjoyment. Wrap it tightly in plastic wrap followed by aluminum foil to prevent freezer burn.
When ready to serve, thaw it in the refrigerator overnight, then reheat in the oven at 350°F for 15-20 minutes to restore that fresh-baked texture. I've used this technique to prepare pies for holiday gatherings when I know I'll be busy.
Serving Prep
Slice the pie into 1-inch squares before serving for easy portioning. Arrange the squares on a platter and dust with a little extra cinnamon or powdered sugar for presentation.
I always prepare serving utensils and toppings (like vanilla ice cream or whipped cream) ahead of time so everything is ready when guests arrive. For a rustic touch, serve with warm apple cider or caramel sauce on the side. 🍏
Nutrition facts
Frequently asked questions
Can I substitute cream cheese with something else?
For a lighter option, you can use 8 oz ricotta cheese mixed with 2 tbsp sour cream to mimic the creaminess. If you're avoiding dairy entirely, try 8 oz coconut cream cheese (ensure it's full-fat for best texture). The tangy richness is key—without it, the pie loses its signature balance.
How do I prevent the crust from getting soggy?
Prevent soggy bottoms by chilling the assembled pie for 30 minutes before baking. Brush the bottom crust with 1 tbsp melted butter before adding filling, and sprinkle with 1 tbsp flour or crushed cornflakes for extra crunch. Bake on a preheated baking sheet to absorb excess moisture.
What's the best way to slice this slab pie?
Use a hot knife (dip in hot water and wipe dry between cuts) for clean slices. Cut into 1-inch squares or rectangles for easy serving. For rustic appeal, use a serrated knife and cut at a slight angle. Let the pie cool completely first—warm filling is easier to slice neatly.
Can I make this pie in a pie dish instead of a slab?
Yes! Use a 9-inch deep-dish pie pan and reduce the filling by about 25% (about 2 cups). Roll out one crust for the bottom, fill, then add a second crust on top. Cut decorative slits and bake for 35-40 minutes at 375°F. The baking time will be shorter due to the smaller surface area.
How do I store leftovers?
Store covered at room temperature for 2 days or refrigerate for up to 4 days. For longer storage, freeze for 3 months wrapped tightly in plastic and foil. Reheat slices in a 350°F oven for 10 minutes to restore crispness. The filling stays creamy when reheated properly!