
Appetizers
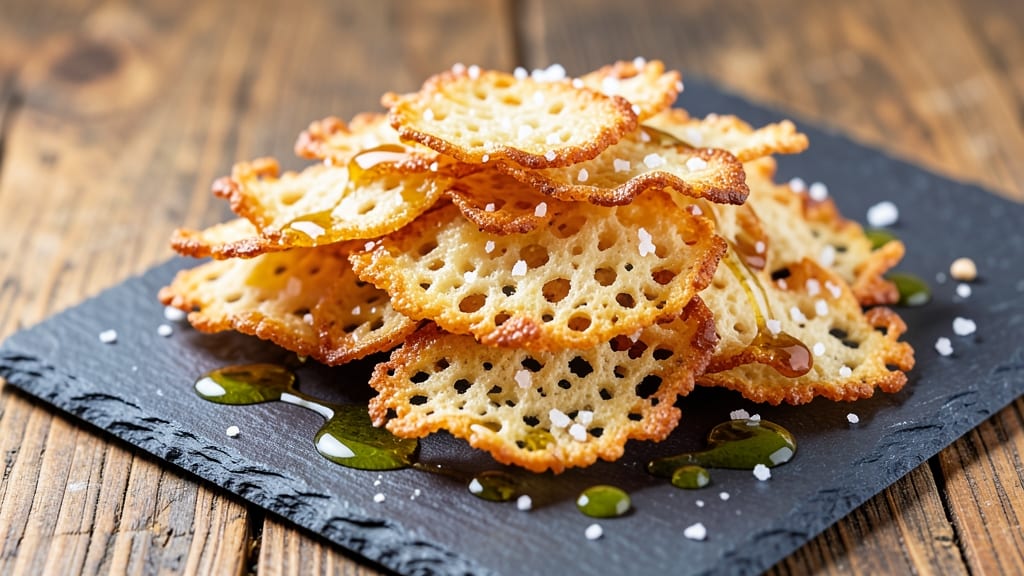
This Asiago cheese crisps recipe transforms simple cheese slices into golden, shatteringly crisp appetizers with a nutty center that melts on your tongue. 🔥 The secret lies in precise thickness and high heat—whether your oven or air fryer—which creates that perfect balance of crunchy exterior and gooey interior.
I've perfected this technique after countless batches, and it never fails to impress. What makes these crisps special is their versatility—serve them as a standalone appetizer, sprinkle them over salads for added texture, or arrange them on a charcuterie board for a sophisticated touch.
The Asiago's natural nuttiness shines through, especially when paired with a drizzle of honey or a sprinkle of flaky sea salt. The process is simpler than you might think: slice the cheese evenly, bake at the right temperature, and monitor closely to avoid burning.
With just 5 minutes of prep time and 10-12 minutes in the oven, you'll have a batch of crispy, golden shards that disappear faster than you can say "cheese board." Store leftovers in an airtight container for up to 5 days, though I doubt they'll last that long.
These crisps are the ultimate crowd-pleaser—elegant enough for parties but easy enough for a quick snack.
Ingredients for asiago cheese crisps
Five ingredients. One oven trick. Crowd-pleasing crisps in minutes.
| Ingredient | Amount | Notes |
|---|---|---|
| Asiago Cheese Block 🧀 | 8 oz | Freshly sliced, even thickness |
| Flaky Sea Salt 🧂 | 1 tbsp | For finishing, optional |
| Raw Honey 🍯 | 2 tbsp | For drizzling, optional |
| Extra-Virgin Olive Oil 🫒 | 1 tbsp | For greasing tray |
| Parchment Paper 📄 | 1 sheet | For easy transfer |
The cheese is everything—Asiago for that perfect nutty crunch, but Parmigiano-Reggiano works too if that's what you've got. Grab a wedge from the deli counter (pre-shredded gets clumpy). The key is even slices—about 1/8-inch thick. I use a mandoline for precision, but a sharp knife works if you're steady. Whole Foods or Trader Joe's always have great cheese selections, but any grocery store's deli should have what you need. Pro tip: take the cheese out of the fridge 10 minutes before slicing—it's easier to handle when slightly softened.
No Asiago? Pecorino Romano has a similar sharpness, or Gruyère for a milder flavor. The sea salt is totally optional but adds that gourmet touch—Maldon is my go-to, but any flaky salt will do. Honey? Local raw honey tastes best, but store-bought works fine. Forgot the olive oil? Coconut oil works too, just don't use butter—it burns too easily. Want to make it fancy? Toss the crisps with crushed pistachios or smoked paprika after baking. And yes, you can freeze these—just reheat in the oven for 2-3 minutes to restore the crunch.
These disappear fast, so make a double batch if you're feeding a crowd. Store in an airtight container for up to 5 days, though they're best fresh. Reheat in a 350°F oven for 2-3 minutes to revive the crunch. I always keep a stash in the freezer—perfect for last-minute parties. The secret to reheating? High heat, short time. Any longer and they'll turn soggy. Trust me on this—nobody will believe they're homemade.
Why You'll Love This Recipe
- Five-Ingredient Magic: I swear by this—just cheese, salt, honey, oil, and parchment. That’s it. No fancy gadgets, no measuring cups, no stress. The block of Asiago gets sliced thin, baked until golden, and boom—crispy perfection with zero fuss.
- Honey-Salt Crunch: Between us, this combo is ridiculously good. The Asiago’s nutty depth melts into a creamy center while the edges get that addictive shatter, then the flaky salt and raw honey? It’s like a little flavor bomb every bite. (Yes, even on a Tuesday night.)
- Party Snack Hero: Honestly, these disappear at gatherings. Serve them warm with a drizzle of olive oil and a sprinkle of extra salt—guests grab them straight from the tray, no plates needed. Perfect for game day, book club, or just because you want to look like a snack genius.
- Zero-Waste Win: I cut the cheese block into paper-thin slices—no crumbs, no waste—and bake them all at once. Store leftovers in an airtight container for up to a week, or freeze them for that instant crunch later. Plus, Asiago’s affordable, so you’re not breaking the bank for a crowd-pleaser.
Step-by-step instructions for Asiago cheese crisps
Crispy, golden cheese shards with a nutty center—here's how to make them foolproof.
👨🍳 Step 1: Prep the Cheese for Perfect Slices
Start with the 8 oz Asiago Cheese Block—this is your star ingredient. Place it between two sheets of parchment paper to prevent sticking. Using a sharp chef's knife, slice the cheese into ¼-inch thick rectangles. I aim for about 16-20 pieces total, keeping them roughly 1½-inch by 1-inch in size.
Here's the thing—consistent thickness is key. If some slices are thicker, they'll stay chewy instead of crispy. Run your knife along a cutting board guide if needed to keep the slices even. Once sliced, arrange them on a fresh sheet of parchment paper—the one from your ingredients list—and refrigerate for 15 minutes to firm up slightly.
🔥 Step 2: Preheat and Prepare the Baking Tray
Preheat your oven to 400°F—this high heat is crucial for those crispy edges. While it's heating, lightly grease a baking sheet with the 1 tbsp Extra-Virgin Olive Oil using a paper towel. I like to spread it evenly across the entire surface so the cheese doesn't stick. Place the greased tray on the middle rack—this ensures even heat distribution.
Here's where it gets fun: arrange the chilled Asiago slices in a single layer on the prepared tray, leaving about ½-inch between each piece. They'll spread slightly during baking, so don't crowd them. The oil will help create that beautiful golden crust while keeping the centers melty.
⏰ Step 3: Bake Until Golden and Crispy
Bake for 8-10 minutes until the edges turn deep golden brown and the centers are just starting to soften. This is the moment that matters: you want the outside crispy enough to snap but still with a gooey center. Watch closely after 7 minutes—ovens vary, and you don't want to overbake.
If you're using the 1 tbsp Flaky Sea Salt, sprinkle it lightly over the crisps during the last 2 minutes of baking. The salt will melt slightly into the cheese, creating those beautiful salt crystals on top. For extra sweetness, you can drizzle with 2 tbsp Raw Honey right after baking—it pairs surprisingly well with the nutty Asiago.
🍽️ Step 4: Cool and Serve Immediately
Remove the crisps from the oven and let them cool on the tray for 2-3 minutes. They'll firm up slightly as they cool, but the centers should still be warm and melty. Transfer them to a wire rack to cool completely—this prevents them from getting soggy if you're serving them warm.
Here's the best part: serve these crisps while they're still warm for maximum crunch. They make fantastic appetizers, snacks, or even a topping for salads. Store any leftovers in an airtight container at room temperature for up to 3 days, but honestly? They rarely last that long.
Pro Tips For Making Asiago Cheese Crisps
- CHILL THE CHEESE FIRST: I learned this the hard way—room-temperature Asiago gets greasy and spreads like butter. Pop the block in the fridge for 30 minutes before slicing. Thin, even slices (about ⅛-inch) crisp up perfectly without turning into a molten puddle. (Yes, even if you're impatient like me.)
- USE A SHARP KNIFE, NOT A SAWS: A serrated knife shreds the cheese unevenly, leading to some crisps that cook too fast and others that stay doughy. Grab a sharp chef’s knife and slice against the grain for clean, uniform pieces. No, your butter knife won’t cut it—this isn’t grated Parmesan.
- SALT BEFORE BAKING, NOT AFTER: Sprinkle flaky sea salt directly onto the cheese slices before baking—it melts into the edges as they crisp, creating a salty crust that’s way more flavorful than just dusting after. Skip the post-bake sprinkle unless you want your crisps to taste like they got salted 10 minutes too late.
- BAKE IN SINGLE LAYERS, SPREAD OUT: Crowd the tray, and you’ll end up with soggy bottoms and uneven cooking. Arrange slices in one layer with at least ½-inch between them—no overlapping, no stacking. If your pan is small, bake in batches. Trust me, the first time I ignored this, I had to toss half the batch.
Flavor customization for these flavors
Herb-Infused Variations
Add fresh herbs for an aromatic twist. Toss the crisps with 1 tbsp chopped rosemary or thyme right after baking—just sprinkle lightly so they don’t overpower. For a Mediterranean flair, mix 1 tsp dried oregano with ½ tsp red pepper flakes before baking.
I love using Penzeys Spices for their high-quality dried herbs. 🌿
Spicy Kick Options
For heat lovers, sprinkle ½ tsp cayenne pepper or 1 tsp smoked paprika on the crisps before baking. After they come out, add a pinch of chili powder and a drizzle of hot honey for a sweet-spicy balance. Trust me, the contrast is addictive. 🌶️
Sweet and Savory Twists
Drizzle the warm crisps with 1 tbsp balsamic glaze for a tangy finish, or sprinkle with toasted pine nuts for crunch. For a dessert-like touch, mix 1 tsp cinnamon with the cheese before baking—it pairs surprisingly well with the nutty Asiago. 🍯
Cheese Substitutions
No Asiago? Swap for Parmigiano-Reggiano (sharper) or Gruyère (milder). For extra richness, use aged Gouda—it caramelizes beautifully. Just adjust baking time by 1-2 minutes if using a denser cheese. 🧀
Global Flavor Profiles
Try a French-inspired version with black truffle oil drizzled on top, or a Mexican twist with cotija cheese crumbles and tajín seasoning. For an Italian touch, add sun-dried tomato flakes and a sprinkle of basil. Each variation keeps the crispy texture while adding exciting flavors. 🌍
Nutrition facts
Frequently asked questions
Can I use pre-shredded Asiago cheese for crisps?
Pre-shredded cheese won't work well—it contains anti-caking agents that prevent proper browning and crispiness. Always use a solid block of Asiago for the best texture. If you must use pre-shredded, try Parmigiano-Reggiano blocks instead, as they're often sold pre-blocked without additives.
How do I fix crisps that turned out greasy instead of crispy?
Greasy crisps usually mean the cheese was too thick or the oven wasn't hot enough. For next time, slice thinner (⅛-inch max) and preheat your oven to 425°F for extra crispiness. If you already have greasy crisps, sprinkle them with cornstarch and bake at 350°F for 2 minutes to absorb excess oil.
Can I make these in an air fryer instead of the oven?
Air fry at 390°F for 5-6 minutes, shaking the basket halfway. The high heat works similarly to an oven but requires closer monitoring. Start checking at 4 minutes—air fryers can crisp faster. Line the basket with parchment paper for easy cleanup.
Why did my Asiago crisps melt completely instead of staying crispy?
This happens when the cheese is too soft or the oven isn't hot enough. Always chill the cheese for 15 minutes before baking and use 400°F+ heat. For extra insurance, place the baking sheet on the top rack where it's hottest. The key is that crispy exterior with a soft center!
What's the best way to reheat stale Asiago crisps?
Revive them by placing on a baking sheet at 350°F for 2-3 minutes until crispy again. For air fryer reheating, use 375°F for 1-2 minutes. Avoid microwaving—they'll turn rubbery. The secret is high heat for a short time to restore that perfect crunch!