
Appetizers
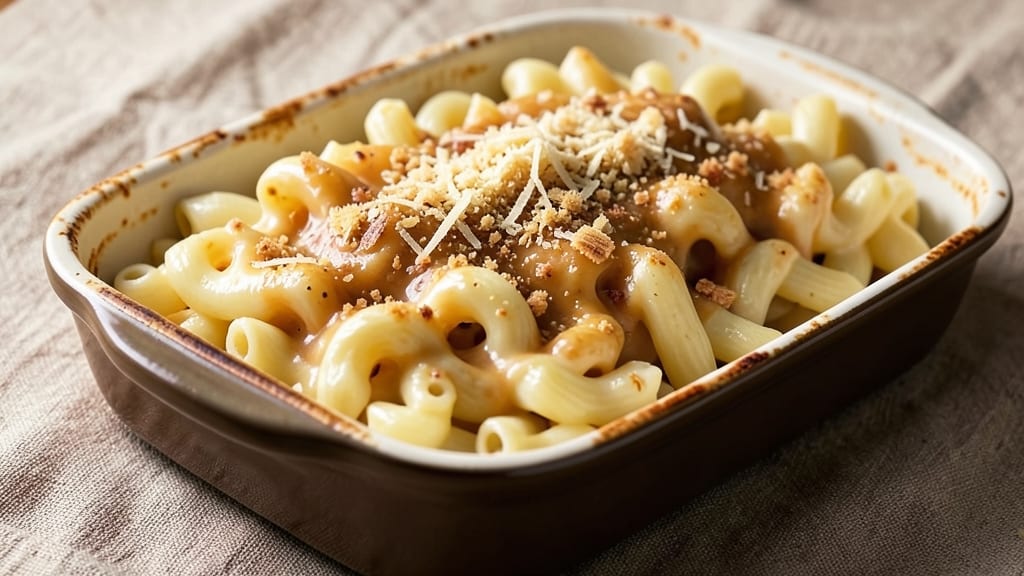
This authentic mac n cheese recipe brings back the comfort of my grandmother's kitchen—where the cheese sauce pulls like silk and the breadcrumb topping crackles with every bite.
The secret lies in a proper roux, sharp cheddar, and slow baking to create that signature crispy crust while keeping the center velvety. I've perfected this method over years of family gatherings, where it's always the first dish to disappear.
The foundation starts with a rich, velvety cheese sauce made from butter, flour, and milk cooked to a smooth consistency before adding the cheese. Sharp cheddar provides the classic tang, while a touch of Gruyère adds depth.
The breadcrumb topping isn't just for show—it creates that irresistible crunch that makes this dish unforgettable. This recipe delivers restaurant-quality results without the fuss.
What you'll end up with is a golden, bubbling mac and cheese with a crispy top that shatters at the slightest touch and a cheese pull so smooth it coats every noodle.
The aroma alone will have everyone gathering around the table, and the first bite will remind them why this dish feels like home. It's the kind of comfort food that brings people together. Perfect for family dinners, holiday gatherings, or when you just need a taste of nostalgia.
The best part? It reheats beautifully, making it ideal for meal prep. Let's get started on creating this timeless classic that's been passed down through generations.
Ingredients for authentic mac n cheese
Six ingredients make this nostalgic mac and cheese shine with that perfect crispy top.
| Ingredient | Amount | Notes |
|---|---|---|
| Elbow Macaroni 🍝 | 1 ½ lbs | Dry, medium or jumbo size |
| Unsalted Butter 🧈 | ½ cup | Cold, cubed for roux |
| All-Purpose Flour 🌾 | ½ cup | White, for roux |
| Whole Milk 🥛 | 3 cups | Full-fat preferred |
| Sharp White Cheddar Cheese 🧀 | 2 cups | Freshly grated, block preferred |
| Gruyère Cheese 🧀 | ½ cup | Freshly grated, for depth |
| Panko Breadcrumbs 🍞 | 1 cup | For crispy topping |
| Butter (for topping) 🧈 | 2 tbsp | Melted, for richness |
| Dijon Mustard 🍯 | 1 tsp | For subtle tang |
| Kosher Salt 🧂 | 1 ½ tsp | Adjust to taste |
| Black Pepper 🌶️ | ½ tsp | Freshly ground |
| Garlic Powder 🧄 | ¼ tsp | Optional, for extra flavor |
The cheeses are non-negotiable here—sharp white cheddar for that classic tang and Gruyère for depth. Grab a wedge of each from the deli counter (pre-grated gets clumpy and lacks flavor). I always buy extra cheddar because it keeps for months in the freezer. For the macaroni, jumbo or medium elbow works best—it holds up to the cheese sauce without getting mushy. The butter? Use unsalted so you control the seasoning. If you're in a rush, Trader Joe's has pre-grated cheddar that's surprisingly decent, but I still prefer grating my own.
No Gruyère? Extra sharp cheddar plus a splash of white wine in the sauce works in a pinch. Running low on butter? Olive oil in the roux keeps things creamy, though it won't be as rich. The breadcrumbs can be any kind, but panko gives that signature crunch. For the topping, I like to mix the breadcrumbs with melted butter, garlic powder, and a pinch of salt before baking—worth the extra minute for that restaurant-style crust. If you're making this ahead, assemble it but skip the topping until baking day.
This reheats beautifully—honestly tastes better the next day once everything melds. Keeps 4-5 days in the fridge, freezes for 3 months. I portion mine into containers so lunches are sorted for the week. For leftovers, just reheat with a splash of milk to loosen it up. The topping might get soggy, so I always add fresh breadcrumbs on top when reheating. Trust me, it's a game-changer.
Why You'll Love This Recipe
- Five-Ingredient Magic: I swear by this lineup—elbow pasta, butter, flour, milk, and that sharp cheddar. No weird add-ins, just pure, creamy, melty perfection that still feels like a recipe.
- Creamy Without Effort: The roux made from butter and flour? It’s the secret weapon here. You won’t find a smoother, richer sauce that clings to every noodle without a struggle.
- Leftover Heaven: This dish actually tastes better the next day. Honestly, I make a big batch on Sunday so I can reheat it for lazy mornings or quick lunches—no one complains.
- Budget Comfort Food: Sharp cheddar stretches far, and elbow macs are cheap. For under $10, you feed four people a meal that feels fancy enough for company but simple enough for a Tuesday.
Step-by-step instructions for grandma-style mac and cheese
Here's how to make that perfect creamy pull and crispy topping your grandma used to serve.
Cook the Elbow Macaroni Al Dente
Bring a large pot of water to a rolling boil and add 1.5 lbs elbow macaroni. Stir once to prevent sticking, then cook until 1 minute before the package directions for al dente texture. You want the pasta to finish cooking in the cheese sauce, so it absorbs all that delicious flavor. Reserve 1 cup of pasta water before draining—this starchy liquid is the secret to that ultra-smooth sauce.
Drain the pasta and return it to the pot. Give it a quick toss with 1.5 tsp kosher salt and 0.5 tsp black pepper. This seasoning step ensures every bite has that perfect balance of salt and pepper throughout. Keep the pot warm while you make the cheese sauce.
Make the Perfect Cheese Sauce
In a large, heavy-bottomed pot, melt 0.5 cup unsalted butter over medium heat. Once it's fully melted and foaming subsides, whisk in 0.5 cup all-purpose flour to create a roux. Cook for 2-3 minutes until the mixture turns a pale golden color—this is your flavor foundation.
Slowly pour in 3 cups whole milk while whisking constantly to prevent lumps. Bring the mixture to a gentle simmer and cook for 5-7 minutes until it thickens enough to coat the back of a spoon. Remove from heat and stir in 2 cups sharp white cheddar cheese and 0.5 cup gruyère cheese, along with 1 tsp Dijon mustard and 0.25 tsp garlic powder. Stir until completely melted and smooth.
Combine Pasta and Cheese Sauce
Add the cooked macaroni to the cheese sauce and stir gently to coat each noodle evenly. If the sauce seems too thick, add pasta water 1 tablespoon at a time until it reaches a creamy, pullable consistency. The sauce should cling to the pasta without being watery—this is where that authentic "cheese pull" comes from.
Real talk: This is the moment that matters. Taste and adjust seasoning if needed. The sauce should be rich, slightly tangy from the mustard, and perfectly balanced. Cover the pot and let it sit off the heat for 5 minutes to let all the flavors meld together.
Prepare the Crispy Topping
While the mac and cheese rests, preheat your oven to 375°F. In a small bowl, mix together 1 cup panko breadcrumbs, 2 tbsp melted butter, and an extra pinch of salt if you like. This topping is what makes this recipe truly special—crispy on top, creamy underneath.
Transfer the mac and cheese to a 9x13-inch baking dish, spreading it out evenly. Sprinkle the breadcrumb mixture evenly over the top, pressing down gently with a spatula to help it adhere. The goal is to get that golden, crispy crust that contrasts perfectly with the creamy interior.
Bake to Golden Perfection
Bake for 15-20 minutes until the top is deep golden brown and the edges are bubbling. You'll know it's ready when you can see that beautiful crispy crust forming. For the last 2 minutes, broil on high to get extra browning—just watch it closely so it doesn't burn.
Let the mac and cheese rest for 5 minutes before serving. This resting time allows the sauce to set slightly, making it easier to cut and serve. The result should be that perfect combination of creamy, cheesy goodness with a crispy, golden top—just like grandma used to make.
Pro Tips For Making Authentic Mac N Cheese
- Melt Cheese Slowly: I learned this the hard way—dumping shredded cheddar into hot milk makes it clump like sad, rubbery glue. Instead, whisk the milk to a gentle simmer first, then sprinkle in the cheese a handful at a time, stirring constantly until fully melted. The slow approach actually makes the sauce smoother and richer.
- Cook Pasta Al Dente: Overcooked macaroni turns mushy and waterlogged, stealing the sauce’s creaminess. Test a piece at the 1-minute early mark—it should have a tiny white core. Drain immediately and toss with a splash of pasta water (about ¼ cup) to help the sauce cling. Trust me, the texture makes all the difference.
- Use Sharp Cheddar Only: Pre-shredded cheese is coated in anti-caking agents that turn your sauce into a greasy, grainy mess. Buy a block of sharp white cheddar, grate it yourself, and pat the shreds dry with a paper towel—this removes excess moisture that weakens the sauce. Skip the shortcut; the flavor and texture are worth the effort.
- Toast the Flour: Skip the roux step, and you’ll end up with a thin, watery sauce. Melt the butter over medium heat, then whisk in the flour and cook for 2–3 minutes until it turns a pale golden color and smells nutty. This toasting step builds flavor and thickens the sauce properly—don’t rush it.
Essential equipment for authentic mac n cheese
Roux Pot Essentials
Your roux is the flavor foundation, so use a heavy-bottomed pot like a 5-quart enameled cast iron or All-Clad stainless steel. These distribute heat evenly and prevent scorching.
I swear by my Le Creuset Dutch oven—it’s perfect for both the roux and sauce stages. Avoid thin, lightweight pots that can’t handle the heat without burning. 🔥
Cheese Grater Matters
Freshly grated cheese makes all the difference. A box grater works for cheddar, but for Gruyère, I prefer a microplane—it yields finer, more flavorful shavings. Pre-grated cheese from the store lacks texture and often contains anti-caking agents that ruin the sauce.
If you’re short on time, Trader Joe’s pre-grated cheddar is the best store-bought option, but I still recommend grating your own for that authentic pull.
Baking Dish Choice
Use a 9x13-inch baking dish with at least 2-inch sides to prevent spills. I love ceramic dishes for their even heat distribution, but glass Pyrex is a budget-friendly alternative. Avoid dark-colored dishes—they can make the top burn before the center cooks.
If your dish is too shallow, transfer the mac and cheese to a larger pan before adding the topping.
Breadcrumbs & Tools
For that perfect crispy topping, panko breadcrumbs are a must—they stay light and crispy. Mix them in a small bowl with melted butter using a spoon or rubber spatula to distribute evenly.
A fine-mesh sieve helps sift breadcrumbs over the top for a smooth, even layer. Pressing down gently with the back of a spoon ensures the topping sticks and crisps up beautifully. ✨
Thermometer for Precision
An instant-read thermometer is your best friend for checking the sauce temperature and ensuring the pasta is al dente. I use a Thermoworks ThermoPop—it’s affordable and accurate.
For baking, an oven thermometer ensures your oven is truly at 375°F (many ovens run hot or cold). This small investment prevents overcooked pasta or underbaked topping. 🌡️
Optional: Food Mill
If you love ultra-smooth sauce, a food mill (like the OXO Good Grips) helps blend the pasta and sauce to perfection. It removes any lumps and creates that signature velvety texture.
Skip this if you prefer a rustic, chunky texture—it’s optional but worth it for a restaurant-quality finish. The mill also works great for blending soups or sauces in general. 💫
Nutrition facts
Frequently asked questions
Why does authentic mac and cheese need a roux?
The roux is the secret to that rich, velvety texture. When butter and flour cook together, they create a flavor base that thickens the sauce beautifully while preventing lumps. Skipping it often leads to a thin, watery cheese sauce that lacks depth. Think of it as the flavor foundation—without it, you're missing that signature comfort food taste!
Can I make this without Gruyère cheese?
If you don't have Gruyère, use extra sharp cheddar (add 0.25 cup more) and stir in 1 tablespoon white wine or 1 teaspoon lemon juice when making the sauce. This adds that tangy depth Gruyère provides. The dish will still taste amazing—just slightly different in flavor profile.
How do I fix a cheese sauce that's too thick?
If your sauce is too thick, add pasta water 1 tablespoon at a time while stirring constantly. The starch in the water helps thin it out smoothly. Never use regular water—it won't have the same thickening properties. If you've already baked it, you can loosen it by adding a splash of milk or cream when reheating.
Can I make this ahead of time?
Yes! Assemble the mac and cheese (without the breadcrumb topping) up to 24 hours ahead and refrigerate. When ready to bake, add the topping and bake as directed. For freezing, assemble completely (with topping), cover tightly, and freeze for up to 3 months. Thaw overnight in the fridge before reheating.
What makes the topping crispy?
The crispy topping comes from three key factors: panko breadcrumbs (they're lighter than regular crumbs), pressing them gently before baking, and baking at 375°F until golden brown. The butter in the topping mixture also helps create that perfect crispy crust. Don't skip the pressing step—it ensures the topping sticks and crisps evenly!