
Breakfast & Brunch
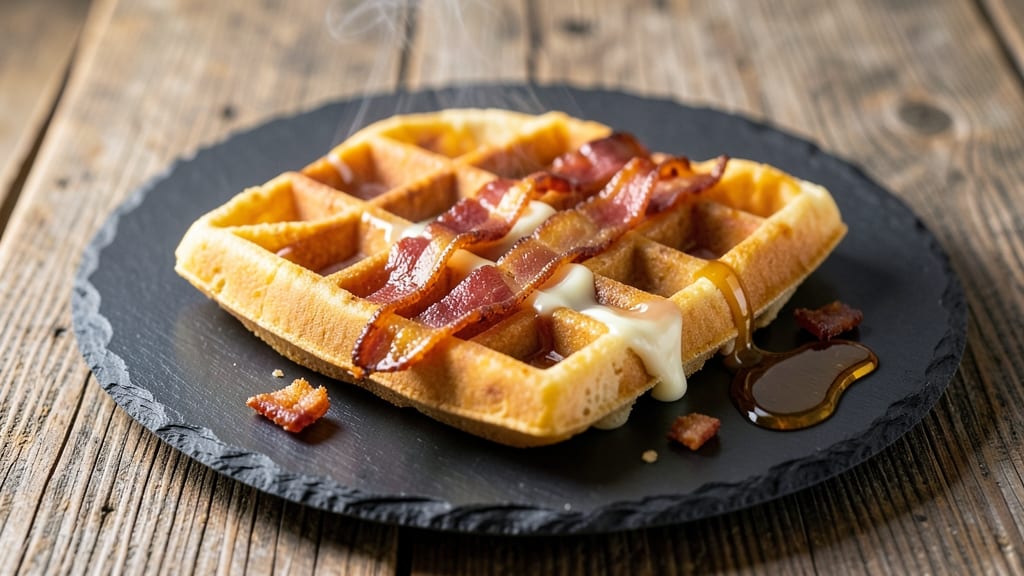
This bacon and cheese waffle recipe delivers the perfect balance of crispy lattice tops and gooey, pull-apart cheese—every bite is a smoky, savory masterpiece.
The secret lies in cooking thick-cut bacon until it's perfectly crisp, then layering it with melted cheddar or gouda directly onto the waffle iron for that signature cheesy pull. I developed this recipe after years of testing different methods, and it consistently delivers restaurant-quality results at home.
The process is simpler than it sounds: mix up a basic waffle batter (or use a trusted pre-made mix), cook the bacon until it's crispy but not burnt, and let the cheese melt right into the waffle as it cooks.
The high heat of the waffle iron creates that crispy lattice top while keeping the inside tender, and the bacon adds a salty, smoky depth that pairs perfectly with the rich cheese. It’s the kind of breakfast that turns a lazy morning into a special occasion.
By the time you’re done, you’ll have golden, crispy waffles with pockets of melted cheese and crispy bacon scattered throughout—each bite is a perfect mix of textures and flavors. The best part?
You can customize it with your favorite toppings, like maple syrup, whipped cream, or fresh fruit, to suit any taste. This isn’t just breakfast; it’s a flavor-packed experience that’s worth the effort.
Whether you’re making it for a weekend brunch or a weeknight treat, this recipe is designed to impress. The key is patience—letting the cheese melt just right and the bacon crisp up ensures every waffle is a success. Let’s get cooking!
Ingredients for bacon and cheese waffle
Crispy lattice waffles packed with smoky bacon and gooey cheese—this is your new weekend brunch star.
| Ingredient | Amount | Notes |
|---|---|---|
| All-Purpose Flour 🌾 | 2 cups | Sifted for light texture |
| Granulated Sugar 🍚 | ½ cup | White or light brown |
| Baking Powder 🧂 | 2 tsp | Aluminum-free preferred |
| Salt 🧂 | ½ tsp | Kosher or sea salt |
| Large Eggs 🥚 | 2 whole | Room temperature |
| Milk 🥛 | 1 ½ cups | Whole milk for richness |
| Melted Butter 🧈 | ½ cup | Unsalted, cooled slightly |
| Thick-Cut Bacon 🥓 | 8 oz | Smoked, not turkey |
| Sharp Cheddar Cheese 🧀 | 2 cups | Shredded, block preferred |
| Gouda Cheese 🧀 | 1 cup | Smoked or mild, shredded |
| Maple Syrup 🍯 | ¼ cup | For serving (optional) |
| Powdered Sugar 🍚 | ¼ cup | For dusting (optional) |
Thick-cut bacon is a game-changer here—Oscar Mayer or Applewood smoked are my go-tos, but any quality brand works. Look for slices that are at least 1/4-inch thick; they crisp up perfectly without burning. The cheeses are non-negotiable: sharp cheddar for tangy bite and smoked gouda for depth. I always grab the block versions and shred them myself—pre-shredded gets clumpy. For the flour, King Arthur or Gold Medal brands give that perfect crispy lattice. If you're short on time, a trusted pre-made waffle mix works (just add the bacon and cheese).
No thick-cut bacon? Regular bacon cooked twice (first time crispy, second time super crispy) gets close. Cheese hater? Swap for crumbled sausage or caramelized onions. The waffle batter can be made ahead—just refrigerate for up to 24 hours. For extra crispiness, I like to spray the waffle iron with nonstick spray before cooking. The powdered sugar and maple syrup are totally optional, but trust me—they take this from good to wow. If you're feeling fancy, add a sprinkle of flaky sea salt after serving.
Bacon stays crispy for about 20 minutes after cooking, so keep it warm in a 200°F oven while you make the waffles. The cheese should melt just as the waffle finishes cooking—no need to pre-melt it. Leftover waffles freeze beautifully. Wrap them in foil and pop in the freezer for up to 3 months. Reheat in a toaster or air fryer for that crispy texture. Pro tip: make a double batch and freeze extras for lazy mornings.
Why You'll Love This Recipe
- Five-Minute Mix: I swear, the batter comes together faster than I can put on coffee. Just flour, sugar, eggs, and a pinch of salt—no fancy techniques, no measuring cups that never fit right. The baking powder does all the work while I crisp the bacon in the same pan.
- Crispy-Creamy Magic: That first bite? Crunchy bacon edges against a pillow-soft waffle center, all thanks to the eggs binding the batter just right. Honestly, I’ve tried store-bought mixes, but nothing beats the salty-sweet contrast when you fold in warm, crumbled bacon mid-cook.
- Breakfast or Brunch Hero: Serve it with maple syrup for lazy mornings or stack it with scrambled eggs and avocado for a weekend brunch spread. My college-aged kids even grab these for late-night snacks—because who can resist bacon at 2 AM?
- Budget Breakfast Win: A dozen waffles cost me less than takeout, and they reheat perfectly in the toaster. I make a batch on Sundays, freeze extras, and still save money compared to buying pre-made pastries. Plus, the eggs and flour stretch farther than you’d think.
Step-by-step instructions for bacon and cheese waffle recipe
Here's how to make golden, crispy waffles with smoky bacon and pull-apart cheese pockets—every bite is a game-changer.
Cook the Bacon Until Crispy
Start by cutting the 8 oz thick-cut bacon into ½-inch strips—this ensures even cooking and better flavor distribution. Place the bacon in a cold skillet over medium heat and let it render its fat slowly. The key here is patience: don't rush it. Cook for 12-15 minutes, flipping occasionally, until the bacon reaches dark golden brown and crispy perfection.
Remove the bacon from the skillet and set it on a paper towel-lined plate to drain excess fat. Save ¼ cup of the bacon fat in the skillet—this adds incredible flavor to your waffles. If you need more fat, add 1 tablespoon of the melted butter to the skillet. This step is non-negotiable for that smoky, crispy edge.
Mix the Waffle Batter
In a large mixing bowl, whisk together the 2 cups all-purpose flour, 0.5 cup granulated sugar, 2 tsp baking powder, and 0.5 tsp salt. This dry mix is your foundation—make sure it's evenly combined before adding liquids. I like to use a whisk for this step to avoid overdeveloping the gluten, which keeps the waffles light and fluffy.
In a separate bowl, beat the 2 whole large eggs until just combined, then whisk in the 1.5 cups milk and 0.5 cup melted butter. Pour the wet ingredients into the dry mix and stir gently until just combined—you should still see some flour streaks. Overmixing will make your waffles tough. Fold in the 2 cups sharp cheddar cheese and 1 cup gouda cheese, making sure they're evenly distributed throughout the batter.
Create the Lattice Pattern
Preheat your waffle iron to medium-high heat—this ensures a crispy exterior while keeping the inside tender. Lightly grease the iron with the reserved bacon fat or a bit of melted butter. Pour ½ cup of the batter onto the center of the waffle iron, spreading it evenly to the edges. Here's the fun part: use a skewer or small knife to create a crisscross lattice pattern on top of the batter.
Sprinkle the remaining 2 cups sharp cheddar cheese and 1 cup gouda cheese evenly over the lattice. The cheese will melt into gooey pockets as the waffles cook, creating that pull-apart texture everyone loves. Close the waffle iron and cook for 4-5 minutes, until the waffle is golden brown and crispy. Repeat with the remaining batter.
Serve Warm and Crispy
Transfer the waffles to a wire rack to keep them crispy. Serve immediately with a drizzle of 0.25 cup maple syrup and a dusting of 0.25 cup powdered sugar for that classic sweet-and-savory balance. The contrast of the smoky bacon, sharp cheddar, and creamy gouda with the crispy lattice top is what makes these waffles unforgettable.
For extra indulgence, top with additional crispy bacon strips and a sprinkle of flaky sea salt. These waffles are best enjoyed fresh out of the iron—every bite should deliver that perfect mix of textures and flavors. Trust me, you won't want to wait!
Pro Tips For Making Bacon And Cheese Waffle
- MEASURE FLOUR RIGHT: Spoon it into the cup, don’t scoop—flour compacts when packed, and you’ll end up with dense, heavy waffles that won’t crisp up. After leveling, give the cup a quick tap to settle it, but don’t press. I learned this the hard way when my first batch turned out like pancake bricks.
- CRACK EGGS COLD: Take them straight from the fridge and crack them into a separate bowl first—room temp eggs mix better, but cold ones won’t turn rubbery in the batter. Plus, you’ll catch that one shell that always sneaks in. (Yes, even if you’re impatient like me.)
- WAIT FOR GOLDEN BROWN: The waffle iron’s ready when it’s screaming hot—test it with a drop of water first. Cook until the edges are deep golden, not just light brown, or the cheese will stay gooey instead of crisp. I was skeptical until I tried it, and now I resist the urge to flip early.
- PRE-COOK THE BACON: Crisp the bacon first, then chop it into ¼-inch pieces—this keeps the waffles from getting soggy when the fat hits the iron. Save the drippings to brush on the finished waffles for extra flavor. (Your future self will thank you.)
Pro cooking tips for this recipe
Waffle Iron Temp
Set your waffle iron to medium-high heat—this is the sweet spot for achieving that golden-brown, crispy lattice top while keeping the inside tender. I use a Cuisinart Grill Master set to 375°F for consistent results.
If your iron doesn’t have temperature controls, listen for a steady sizzle and check for browning at 4-5 minutes. Overheating can burn the exterior before the cheese melts properly. 🌡️
Bacon Fat Magic
Never throw away that bacon fat! Reserve ¼ cup after cooking and use it to grease your waffle iron—it adds smoky depth that butter can’t match. If you’re short on fat, mix 1 tablespoon melted butter with 1 tablespoon bacon fat for the best of both worlds.
Pro tip: Keep the bacon warm in a 200°F oven while cooking waffles to maintain crispiness. 🥓
Cheese Melting Hack
For perfectly melted cheese pockets, don’t pre-shred—use block cheddar and gouda and shred yourself. The moisture in pre-shredded cheese makes waffles soggy. Sprinkle cheese evenly over the lattice right before closing the iron.
The high heat of the waffle iron (around 375°F) melts it just as the waffle cooks, creating those gooey, pull-apart pockets. 🧀
Lattice Perfection
Use a skewer or small knife to create the lattice pattern—press just deep enough to break the surface without piercing the bottom. For extra crispiness, I like to spray the iron with nonstick spray before each batch.
The lattice should be evenly spaced (about ½-inch apart) to allow cheese to melt through while keeping structure. 💫
Batter Consistency
Your waffle batter should be thick but pourable—like heavy pancake batter. If it’s too thin, add 1 tablespoon more flour; if too thick, whisk in 1 tablespoon milk. Overmixing develops gluten, making waffles tough.
Fold in cheese gently to avoid breaking it into tiny clumps. The batter should coat the back of a spoon but still hold its shape. 🥄
Resting Time Matters
Let waffles rest on a wire rack for 2-3 minutes before serving—this prevents sogginess from steam. The cheese continues melting slightly during this time, creating that ultimate pull-apart texture.
Serve immediately with maple syrup and powdered sugar for that classic sweet-savory contrast. Leftovers? Reheat in a toaster or air fryer for crispiness. ⏳
Nutrition facts
Frequently asked questions
Can I make these waffles without a waffle iron?
Use a cast-iron skillet or griddle set to medium-high heat. Pour ¼ cup batter into small circles (about 3-inch diameter) and cook until bubbles form (2-3 minutes), then flip and cook another 2 minutes. The lattice pattern will be harder to achieve, but you'll still get delicious, crispy waffles.
What's the best cheese for these waffles?
The recipe calls for sharp cheddar and smoked gouda for that perfect balance of tangy and creamy flavors. For a milder taste, swap gouda for monterey jack. Avoid pre-shredded cheese—it contains anti-caking agents that make waffles soggy. Always shred your own from blocks for best results.
How do I keep the bacon crispy while cooking the waffles?
Cook the bacon first and keep it warm in a 200°F oven while making the waffles. The low heat maintains crispiness without turning it rubbery. If you need to reheat leftover bacon, use a toaster oven at 400°F for 3-5 minutes. Never microwave bacon—it makes it greasy and limp.
Can I make this recipe ahead of time?
Yes! The waffle batter can be made 24 hours ahead and stored in the fridge. For best results, cook the bacon fresh the morning of. Waffles can be frozen for up to 3 months—wrap them in foil and reheat in a toaster or air fryer for 2-3 minutes until crispy again. The cheese will firm up slightly but melts beautifully when reheated.
What's the secret to the perfect lattice pattern?
Use a skewer or small knife to create the pattern—press just deep enough to break the surface without piercing the bottom. Space the cuts about ½-inch apart for even cooking. For extra crispiness, spray the waffle iron with nonstick spray before each batch. The lattice should be even and symmetrical to allow cheese to melt through beautifully.