
Snacks
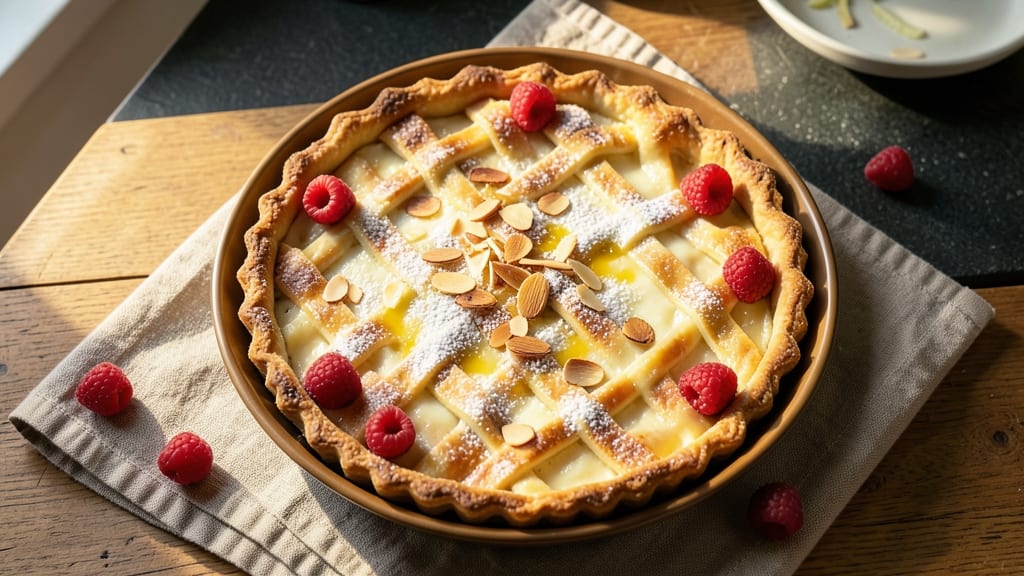
This bake cheese tart recipe delivers the perfect balance of a crispy golden crust and a luscious, melted cheese center that begs to be sliced into warm triangles.
The secret lies in a foolproof shortcrust base that stays flaky and buttery while supporting a rich, creamy filling that transforms into velvety perfection in the oven.
I've perfected this technique over years of testing, ensuring every bite offers that satisfying contrast between the crisp edges and the tender, gooey interior.
The foundation starts with a classic shortcrust pastry—just 15 minutes of prep time before chilling, followed by a 350°F bake that develops that signature flakiness.
For the filling, a blend of cream cheese and ricotta creates a silky texture that becomes irresistibly creamy when baked, while a touch of lemon zest brightens the richness.
This recipe is designed to be both impressive enough for guests and simple enough for weeknight cravings, with optional toppings like caramelized sugar or fresh berries to elevate it further.
What you'll end up with is a tart that looks like it came straight from a patisserie—golden, shimmering edges framing a center that's almost too soft to cut. The aroma alone will fill your kitchen with warmth, and the first bite delivers that perfect harmony of textures and flavors.
Whether you're serving it at a brunch spread or enjoying a slice with afternoon tea, this cheese tart is guaranteed to become a favorite.
For those with dietary preferences, variations include gluten-free crust options or a savory version with herbs and sun-dried tomatoes. The beauty of this recipe lies in its versatility—once you master the technique, you can customize it endlessly while always achieving that crispy shell and melt-in-your-mouth center.
Ingredients for bake cheese tart
Sixteen ingredients transform into a tart that looks bakery-made but takes just 15 minutes to prep.
| Ingredient | Amount | Notes |
|---|---|---|
| All-Purpose Flour 🌾 | 2 ½ cups | Sifted for light texture |
| Cold Unsalted Butter 🧈 | 1 cup | Cubed, not softened |
| Granulated Sugar 🍚 | ¼ cup | Plus 1 tbsp for caramelized top |
| Large Egg Yolks 🥚 | 2 whole | Reserve whites for brushing |
| Pinch of Salt 🧂 | ¼ tsp | Diamond Crystal preferred |
| Ice Water 💧 | ⅓ cup | Adjust for dough consistency |
| Cream Cheese 🧀 | 8 oz | Full-fat, room temperature |
| Ricotta Cheese 🧀 | 1 cup | Whole-milk preferred |
| Large Eggs 🥚 | 1 whole | For filling, beaten |
| Granulated Sugar 🍚 | ¼ cup | For filling sweetness |
| Lemon Zest 🍋 | 1 tbsp | Freshly grated |
| Vanilla Extract 🌸 | ½ tsp | Pure, not imitation |
| Fresh Berries 🍓 | 1 cup | Optional topping (raspberries recommended) |
| Powdered Sugar 🍚 | 2 tbsp | For dusting tart edges |
The butter matters most here—European-style or Plugrá gives the flakiest crust, but any cold, unsalted butter works. King Arthur Flour is my go-to for the all-purpose flour, but any high-protein blend (11-12%) will do. The ricotta should be full-fat and at room temperature when mixing—Trader Joe's sells a great tub that's perfect. For the lemon zest, use an organic lemon if possible—the thicker the peel, the more flavor you'll extract. The vanilla extract? Pure Madagascar bourbon is ideal, but any good-quality brand will work.
No cream cheese? Substitute mascarpone at a 1:1 ratio, but the texture will be slightly denser. Short on ricotta? Cottage cheese blended smooth works in a pinch, though it won't be as creamy. The egg yolks can be replaced with 2 tbsp aquafaba per yolk for a vegan option, but the crust won't be quite as tender. For the sugar topping, turbinado sugar caramelizes beautifully, but regular granulated works fine too. The berries are optional but add that perfect pop of color and freshness—frozen berries thawed work just as well as fresh.
The dough must chill for at least 30 minutes before rolling—this prevents shrinking. Wrap it tightly in plastic and press flat with your palm. The filling can be prepped ahead and stored in the fridge for 24 hours, but let it sit at room temperature for 15 minutes before baking. Once baked, the tart keeps 3 days at room temperature covered loosely, or 5 days refrigerated. Reheat slices in a 350°F oven for 5 minutes to restore that gooey center.
Why You'll Love This Recipe
- No-Fuss Crust: I swear by this butter-and-flour combo—just cut in the cold butter until it’s pea-sized, press it in, and you’ve got a golden, flaky base without rolling or fuss. (Yes, even on a Tuesday night.)
- Sweet-Savory Magic: That sugar in the crust caramelizes just enough to balance the rich cheese filling—like a grown-up dessert sneaking into your breakfast rotation. Honestly, the first bite makes me forget it’s technically a savory dish.
- Party in a Pan: Slice it for brunch, cube it for charcuterie, or serve whole at dinner parties—it’s the one dessert that works for any occasion. My in-laws think it’s fancy; I just call it my lazy genius move.
- Makes More Than You’ll Eat: One tart feeds four, but it’ll disappear in two. The leftovers? Just as good reheated (or cold, no judgment) and perfect for quick lunches or midnight cravings. Budget win, flavor win.
Step-by-step instructions for baking a cheese tart
Here's how to create a golden crust with a velvety cheese center that melts perfectly.
Prepare the Crust Dough for a Crispy Shell
In a large bowl, combine the 2.5 cups all-purpose flour and 0.25 tsp salt. Cut in the 1 cup cold unsalted butter using a pastry cutter or your fingers until the mixture resembles coarse crumbs with pea-sized butter pieces. This cold butter creates flaky layers when baked.
Add the 0.25 cup granulated sugar and 2 whole large egg yolks, mixing just until the dough comes together. The dough should be slightly shaggy—don't overwork it. Sprinkle in 0.33 cup ice water 1 tablespoon at a time, mixing gently until the dough forms a smooth ball. Wrap it tightly in plastic wrap and chill for at least 1 hour (or up to 24 hours). Chilling relaxes the gluten for a tender crust.
Roll and Blind-Bake the Crust
Preheat your oven to 375°F. On a lightly floured surface, roll the chilled dough into a 12-inch circle (about ⅛-inch thick). Transfer it to a parchment-lined baking sheet and gently press it into a 9-inch tart pan with removable bottom, trimming any excess dough. Prick the bottom all over with a fork.
Line the crust with parchment paper, fill it with pie weights or dried beans, and bake for 15 minutes. Remove the weights and bake for another 10 minutes until the edges are light golden brown and the crust is set. This blind-baking prevents a soggy bottom when you add the filling. Let it cool slightly before filling.
Create the Silky Cheese Filling
In a mixing bowl, beat the 8 oz cream cheese and 1 cup ricotta cheese until completely smooth. Add the 1 whole large egg, 0.25 cup granulated sugar, 1 tbsp lemon zest, and 0.5 tsp vanilla extract, mixing until just combined. The filling should be thick but pourable—if it's too stiff, add 1 teaspoon ice water at a time until it reaches the right consistency.
Real talk: Don't overmix here. You want a smooth, lump-free filling that will create that signature silky texture. Spread the mixture evenly into the pre-baked crust, smoothing the top with a spatula. Sprinkle the remaining 1 tablespoon granulated sugar evenly over the filling for a caramelized top.
Bake to Golden Perfection
Return the tart to the oven and bake at 350°F for 35-40 minutes, until the filling is just set but still slightly jiggly in the center. The edges should be deep golden brown and the top lightly caramelized from the sprinkled sugar. If the edges brown too quickly, cover them loosely with aluminum foil after 20 minutes.
Let the tart cool completely at room temperature before removing it from the pan. This resting period allows the filling to fully set and prevents it from sliding around when you serve it. The contrast between the crispy golden crust and the creamy cheese center is what makes this tart irresistible.
Add Toppings and Serve
Once completely cool, dust the tart with 2 tbsp powdered sugar through a fine-mesh sieve for a delicate finish. Arrange the 1 cup fresh berries (raspberries work beautifully) on top just before serving to keep them vibrant. The powdered sugar adds a lovely contrast to the tart's rich flavors while balancing any tartness from the berries.
Slice with a warm knife for clean pieces, and serve at room temperature. The contrast between the crispy crust, velvety cheese filling, and fresh berries makes every bite perfect. This tart keeps well in the refrigerator for up to 3 days, though I doubt it'll last that long in your house!
Pro Tips For Making Bake Cheese Tart
- Chill the Butter: DESCRIPTION: I learned this the hard way—using soft butter for the crust makes it greasy and hard to handle. Take that block of unsalted butter straight from the fridge, slice it into thin sheets, and let it sit in the freezer for 10 minutes before cutting into cubes. The cold butter creates flaky layers instead of a dense, chewy mess.
- Whisk Yolks Like a Pro: DESCRIPTION: Don’t just dump those yolks in—whisk them with the sugar first until the mixture turns pale and thickens slightly. This step prevents a grainy texture in the filling and ensures a smoother, silkier finish. (Yes, even if you’re impatient like me, take the extra 30 seconds.)
- Skip the Overmixing: DESCRIPTION: Once you add the flour to the butter mixture, stir just until it comes together—no more. Overworking the dough develops gluten, which turns your crust into a tough, dry brick instead of a tender, melt-in-your-mouth base. Stop when the crumbs are pea-sized, and resist the urge to "fix" it.
- Blind-Bake the Crust: DESCRIPTION: If you’re adding a cheese filling, blind-bake the crust for 10 minutes with pie weights or dried beans before adding the filling. This prevents a soggy bottom and ensures the crust holds its shape. (Pro move: Sprinkle a pinch of salt on the weights—it caramelizes slightly and adds depth.)
Make-ahead tips for bake cheese tart
Prep Ahead for Crust
The crust dough can be made up to 2 days in advance and stored in an airtight container in the fridge. I wrap mine tightly in plastic wrap to prevent drying.
When ready to bake, let it sit at room temperature for 30 minutes before rolling—this makes it much easier to handle. For a gluten-free option, substitute 1:1 gluten-free flour blend like Bob's Red Mill for the all-purpose flour. 🧀
Filling Prep
Mix the cheese filling 1 day ahead and store it in an airtight container in the fridge. Bring it to room temperature before assembling the tart—this prevents condensation that can make the crust soggy.
For a vegan version, replace the cream cheese with 8 oz silken tofu and add 1 tsp lemon juice to mimic tanginess. The filling keeps well for 24 hours before baking. ✨
Blind-Bake Timing
Blind-bake the crust 1 day before if possible and store it in a cool, dry place wrapped in parchment paper. Reheat it at 350°F for 5 minutes before adding the filling to ensure it's completely dry.
This step is crucial for preventing a soggy bottom. I like to mark the tart pan with a pencil before blind-baking so I know where to trim excess dough later. 🔥
Assembling the Tart
Assemble the tart 4 hours ahead of baking and refrigerate uncovered. This helps the filling firm up slightly, making it easier to slice later.
For a savory twist, swap the sugar in the filling for 1 tsp dried herbs like thyme or rosemary and add 2 oz sun-dried tomatoes on top before baking. The flavors meld beautifully overnight. 💫
Storage Solutions
Store the fully baked tart at room temperature for 3 days in a loosely covered container to prevent moisture buildup. For longer storage, refrigerate for up to 5 days—just let it sit at room temperature for 30 minutes before serving to restore that perfect texture.
To reheat slices, warm them in a 350°F oven for 5 minutes until the filling is gooey again. 💡
Freezing Options
This tart freezes beautifully! Wrap individual slices in plastic wrap and store them in a freezer bag for up to 3 months. Thaw overnight in the fridge before reheating. For whole tarts, freeze the baked tart (without toppings) in an airtight container with parchment paper between layers.
Reheat at 350°F for 10-15 minutes until warmed through. The texture remains surprisingly good after freezing. ❄️
Nutrition facts
Frequently asked questions
Can I make this cheese tart without a tart pan? Yes! Use a 9-inch round cake pan or even a 12-inch oven-safe skillet with a removable bottom. For a rustic look, shape the dough into a free-form tart on a parchment-lined baking sheet. Just
Why did my crust turn out greasy instead of flaky?
Overworking the dough or using warm butter are the most common culprits. Keep your butter cold and cut it into the flour until it resembles coarse crumbs, not a paste. Also, chill the dough for at least 1 hour before rolling—this relaxes the gluten and prevents tough, greasy results. If the dough feels too sticky, add just 1 more tablespoon of ice water at a time.
How can I make this tart gluten-free?
Replace the all-purpose flour with a 1:1 gluten-free flour blend like Bob's Red Mill or King Arthur. For best results, add ½ teaspoon xanthan gum to the dough to improve texture. The crust may be slightly denser, but it'll still hold up beautifully. For the filling, all the ingredients remain the same—just ensure your cheese is certified gluten-free if you're avoiding cross-contamination.
Can I bake this tart in a convection oven?
Yes, but reduce the temperature by 25°F (so 325°F instead of 350°F) and check for doneness 5 minutes early. Convection ovens circulate hot air more efficiently, which can cause the edges to brown faster. If the top isn't caramelized enough, broil for 1-2 minutes at the end, watching closely to avoid burning.
What's the best way to slice this tart cleanly?
Warm your knife under hot water for 10 seconds and wipe it dry before slicing. This creates a clean cut through the crisp crust and creamy filling. For perfect triangles, use a sharp chef's knife and cut through the center first, then make diagonal cuts from the edge to the center. Serve immediately after slicing to prevent the filling from sliding.