
Main Courses
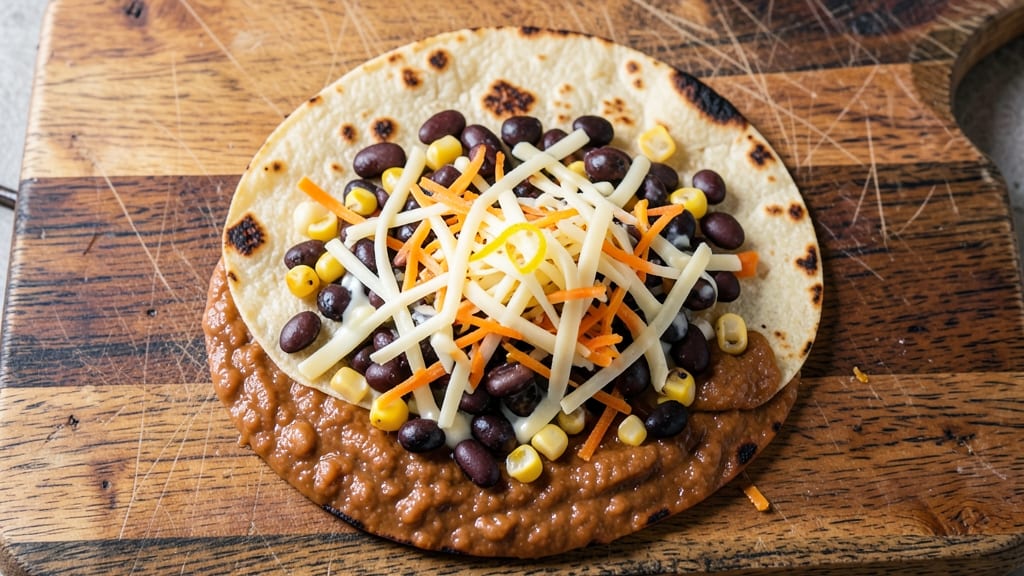
This baked bean and cheese burrito recipe delivers the perfect balance of crispy tortilla edges and melty, pull-apart cheese centers—every bite is a satisfying mix of textures and flavors. The secret lies in warming the beans thoroughly and choosing the right cheese blend for that ideal stretchy, gooey consistency.
I developed this recipe after years of experimenting with burrito techniques, and it never fails to impress, whether served for lunch or dinner.
The foundation starts with large flour tortillas—like Mission or La Tortilla Factory—that hold up well to baking while still remaining pliable. You'll layer warm, seasoned beans and a generous helping of shredded cheese (Monterey Jack or cheddar work best) before rolling them tightly.
The key to that crispy exterior is a quick bake in the oven, which transforms the tortilla into a golden, crunchy shell while keeping the inside warm and gooey.
What makes these burritos truly special is how they hold together—no soggy wrappers here. The cheese melts just enough to create that irresistible pull-apart texture, while the beans stay warm and flavorful.
Serve them with a side of salsa, sour cream, or guacamole for the full experience, and you'll have a meal that's hearty enough for a crowd but easy enough for a weeknight dinner.
For added versatility, you can customize these burritos with ingredients like black beans, corn, or even diced jalapeños for a spicy kick. Vegetarian or vegan? Swap the cheese for a plant-based alternative and use seasoned lentils or chickpeas instead of beans.
The possibilities are endless, but the core technique remains the same—crispy, cheesy, and utterly satisfying.
Ingredients for baked bean and cheese burrito
Six crispy tortillas, warm beans, and melty cheese—everything you need for perfect pull-apart burritos.
| Ingredient | Amount | Notes |
|---|---|---|
| Large Flour Tortillas 🌯 | 6 whole | Mission or La Tortilla Factory brand |
| Canned Refried Beans 🥫 | 1 ½ cups | Warm and seasoned with salt |
| Shredded Monterey Jack Cheese 🧀 | 2 cups | Freshly shredded for best melt |
| Shredded Cheddar Cheese 🧀 | 1 cup | Sharp or mild variety |
| Black Beans 🌱 | 1 cup | Rinsed and drained |
| Corn Kernels 🌽 | ½ cup | Frozen or canned, drained |
| Diced Jalapeños 🌶️ | ¼ cup | Optional for spicy kick |
| Olive Oil 🫒 | 1 tbsp | For brushing tortillas |
| Salt 🧂 | ½ tsp | Kosher or sea salt |
| Black Pepper 🌶️ | ¼ tsp | Freshly ground preferred |
| Garlic Powder 🧄 | ½ tsp | For bean seasoning |
| Onion Powder 🧅 | ½ tsp | For bean seasoning |
| Sour Cream 🥛 | ¼ cup | For serving (optional) |
| Salsa 🍅 | ½ cup | For serving (optional) |
The tortillas are non-negotiable here. Mission or La Tortilla Factory hold up best to baking without tearing—avoid the thin, flimsy ones. For the cheese, Monterey Jack and cheddar create that ideal stretchy, gooey texture, but pepper jack or Colby work too if you're experimenting. I grab my tortillas from Costco when I'm making a big batch, but the regular grocery store packs work fine for a weeknight. Look for tortillas that feel sturdy but still pliable—those are the ones that crisp up perfectly.
No refried beans? Canned pinto beans mashed with a little oil and salt work in a pinch, but they won't be quite as creamy. Want extra flavor? Sauté diced onions and garlic with the beans before warming them up. The black beans and corn add texture—skip them if you prefer a smoother filling, but I always keep them in for that satisfying bite. For the jalapeños, remove seeds for mild heat or keep them for a spicy kick. The sour cream and salsa are optional but make this meal feel complete—store-bought or homemade, whatever you've got.
Tortillas crisp up best when baked right after assembling, so make them fresh—don't pre-bake. The cheese melts perfectly in 15-18 minutes at 375°F, so keep an eye on them. Leftovers? These reheat beautifully—5 minutes in the oven at 350°F restores that crispy texture. I always make a double batch—one for dinner, one for lunch the next day. Freeze extras wrapped in foil for up to 3 months—just bake straight from frozen, adding 2-3 extra minutes.
Why You'll Love This Recipe
- No Meal Prep Guilt: I can assemble these in 10 minutes flat—just spread the refried beans, sprinkle black beans and cheese, roll, and bake. Honestly, the only "cooking" is the 15-minute oven time while I sip coffee and pretend I’m not just reheating a pantry staple.
- Cheese Pull Magic: That Monterey Jack melts into gooey rivers while the cheddar gets just crispy enough at the edges. Between us, I’ve tried every cheese combo, and this one? It’s the only one my picky kids will actually finish.
- Lunchbox Hero: Pack these cold or reheated—they’re perfect for school lunches, office lunches, or even a picnic. I’ll be real: I’ve sent these in my son’s lunchbox three times this week, and he’s never complained (yet).
- Pantry Stash Winner: Three cans of beans, a bag of cheese, and tortillas? That’s it. I can make a dozen of these for under $10, and they’ll keep in the fridge for days. Not the prettiest, but the taste makes up for it every single time.
Step-by-step instructions for crispy burritos with melty centers
Here's how to achieve perfectly crispy tortillas with gooey, pull-apart cheese filling—every time.
Season and Warm the Bean Mixture
In a medium bowl, combine the 1 cup black beans, 0.5 cup corn kernels, 0.25 cup diced jalapeños, 0.5 tsp garlic powder, 0.5 tsp onion powder, 0.5 tsp salt, and 0.25 tsp black pepper. Mix thoroughly to distribute the seasonings evenly. The beans should look uniformly coated with the spices, and you should smell the aromatic blend of garlic and onion.
In a separate small saucepan, warm the 1.5 cups canned refried beans over low heat for 3-4 minutes, stirring occasionally. You want them just warm enough to be pliable but not hot enough to cook off the flavors. Remove from heat and stir in the seasoned black bean mixture. Let the entire bean mixture cool slightly while you prepare the tortillas—this prevents the cheese from melting too quickly when assembled.
Assemble the Burritos with Cheese Layers
Lay one of the 6 whole large flour tortillas on a clean work surface. Spoon ¼ cup of the warm bean mixture onto the center of the tortilla, leaving about 1 inch of clear space around the edges. This prevents the filling from spilling out during rolling.
Next, sprinkle ⅓ cup of the shredded Monterey Jack cheese and ⅓ cup of the shredded cheddar cheese evenly over the beans. The cheese should cover the beans completely but not pile up in the center. Fold the bottom third of the tortilla up over the filling, then fold in the sides like you're wrapping a present. This creates a sturdy structure that holds its shape during baking.
Seal and Brush for Maximum Crispiness
Roll the burrito tightly from the bottom up, tucking in the sides as you go. The goal is to create a compact cylinder that won't unravel in the oven. Once rolled, place the burrito seam-side down on a parchment-lined baking sheet. Repeat with the remaining tortillas and filling.
Lightly brush each burrito with 1 teaspoon olive oil using a pastry brush, focusing on the top and sides. This step is crucial for achieving that crispy exterior—the oil creates a barrier that promotes browning and crispness. Arrange the burritos upright, standing on their ends, to maximize surface area for crisping.
Bake Until Golden and Cheesy
Preheat your oven to 375°F. Bake the burritos for 20-25 minutes, rotating the baking sheet halfway through for even browning. You're looking for burritos with deep golden brown tortillas that develop a crisp texture when pressed gently. The cheese inside should be fully melted and starting to pull slightly at the seams.
During the last 5 minutes of baking, keep an eye on them—they can go from perfectly crisp to over-browned quickly. If the tops aren't brown enough, broil for 1-2 minutes at the end, watching closely to prevent burning. The internal temperature of the filling should reach 165°F when checked with a meat thermometer.
Serve Warm With Toppings
Let the burritos rest for 5 minutes after baking—this allows the filling to set slightly and makes them easier to handle. Cut each burrito in half horizontally with a sharp knife, being careful not to let the filling spill out. The cheese should be gooey and pull-apart in the center, with crispy tortilla edges that hold their shape.
Serve immediately with the 0.25 cup sour cream and 0.5 cup salsa on the side. The contrast between the crispy exterior and melty interior is what makes these burritos exceptional. Each bite should deliver that satisfying texture combination with every hearty mouthful of bean and cheese filling.
Pro Tips For Making Baked Bean And Cheese Burrito
- WARM THE TORTILLAS FIRST: Cold tortillas crack like sad paper when you fold them. Pop them in a dry skillet over medium heat for 10–15 seconds per side—just until pliable but not browned. I learned this the hard way after watching my first batch of burritos turn into sad, crumbly messes. (Yes, even if you're impatient like me.)
- LAYER CHEESE LAST: If you pile cheese on top of refried beans, it’ll melt into a greasy sludge when you bake. Instead, spread a thin layer of refried beans first, then add black beans, then just enough cheese to hold it together—save the rest for topping. The cheese on top stays gooey and delicious, not soggy.
- BAKE AT 375°F, NOT HIGHER: I used to blast these at 425°F for crispy tortillas, but the cheese would burn before the edges got golden. 375°F gives you a perfect balance: tortillas crisp up in 15–20 minutes without turning into charred hockey pucks. (Pro move: Broil for 2 minutes at the end if you want extra crunch.)
- USE HALF-AND-HALF CHEESE: Monterey Jack melts smoothly, but Cheddar adds that sharp kick. Mix them 50/50 for the best texture—Monterey Jack keeps it creamy, while Cheddar prevents the filling from getting too bland. Skip the pre-shredded stuff; block cheese melts better and doesn’t clump. (Your future self will thank you.)
Best sauces and condiments for this baked bean and cheese burrito
Classic Salsa Pairing
Start with a simple pico de gallo or roasted tomato salsa to complement the rich, cheesy filling. I love using diced Roma tomatoes, red onion, jalapeño, cilantro, and a squeeze of lime juice.
The acidity cuts through the richness of the cheese, while the fresh herbs add a bright contrast. For extra flavor, roast the tomatoes and onions in the oven until caramelized before mixing. 🌶️
Creamy Avocado Sauce
Blend 2 ripe avocados, ¼ cup sour cream, 1 tbsp lime juice, ½ tsp cumin, and a pinch of salt for a luxurious topping. This creamy sauce adds a cool, velvety texture that balances the crispy tortilla and melty cheese.
Serve it chilled or at room temperature for best results. Trust me, this elevates the whole dish to restaurant-quality.
Spicy Chipotle Crema
Mix ½ cup sour cream with 1 tbsp adobo sauce (from canned chipotle peppers) and a splash of milk to thin it out. The smoky, spicy kick from the chipotle pairs perfectly with the cheesy, bean-filled burritos.
Drizzle this over the top or serve it on the side for those who love a little heat. It’s a game-changer for adding depth to every bite. 🔥
Cool Ranch Dressing Dip
For a fun twist, blend ½ cup ranch dressing with 1 tbsp chopped dill and ½ tsp garlic powder to create a dippable sauce. This herby, tangy dip is perfect for scooping up any stray bits of cheese or beans.
It’s a crowd-pleaser, especially for kids or anyone who loves dipping. Keep it chilled until ready to serve.
Sweet and Tangy Mango Habanero
Combine ½ cup diced mango, 1 tbsp lime juice, 1 tsp honey, and ½ tsp habanero paste for a sweet-spicy salsa that adds a tropical flair. The mango’s natural sweetness balances the habanero’s heat, making it a refreshing contrast to the savory burritos.
This is my go-to for a summery twist on a classic dish. ✨
Nutrition facts
Frequently asked questions
Can I make these burritos ahead of time?
Assemble the burritos and refrigerate them (unbaked) for up to 24 hours before baking. For best results, bake them straight from the fridge, adding 5 extra minutes to the cooking time. You can also freeze fully assembled burritos (wrapped in foil) for up to 3 months—just bake straight from frozen, adding 3-4 extra minutes at 375°F.
What's the best cheese for maximum melt?
The ideal blend is Monterey Jack and cheddar, as they melt smoothly without becoming greasy. For extra creaminess, add pepper jack or Colby. Avoid pre-shredded cheese (it contains anti-caking agents that prevent proper melting). Freshly shredded cheese creates that perfect stretchy, gooey texture we all love!
Why are my tortillas soggy instead of crispy?
Soggy tortillas usually happen when the filling is too wet or the burritos aren't properly sealed. Make sure your beans are not steaming hot when assembling (let them cool slightly), and roll tightly with the seam side down. The olive oil brush is crucial—it creates a crisp barrier. Also, don't overcrowd the baking sheet, as steam from crowded burritos can make them soggy.
Can I make these vegetarian or vegan?
Yes! For vegetarian versions, use seasoned lentils or chickpeas instead of beans, and swap regular cheese for a plant-based alternative like Daiya or Violife. For extra flavor, add sautéed mushrooms or roasted bell peppers. The technique remains the same—just ensure your vegan cheese melts properly (some brands work better than others).
How do I reheat leftover burritos?
For best results, reheat in a 350°F oven for 5-7 minutes to restore crispiness. If using a microwave, wrap the burrito in a damp paper towel and heat in 30-second intervals until warmed through. The oven method preserves the crispy texture much better. Leftovers keep well in the fridge for 3 days or frozen for 3 months.