
Snacks
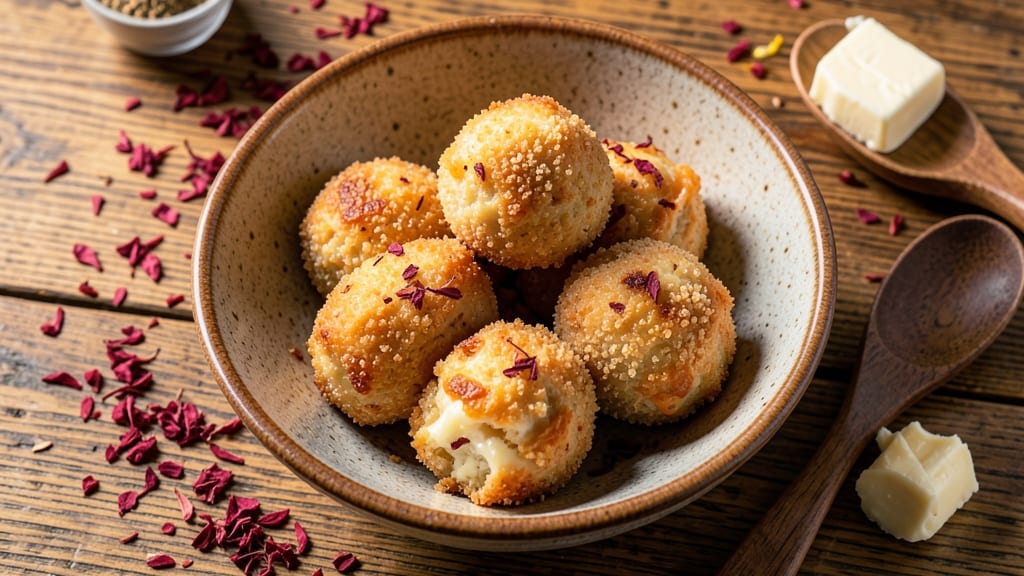
This baked cheddar cheese balls recipe delivers the perfect balance of crispy shells and gooey, pull-apart cheddar that disappears faster than you can say "appetizer." The secret lies in the right mix of sharp cheddar, breadcrumbs, and herbs—baked to golden perfection with a melt-in-your-mouth center that’s impossible to resist.
I’ve tested countless variations, and this one consistently wins over crowds, whether you’re serving them at game day or as a simple snack for the family.
The process is straightforward but requires attention to detail—especially when shaping the balls for even baking. You’ll start with a simple dough of shredded cheddar, cream cheese, and seasonings, then coat them in a buttery breadcrumb mixture for that signature crunch.
The oven does the rest, transforming your ingredients into crispy, golden bites that stay warm and delicious straight from the tray.
What makes these cheese balls truly special is how they hold up: the exterior stays crispy while the interior remains soft and stretchy, making every bite a satisfying contrast.
Serve them warm with marinara for dipping, or sprinkle with green onions and cracked black pepper for an extra touch of freshness. They’re perfect for parties, meal prep, or just satisfying that afternoon craving.
With just a handful of ingredients and 30 minutes of active time, you’ll have a snack that’s foolproof, crowd-pleasing, and far better than anything store-bought. Let’s get started—your taste buds will thank you.
Ingredients for baked cheddar cheese balls
Sharp cheddar and crispy panko create the perfect pull-apart texture—here's what you'll need to make them golden and gooey.
| Ingredient | Amount | Notes |
|---|---|---|
| Sharp Cheddar Cheese 🧀 | 2 cups | Shredded, 2-year aged preferred |
| Cream Cheese 🧈 | 8 oz | Full-fat, room temperature |
| Panko Breadcrumbs 🍞 | 1 ½ cups | For crispy exterior coating |
| Unsalted Butter 🧈 | ½ cup | Melted, cooled slightly |
| All-Purpose Flour 🌾 | ¼ cup | For extra crunch layer |
| Dried Parsley 🌿 | 1 tbsp | Finely chopped, for herb flavor |
| Garlic Powder 🧄 | 1 tsp | Freshly ground preferred |
| Onion Powder 🧅 | 1 tsp | For savory depth |
| Ground Black Pepper 🌶️ | ½ tsp | Freshly cracked for heat |
| Kosher Salt 🧂 | ½ tsp | Diamond Crystal preferred |
| Green Onions 🧅 | 2 whole | Sliced thin, for garnish |
| Marinara Sauce 🍅 | ½ cup | For dipping, optional |
The cheddar is non-negotiable—2-year aged sharp cheddar gives the best melt and flavor. Costco or specialty cheese shops often carry this, but if you can't find it, Parmela brand from the grocery store works in a pinch. Room-temperature cream cheese blends better, so take it out 30 minutes before mixing. For the panko, Japanese brands like Nissin are best, but any panko will work—just avoid regular breadcrumbs, which get soggy. Pro tip: Toast your panko in a dry pan for 2 minutes before using for extra crunch.
No sharp cheddar? Pepper jack or smoked cheddar add different flavors but work well. Out of panko? Crushed cornflakes or Ritz cracker crumbs make decent substitutes. The butter and flour mix is key for that crispy shell—don't skip the flour, it's what makes them golden. Fresh herbs matter here: dried parsley loses potency, so if you've got fresh, use that instead. For extra flavor, add 1/4 tsp smoked paprika to the cheese mix. And if you're feeling fancy, swap the marinara for spicy mayo or chipotle ranch for dipping.
These stay crispy for 2 hours at room temperature, so make a big batch. Store leftovers in an airtight container for 5 days, but honestly, they're best eaten fresh. Freeze extras on a tray first, then transfer to a bag—they reheat perfectly in the oven at 350°F for 10 minutes. The secret to even baking? Roll the balls exactly 1.5 inches in diameter. Too big, and the center stays cold; too small, and they burn before melting. Trust me on this—measure them!
Why You'll Love This Recipe
- I swear by this combo: sharp cheddar’s tang cuts through the cream cheese’s richness, while the panko soaks up just enough melted butter to get crunchy instead of soggy. No weird spices, no fancy techniques—just pure, cheesy satisfaction.
- Five-Ingredient Magic: I swear by this combo: sharp cheddar’s tang cuts through the cream cheese’s richness, while the panko soaks up just enough melted butter to get crunchy instead of soggy. No weird spices, no fancy techniques—just pure, cheesy satisfaction.
- No-Fuss Baking: Roll, bake, repeat. That’s it. The dough stays together without sticking (thanks to the flour), and the oven does all the heavy lifting while you sip coffee or scroll through your phone. Honestly, I’ve made these while waiting for takeout to arrive.
- Party in a Bite: These disappear at game days, book club gatherings, or even as a snack while grading papers. The kids grab them for lunchboxes, my husband sneaks them after dinner, and guests always ask for the recipe. Not the prettiest, but the taste makes up for it every time.
Step-by-step instructions for baked cheddar cheese balls
Here's how to create golden, crispy cheese balls with a gooey cheddar center that melts in your mouth.
Mix the Cheese Filling to Perfect Consistency
In a large mixing bowl, combine the 2 cups sharp cheddar cheese and 8 oz cream cheese. I use my hands for this part—it's the best way to ensure everything melts together evenly. Microwave the mixture in 20-second bursts until the cheddar softens and becomes pliable, but don't overdo it or you'll end up with a greasy mess. You're aiming for a smooth, spreadable texture that holds together when pressed.
Once melted, remove the bowl from the microwave and let it cool for 2-3 minutes. While it's cooling, add the 1 tbsp dried parsley, 1 tsp garlic powder, 1 tsp onion powder, 0.5 tsp ground black pepper, and 0.5 tsp kosher salt. Mix thoroughly with a silicone spatula until the seasonings are evenly distributed. The mixture should be cool enough to handle but still slightly warm—this makes shaping easier and prevents the cheese from cracking during baking.
Create the Crispy Coating Mixture
In a separate bowl, whisk together the 0.5 cup melted unsalted butter (cooled slightly), 1.5 cups panko breadcrumbs, and 0.25 cup all-purpose flour until fully combined. This coating is what gives those cheese balls their signature crispy exterior. I like to press the mixture through a fine-mesh sieve to break up any large panko pieces—this ensures an even, fine crumb texture that adheres perfectly to the cheese.
For extra flavor, add the 2 whole green onions, sliced thin, to the coating mixture. The green onions will add a fresh, bright contrast to the rich cheddar. Mix well so they're evenly distributed throughout the coating. The texture should be like wet sand—moist enough to stick to your fingers but not so wet that it clumps together.
Shape and Coat the Cheese Balls
Working quickly, take about 1 tablespoon of the cheese mixture and roll it into a ball between your palms. I find it helps to wet my hands slightly with cold water—this prevents the cheese from sticking. Place the ball on a parchment-lined baking sheet and immediately roll it in the panko mixture, pressing gently to ensure full coverage. The coating should adhere completely, with no cheese showing through.
Repeat this process until all the cheese mixture is used. For even baking, arrange the cheese balls about 1 inch apart on the baking sheet. If you have any leftover coating, you can use it to press down on the tops of the cheese balls for extra crispiness. Once coated, let them rest for 10 minutes at room temperature—this allows the coating to set slightly and prevents them from falling apart in the oven.
Bake to Golden Perfection
Preheat your oven to 375°F and bake the cheese balls for 12-15 minutes, until they're deep golden brown and the edges are crispy. The key here is patience—don't open the oven door early to check. The residual heat will cause them to lose their crispiness and steam instead of browning. You'll know they're done when they've developed a beautiful golden crust and the cheese inside is just beginning to soften.
For the final touch, transfer the baked cheese balls to a wire rack and let them cool for 5 minutes. This resting period allows the coating to set completely and the cheese to firm up slightly, making them easier to handle. Serve warm with the 0.5 cup marinara sauce for dipping—it's the perfect balance to the rich, savory cheese. The contrast of the warm, gooey center with the crispy exterior is what makes these cheese balls irresistible.
Pro Tips For Making Baked Cheddar Cheese Balls
- Use Room-Temp Cheese: Sharp cheddar and cream cheese work best when they’re not straight from the fridge—take them out 30 minutes before mixing. I learned this the hard way after ending up with a dough that fought me like doughy glue. Cold cheese doesn’t blend smoothly, and your balls will turn out uneven.
- Mix Panko Last: Fold in the panko breadcrumbs after shaping the balls, not before. Pressing them into the outside gives you that perfect crispy crust without losing texture from overmixing. (Yes, even if you’re impatient like me—resist the urge to dump it all in at once.)
- Bake at 375°F, Not Higher: Skip the 400°F temptation—375°F is the sweet spot for golden, gooey perfection. Higher heat burns the panko crust before the inside melts, leaving you with a sad, dry exterior. I used to rush it, and now I just set the oven and walk away.
- Chill Before Baking: Pop shaped cheese balls in the fridge for 15–20 minutes before baking. This prevents them from spreading into flat, sad pancakes. (Your future self will thank you—trust me, I’ve seen the aftermath.)
Dietary considerations for this dish
Gluten-Free Adaptation
Swap out the panko breadcrumbs and all-purpose flour for a gluten-free breadcrumb blend (like Bob's Red Mill or Pillsbury) mixed with 1 tablespoon cornstarch for crispiness.
Use 1:1 gluten-free flour in place of the all-purpose flour. The texture will still be crispy—just ensure your coating is dry enough to adhere properly. 🌟
Dairy-Free Swaps
For a dairy-free version, replace the sharp cheddar with nutritional yeast (for cheesy flavor) and vegan cream cheese (like Kite Hill). Use olive oil instead of butter in the coating.
The result won’t melt like traditional cheese balls, but they’ll still hold their shape and offer a crispy exterior. Trust me, they’re surprisingly good!
Lower-Carb Options
Cut carbs by omitting the breadcrumbs entirely and using crushed pork rinds (about 1 cup) mixed with 1 tablespoon melted butter for the coating. This keeps the dish keto-friendly while maintaining that satisfying crunch. Just ensure the pork rinds are finely crushed—no one wants a chewy bite! 💪
Allergy-Friendly Adjustments
If nut allergies are a concern, skip any nut-based cheeses and stick to dairy-only ingredients. For egg-free binding, ensure your cream cheese is egg-free (most are), and avoid any additives that might contain hidden allergens.
Always double-check labels—Kraft and Philadelphia brands are typically safe, but homemade or specialty cheeses can vary.
Lower-Fat Version
Reduce fat by using low-fat cream cheese (like Philadelphia Light) and light butter in the coating. While the texture will be slightly less rich, the flavor remains bold.
For extra crispiness, bake at 350°F instead of 375°F—this helps the coating set without overcooking the cheese inside. A small trade-off for a lighter bite!
Nutrition facts
Frequently asked questions
Why do my cheese balls turn out greasy instead of crispy?
The most common cause is overmixing the cheese or using too much butter in the coating. Start by ensuring your cheddar and cream cheese are room temperature—this prevents greasiness. Also, chill the coating mixture for 10 minutes before rolling the balls, and don't press too hard when shaping. The key is a light, even coating—think "dusting" rather than "smothering."
Can I make these cheese balls ahead of time?
Shape and coat the balls, then refrigerate them on a tray for up to 24 hours before baking. For even better results, bake them straight from the fridge—they'll stay crispier longer. Store baked cheese balls in an airtight container for 5 days, or freeze them for 3 months. Reheat frozen balls at 350°F for 10 minutes to restore crispiness.
What's the best way to reheat leftover cheese balls?
For maximum crispiness, reheat in a 350°F oven for 8-10 minutes on a wire rack. If you're in a hurry, use the air fryer at 375°F for 3-4 minutes—this preserves the crunch while warming the center. Microwaving works in a pinch, but they'll lose their crisp texture. Always reheat from room temperature for even warming.
How do I keep the cheese from leaking out during baking?
Chill the shaped balls for 10 minutes before baking to firm up the cheese slightly. Also, ensure your oven isn't too hot—375°F is ideal. If you notice leaking, the cheese mixture was too warm when shaping. For extra insurance, roll the balls in a thin layer of flour before the panko coating to create a barrier. This trick prevents the cheese from oozing out while keeping the exterior crispy.
Can I add other cheeses to this recipe?
Yes! For a smoky flavor, mix in 1/2 cup smoked cheddar. Want something spicier? Add 1/2 cup pepper jack or 1 tsp cayenne to the cheese mixture. Just remember: the more cheese you add, the softer your coating will be. Keep the total cheese amount at 2.5 cups max to maintain the perfect texture.