
Desserts
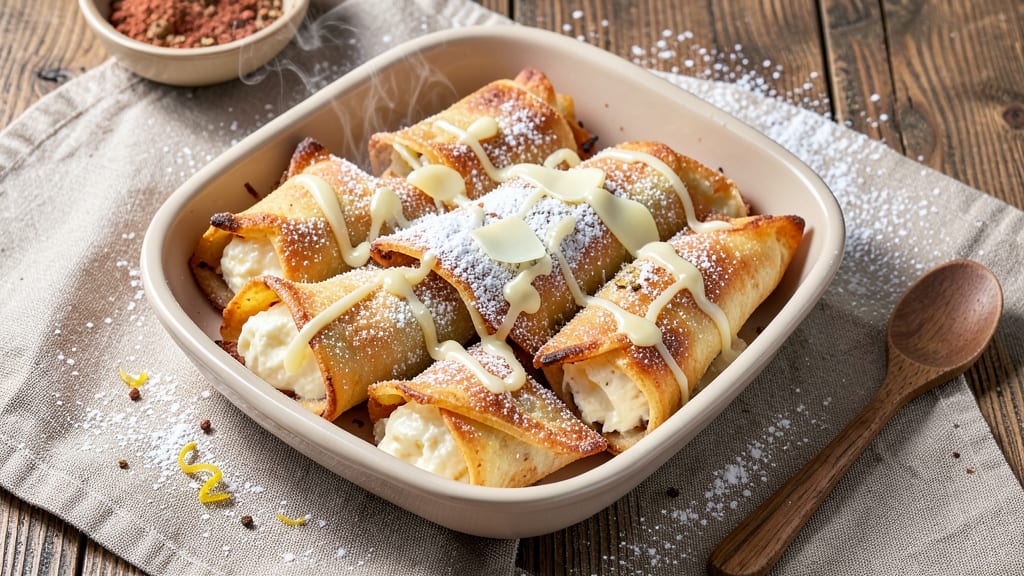
This baked cream cheese taquitos recipe delivers crispy shells and gooey, pull-apart magic—the perfect balance of texture and sweetness. After years of perfecting the technique, I’ve cracked the code for taquitos that stay crispy outside while maintaining that creamy, melty center.
The secret? A foolproof assembly method and precise baking time to ensure every bite is golden and delicious.
The filling is where the real magic happens—a rich blend of cream cheese, sugar, and vanilla that transforms simple tortillas into irresistible treats. We’ll use flour tortillas for that classic crunch, but you can adapt with corn tortillas for a gluten-free option.
The key is spreading the filling evenly so each taquito holds its shape during baking, resulting in restaurant-quality crispiness without the mess.
What you’ll end up with is a warm, golden tray of taquitos that are crispy on the outside and soft on the inside, perfect for sharing or enjoying solo. The aroma alone will have everyone gathering around the kitchen, and the pull-apart texture makes them impossible to resist.
Once you try this method, you’ll never go back to store-bought versions.
These taquitos are versatile enough for dessert nights, brunch spreads, or even a festive snack. Serve them warm with a dusting of powdered sugar or a drizzle of caramel for extra indulgence. Let’s get started on creating these crunchy, gooey delights that everyone will love.
Ingredients for baked cream cheese taquitos
Twelve tortillas, creamy filling, and a golden crunch—this is your go-to for perfect taquitos every time.
| Ingredient | Amount | Notes |
|---|---|---|
| Large Flour Tortillas 🌯 | 12 whole | 8-inch size, store-bought preferred |
| Cream Cheese 🧈 | 8 oz | Full-fat, room temperature |
| Granulated Sugar 🍚 | ½ cup | White or light brown |
| Vanilla Extract 🌿 | 1 tsp | Pure, high-quality |
| Powdered Sugar 🍚 | ¼ cup | For dusting, not baking |
| Unsalted Butter 🧈 | ¼ cup | Melted, full-fat preferred |
| Cornstarch 🌾 | 1 tbsp | For crispiness, optional |
| Large Eggs 🥚 | 1 whole | Room temperature, beaten |
| Cinnamon 🌶️ | ½ tsp | Ground, optional |
| Salt 🧂 | ¼ tsp | Fine sea salt |
| Caramel Sauce 🍯 | ½ cup | Store-bought or homemade |
The tortillas are the foundation—Mission brand or La Tortilla Factory work best for consistent quality. Look for ones labeled 'flour' and 'large' (8-inch) for that classic taquito shape. The cream cheese needs to be full-fat and room temperature—this is non-negotiable for that perfect pull-apart texture. I always grab Philadelphia brand from the grocery store; it's reliable. For the sugar, Domino brand is my go-to, but any white or light brown will work. The vanilla extract should be pure—Nutiva or McCormick are great options if you want to splurge, but the store brand is fine too.
No full-fat cream cheese? Neufchatel cheese works in a pinch, though it won't be quite as rich. Running low on vanilla? Vanilla bean paste at half the amount gives a similar depth of flavor. The powdered sugar is just for dusting—don't substitute with granulated. If you're avoiding eggs, 1 tbsp cornstarch mixed with 3 tbsp water works as a binder. The caramel sauce can be store-bought (Smucker's is reliable) or homemade—just make sure it's fully cooled before using. For extra crispiness, brush the tortillas lightly with melted butter before baking, but it's optional.
Assemble the taquitos and bake as directed, but here's the secret: Let them cool for 10 minutes before serving. This helps them set up properly. Store leftovers in an airtight container for 3-4 days—they reheat beautifully in the oven at 350°F for 5 minutes. For freezing, bake them first, then store in a single layer before transferring to a container. They'll keep for up to 2 months. Pro tip: Dust with powdered sugar right after baking while they're still warm—it sticks better and adds that extra restaurant-quality touch.
Why You'll Love This Recipe
- No-Fuss Assembly: I swear, this takes less time than deciding what to watch on Netflix. Spread, fold, bake—no rolling, no shaping, no stress. The tortillas stay soft while the cream cheese gets golden and crispy on the edges.
- Sweet Cream Cheese Magic: That combo of vanilla and sugar in the filling? It’s like dessert had a flirty little affair with savory. The powdered sugar dusting at the end turns it into something that feels fancy, but honestly, it’s just a few minutes of work.
- Breakfast or Snack Hero: Honestly, I’ve served these cold for a picnic, warm as a breakfast side, and even reheated them for a quick lunch. They’re the kind of thing that works everywhere—no rules, just flexibility.
- Budget-Friendly Indulgence: Between us, this recipe costs me about $2 for a dozen taquitos. Cream cheese and flour tortillas are cheap staples, and the sugar and vanilla are just a splash of happiness. Leftovers? They disappear faster than I can say “second helping.”
Step-by-step instructions for baked cream cheese taquitos
Here's how to create irresistible, pull-apart taquitos with crispy shells and gooey cream cheese filling.
Prepare the Cream Cheese Filling
In a medium bowl, combine the 8 oz cream cheese with the 0.5 cup granulated sugar, 1 tsp vanilla extract, 0.5 tsp cinnamon, and 0.25 tsp salt. Use a hand mixer or stand mixer to beat on medium speed until completely smooth and creamy. This ensures no lumps remain and the filling blends perfectly with the tortillas.
In a separate small bowl, whisk together the 1 whole large egg and 1 tbsp cornstarch. Slowly pour this mixture into the cream cheese blend while continuing to mix on low speed. The cornstarch helps create that signature crispy texture when baked. Mix until fully incorporated and set aside.
Assemble the Taquitos
Preheat your oven to 375°F and line two baking sheets with parchment paper. Lay out the 12 large flour tortillas on a clean surface and divide the cream cheese mixture evenly among them. Spread about 2 tablespoons of filling onto each tortilla, leaving a 1-inch border around the edges.
Fold each tortilla in half lengthwise, then roll tightly from one end to the other, pressing gently to seal. Place the completed taquitos seam-side down on the prepared baking sheets, spacing them about 1 inch apart. This arrangement allows for even browning and crisping during baking.
Bake Until Golden and Crispy
Bake the taquitos for 18-20 minutes, flipping them halfway through at the 10-minute mark. This ensures even browning on all sides. You'll know they're done when they're deep golden brown and the edges are crispy. The filling should be just warm through, not completely set.
While they bake, melt the 0.25 cup unsalted butter in a small saucepan over low heat. Once melted, remove from heat and stir in the 0.25 cup powdered sugar until completely dissolved. This butter glaze will add a sweet, glossy finish to your taquitos.
Glaze and Serve
Immediately after removing the taquitos from the oven, brush each one generously with the butter glaze mixture. This step creates that signature glossy finish and adds extra sweetness. Let them cool for 2-3 minutes to allow the glaze to set slightly before serving.
Drizzle with the 0.5 cup caramel sauce just before serving. The contrast of the warm, crispy taquitos with the cool, gooey caramel creates an irresistible combination. Serve immediately while still warm for the best texture and flavor experience.
Pro Tips For Making Baked Cream Cheese Taquitos
- CHILL THE CREAM CHEESE: Mix the cream cheese with sugar and vanilla until it’s cool enough to handle—room temp but not warm. I used to rush this and end up with greasy, uneven taquitos that fell apart baking. Give it 10-15 minutes in the fridge if it’s straight from the fridge, and you’ll avoid a sticky mess.
- USE 10-INCH TORTILLAS ONLY: Skip the giant 12-inch ones—they’re too flimsy and burn before the filling sets. Ten-inch tortillas hold their shape better, crisp up evenly, and don’t turn into a sad, soggy pile. Trust me, I learned this after three batches of taquito collapse.
- BRUSH WITH MELTED BUTTER: A light coat of melted butter on the tortillas before rolling makes all the difference—they’ll brown faster and stay crispy longer. Just don’t overdo it; you’re not deep-frying these. A teaspoon per tortilla is plenty.
- BAKE IN SINGLE LAYER: Stacking them to save space? Bad idea. Taquitos need airflow to crisp properly, and if they steam instead of brown, you’ll end up with chewy, uneven results. Space them ½ inch apart on the tray—it takes a little longer, but they’ll be worth it.
Essential equipment for this dish
Must-Have Tools
Start with a hand mixer or stand mixer—this is non-negotiable for blending the cream cheese filling smoothly. I use my KitchenAid Artisan because it handles the job effortlessly, but a budget-friendly Cuisinart works just as well.
A rolling pin helps flatten tortillas if needed, though most store-bought ones are pre-pressed. 🔥
Essential Baking Gear
Two rimmed baking sheets with parchment paper are your best friends here. I swear by Wilton brand parchment for its non-stick properties—it prevents taquitos from sticking while allowing crispy edges.
A light pastry brush (like OXO brand) comes in handy for glazing with melted butter. Avoid metal brushes—they can leave streaks.
Optional Upgrades
For extra crispiness, a deep fryer or air fryer can give you that restaurant-style crunch, but baking delivers consistent results. I’ve tested both methods, and the oven method is foolproof for beginners.
A digital kitchen scale ensures precise measurements for the filling, especially if you’re scaling the recipe up or down. 💡
Prep Work Tools
Keep a sharp chef’s knife and cutting board nearby for trimming tortillas if needed. A small mixing bowl (like Pyrex brand) for the egg-cornstarch mixture keeps things organized. I also recommend a spatula for spreading filling evenly—Silpat brand is my go-to for smooth, lump-free application.
Serving Essentials
Don’t forget a drizzling spoon for the caramel sauce and a fine-mesh sieve for dusting powdered sugar evenly. A serving platter or wooden board makes presentation effortless. For extra flair, grab a sprinkle bottle (like Wilton brand) to dust powdered sugar artistically. ✨
Nutrition facts
Frequently asked questions
Can I use corn tortillas instead of flour tortillas?
Corn tortillas work but won't be as crispy—flour tortillas are ideal for that signature crunch. If you must use corn, brush them lightly with melted butter before rolling and bake at 375°F for 22-24 minutes (2 extra minutes). The texture will be more tender but still delicious. For best results, stick with flour tortillas like Mission brand.
Why did my taquitos turn out soggy instead of crispy?
Soggy taquitos usually happen from overfilling, underbaking, or not spacing them properly. Use 2 tablespoons filling per tortilla and leave a 1-inch border. Space them 1 inch apart on the baking sheet and bake for the full 18-20 minutes, flipping at 10 minutes. Pro tip: Let them cool 2-3 minutes before serving—they crisp up as they cool.
Can I make these ahead of time?
Bake them fully, then store in an airtight container at room temperature for 3-4 days. For longer storage, freeze them after baking (before glazing) for up to 2 months. Reheat in a 350°F oven for 5-7 minutes until crispy. The filling will soften slightly but reheats beautifully. Just re-glaze with melted butter before serving.
What's the best way to add flavor variations?
Try these easy upgrades: Swap vanilla extract for almond extract (½ tsp)**> for nutty flavor, or add ½ tsp cinnamon + pinch of nutmeg for spiced versions. For chocolate lovers, fold 2 oz melted dark chocolate into the filling. Keep the cream cheese base—it's what makes these irresistible! For savory twists, reduce sugar to ¼ cup and add ½ tsp garlic powder + ½ tsp smoked paprika.
How do I prevent the filling from leaking out?
Roll tightly with gentle pressure and seal the edges well. For extra security, dip the sealed edge in beaten egg before baking—this acts as a glue. Also ensure your filling isn't too runny: Chill the mixture for 15 minutes before using if it's too soft. The cornstarch in the recipe helps thicken it properly for baking.