
Appetizers
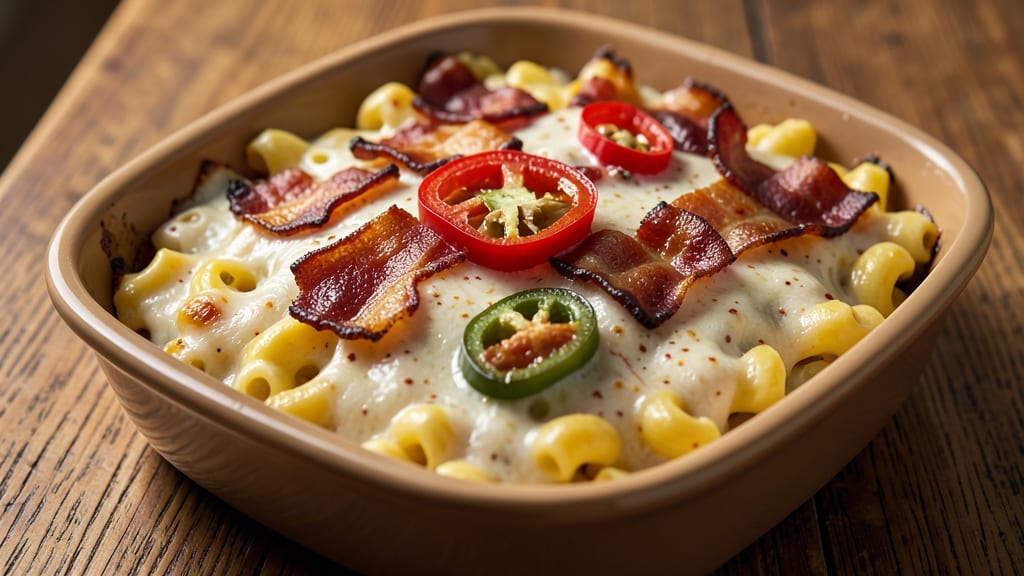
This baked jalapeño bacon mac and cheese recipe delivers the ultimate fusion of smoky, spicy, and creamy comfort food. The crispy bacon and fresh jalapeños add a bold kick, while layers of melted cheese create rivers of golden goodness that'll have everyone asking for seconds.
I perfected this dish after years of experimenting with mac and cheese variations, and the combination of textures—crispy, chewy, and creamy—is pure magic.
What sets this recipe apart is the balance of flavors and textures: crispy bacon bits cut through the richness of the cheese sauce, while fresh jalapeños add a bright, spicy contrast.
The secret to achieving that perfect crispy top layer without burning the cheese underneath is a two-step baking process—first at a lower temperature to melt the cheese evenly, then at high heat to create a golden, bubbly crust. This method ensures every bite delivers that satisfying crunch and melt.
The result is a dish that's restaurant-quality but easy enough to make at home. The creamy cheese sauce clings to perfectly cooked elbow macaroni, while the jalapeños and bacon add layers of flavor that keep every bite exciting.
It's the kind of dish that feels indulgent but still satisfies cravings for something a little more adventurous than classic mac and cheese.
Whether you're serving this as a main course for a dinner party or a hearty appetizer for game day, it's guaranteed to be a crowd-pleaser. The recipe includes optional garnishes like chopped green onions or extra cheese for added flair, but even without them, it's a showstopper.
Let's get started on this smoky-spicy mac and cheese that's impossible to resist.
Ingredients for baked jalapeno bacon mac and cheese
Six servings of restaurant-quality comfort with smoky-spicy depth and melty cheese rivers.
| Ingredient | Amount | Notes |
|---|---|---|
| Elbow Macaroni 🍝 | 1 ½ lb | Dry, medium elbow shape |
| Thick-Cut Bacon 🥓 | 1 ¼ lb | Center-cut for crispiness |
| Fresh Jalapeños 🌶️ | 4 whole | Seeds removed for mild heat |
| Sharp Cheddar Cheese 🧀 | 2 cups | Shredded, 2-year aged preferred |
| Monterey Jack Cheese 🧀 | 1 ½ cups | Shredded, mild flavor balance |
| Heavy Cream 🥛 | 1 cup | Full-fat for creaminess |
| Whole Milk 🥛 | 1 cup | Warmed to blend smoothly |
| Butter 🧈 | ½ cup | Unsalted, melted |
| All-Purpose Flour 🌾 | ¼ cup | For velvety sauce texture |
| Yellow Onion 🧅 | 1 whole | Diced, medium size |
| Garlic Cloves 🧄 | 4 cloves | Minced for aromatic depth |
| Diamond Crystal Kosher Salt 🧂 | 1 ½ tsp | For seasoning adjustments |
| Freshly Ground Black Pepper 🌶️ | ½ tsp | Cracked peppercorns preferred |
| Panko Breadcrumbs 🍞 | ½ cup | For crispy top layer |
| Green Onions 🧅 | 3 whole | Sliced, for garnish |
The cheeses are where this dish shines—sharp cheddar for bold flavor and Monterey Jack to smooth out the heat. Penzeys Spices or a specialty grocery store carry the best aged cheddar blocks; look for the vibrant orange color and minimal additives. For the jalapeños, fresh is non-negotiable—canned versions lack the bright, crisp contrast. If you can't find thick-cut bacon, cut regular bacon slices in half lengthwise for better crisping. The onion and garlic form the flavor base, so sweat them low and slow to develop sweetness before adding the bacon.
No sharp cheddar? Pepper jack at half the amount adds heat without sacrificing flavor. Out of panko? Toasted breadcrumbs work too, but they won't be as crispy. The heavy cream and milk can be swapped for half-and-half, though the sauce won't be quite as rich. For extra smokiness, add 1/4 tsp smoked paprika to the cheese sauce. The jalapeños can be pickled if you prefer—Trader Joe's carries excellent pickled jalapeños that add tangy depth. If you're sensitive to dairy, use a lactose-free milk substitute in the sauce, though texture may vary slightly.
Prep the bacon and jalapeños first—they take the longest. Store cooked bacon in an airtight container for up to 5 days, but it's best used fresh. The cheese sauce keeps 3 days refrigerated if reheated gently, but the baked mac reheats beautifully—cover with foil to prevent over-browning. For make-ahead convenience, assemble the dish in a baking dish and refrigerate up to 24 hours before baking. The flavors meld overnight, creating even deeper complexity.
Why You'll Love This Recipe
- One-Pan Magic: I swear by this recipe when I’m too tired to scrub pots—bacon cooks right on the baking sheet with the pasta, and the cheese melts into a golden crust. No boiling over, no sticking, just done.
- Spicy-Savory Balance: That crispy bacon edge paired with fresh jalapeños? It’s the kind of flavor combo that makes you pause mid-bite. Honestly, the cheddar-jack blend is rich enough to stand up to the heat, so it’s never too overpowering.
- Tailgate or Tuesday: Between us, this is my go-to for game days and lazy nights. The heat from the jalapeños cuts through the richness, so it’s satisfying but not greasy—perfect for when I’m feeding a crowd or just myself after a long week.
- Budget-Friendly Leftovers: A pound of bacon and a bag of pasta stretch this into three meals without breaking the bank. I’ll be real: the second day is even better because the flavors meld together, and it reheats like a dream.
Step-by-step instructions for baked jalapeño bacon mac and cheese
This method delivers perfect layers of smoky bacon, spicy jalapeños, and ultra-creamy cheese with a crispy breadcrumb topping.
🍳 Step 1: Cook the Bacon and Prepare Jalapeños
Cut the 1.25 lb thick-cut bacon into ½-inch pieces and cook in a large skillet over medium heat for 12-15 minutes, stirring occasionally, until deep golden brown and crispy. Remove bacon with a slotted spoon and set aside on paper towels, leaving the rendered fat in the pan.
While bacon cooks, slice the 4 whole fresh jalapeños lengthwise, remove seeds and membranes, then dice into ¼-inch pieces. Set aside for later use. I like to wear gloves when handling jalapeños—they pack a punch even without seeds!
🍳 Step 2: Build the Creamy Cheese Sauce
In the same skillet with bacon fat, add the 1 whole diced yellow onion and cook for 5 minutes until softened. Add the 4 minced garlic cloves and cook for 30 seconds until fragrant. Sprinkle in the 0.25 cup all-purpose flour and whisk constantly for 1-2 minutes until golden.
Gradually whisk in the 1 cup whole milk and 1 cup heavy cream, then remove from heat. In a separate bowl, combine the 2 cups sharp cheddar cheese and 1.5 cups monterey jack cheese, then slowly add to the sauce while whisking until completely melted and smooth. Season with 1.5 tsp diamond crystal kosher salt and 0.5 tsp freshly ground black pepper. The sauce should be velvety and thick enough to coat the back of a spoon.
👨🍳 Step 3: Cook and Combine with Pasta
In a large pot, bring 8 cups water to a rolling boil and add 1.5 lb elbow macaroni. Cook until 1 minute before al dente (about 11-12 minutes), then drain and return to the pot. Pour the cheese sauce over the pasta and stir until fully coated. Fold in the cooked bacon and diced jalapeños, mixing gently to distribute evenly.
Transfer the macaroni mixture to a 9x13-inch baking dish, spreading it evenly. The dish should be ¾ full—this ensures proper browning and prevents overflow. Here's the thing—don't press down on the pasta as you transfer it. You want those pockets of air to create those beautiful cheese rivers when baked.
🥘 Step 4: Assemble and Bake to Perfection
Melt the 0.5 cup butter in a small saucepan over low heat, then stir in the 0.5 cup panko breadcrumbs until evenly coated. Spread this mixture evenly over the top of the macaroni in the baking dish, pressing down lightly with a spatula. This creates that irresistible crunchy crust we all love.
Bake at 375°F for 20-25 minutes until the top is deep golden brown and bubbly, with cheese pulling away from the edges. For the best results, I place the baking dish on a rimmed sheet pan to catch any potential overflow. The internal temperature should reach 165°F at its thickest point.
🍽️ Step 5: Rest and Serve with Garnish
Remove from the oven and let rest for 10 minutes before serving. This resting period allows the cheese to set slightly and makes slicing much easier. The dish will be hot—use oven mitts when handling the baking dish.
Garnish each serving with sliced green onions and serve immediately. The contrast of crispy breadcrumbs, smoky bacon, spicy jalapeños, and melty cheese creates a perfect balance in every bite. For extra presentation, you can drizzle with a bit of hot sauce or serve with a side of pickled jalapeños for those who want more heat.
Pro Tips For Making Baked Jalapeno Bacon Mac And Cheese
- CUT BACON IN HALF: Fresh thick-cut bacon takes forever to crisp, and that’s before it even hits the pan. Halve each slice lengthwise before cooking—it renders faster, gets crispier, and you’ll still have plenty of bacon flavor in every bite. (Yes, even if you’re impatient like me, this makes a real difference.)
- SCORE JALAPEÑOS THINLY: Thick-skinned jalapeños turn rubbery when baked. Use a sharp knife to slice them lengthwise into thin strips (about 1/8-inch thick), then cut those strips crosswise into matchsticks. This ensures they soften perfectly without turning mushy—no one wants a chewy jalapeno surprise in their mac.
- BAKE LOW AND SLOW: I used to blast this at 400°F like a racecar, but the top burned before the cheese melted. Drop the heat to 375°F and give it 15–20 minutes covered with foil first. The cheese will pool smoothly, and the crust will form beautifully when you uncover it—no sad, overcooked edges.
- USE A MIXED CHEESE SLURRY: Dry cheese clumps like a nightmare. Melt half the sharp cheddar and Monterey Jack together in a saucepan with a splash of milk (about 1/4 cup), then whisk it into the pasta. The slurry coats the noodles evenly, giving you that creamy, velvety texture instead of a sad, grainy mess. (Your future self will thank you.)
Dietary considerations for this recipe
Gluten-Free Adaptation
For a gluten-free version, simply swap the elbow macaroni for gluten-free pasta like Barilla or Jovial. These brands mimic traditional pasta texture while being certified gluten-free. Use the same cooking time but check for al dente 1 minute earlier than gluten-containing pasta since it tends to soften faster.
The cheese sauce and toppings remain unchanged, so the flavor stays rich and satisfying. 🌾
Dairy-Free Options
Replace the sharp cheddar and Monterey Jack with nutritional yeast (for cheesy flavor) and dairy-free cheese shreds like Violife or Daiya. Use unsweetened almond milk or oat milk instead of heavy cream and whole milk—just warm them to help the sauce emulsify better.
The texture will be slightly lighter but still creamy. For extra richness, stir in 2 tbsp melted coconut oil into the sauce. 🧀
Lower-Carb Version
Cut carbs by using cauliflower rice instead of pasta—it absorbs the cheese sauce beautifully. Cook 4 cups riced cauliflower (fresh or frozen) until tender, then mix with the cheese sauce as usual.
For extra heartiness, fold in ½ cup cooked quinoa to add protein and texture. The dish still delivers that comforting, cheesy experience while being lower in carbs. 🥦
Spice Control Tips
If the jalapeños feel too intense, remove all seeds and membranes before dicing. For extra mild heat, use pickled jalapeños instead—they add tang without the same fiery kick.
You can also reduce the amount to 2 whole jalapeños and compensate with ¼ tsp smoked paprika for depth. Always taste as you go! 🌶️
Allergy-Friendly Swaps
For nut allergies, ensure your panko breadcrumbs are nut-free (check labels). If you're sensitive to dairy, use dairy-free butter like Miyoko's in the breadcrumb topping. For egg-free binding (if needed), stir 1 tbsp cornstarch into the cheese sauce to help thicken it without eggs.
Always double-check ingredient labels for hidden allergens. 🍞
Nutrition facts
Frequently asked questions
Can I make this recipe without fresh jalapeños?
Use pickled jalapeños (about ½ cup) for tangy flavor without fresh heat, or swap for ½ tsp smoked paprika + ¼ tsp cayenne pepper for a similar smoky-spicy kick. Drain pickled jalapeños well to avoid excess moisture in the dish.
How do I prevent the cheese sauce from separating?
Whisk the cheese sauce constantly over low heat until fully melted, then remove from heat immediately. For extra insurance, stir in 1 tbsp cornstarch mixed with 2 tbsp cold water to thicken it. Never boil the sauce—just warm it gently to 160°F to keep it silky smooth.
What's the best way to reheat leftovers?
Cover with foil and reheat at 350°F for 15-20 minutes until warmed through. For microwave reheating, use 30-second intervals on medium power, stirring between each interval. Add a splash of milk or water to restore creaminess if needed. Leftovers keep 4 days refrigerated.
Can I use different cheeses for this recipe?
Yes! For extra sharpness, add ½ cup pepper jack to the cheese mix. For creaminess, swap ½ cup Monterey Jack for Gruyère. Avoid pre-shredded cheese (it contains anti-caking agents that prevent melting). Always use 2-year aged cheddar for the best flavor.
Why did my mac and cheese get watery?
Overcooked pasta absorbs too much water, or the sauce may have been too thin. Next time, cook pasta 1 minute less than package instructions and drain well. For extra insurance, stir in 1 tbsp butter at the end to help bind the sauce.