
Side Dishes
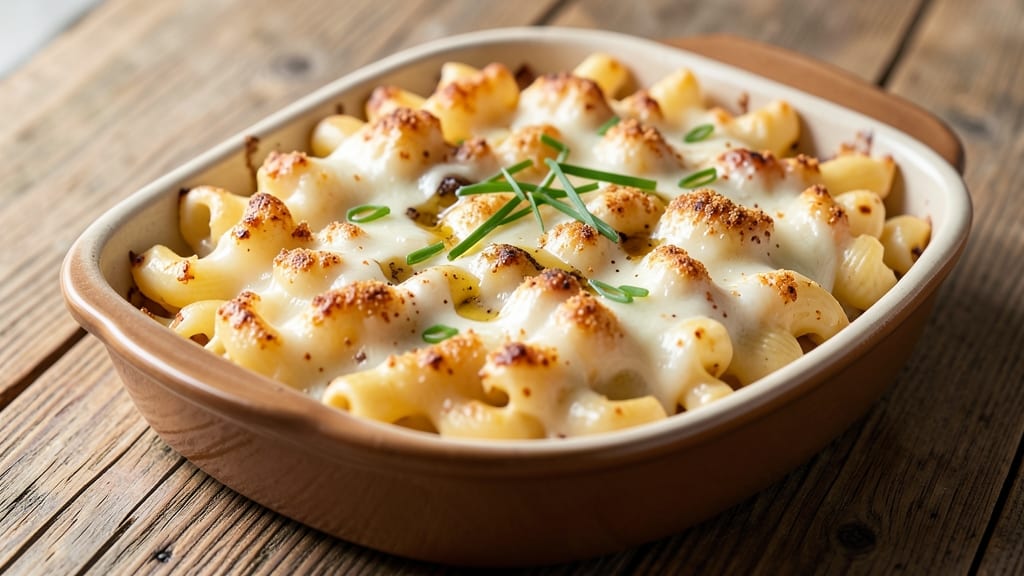
This baked mac and cheese recipe with measurements delivers restaurant-quality comfort in one foolproof baking dish. 🔥 The secret lies in a triple-layered approach—creamy cheese sauce, crispy breadcrumb topping, and perfectly tender pasta—that transforms simple ingredients into a showstopper side.
I’ve perfected this version after years of trial and error, ensuring every bite has that melty, stretchy texture you crave.
The recipe uses precise measurements to balance richness and texture, with a blend of sharp cheddar, creamy Gruyère, and a touch of cream cheese for depth. The breadcrumb topping isn’t just for crunch—it’s toasted to a golden brown for maximum flavor, while the sauce stays velvety smooth.
No shortcuts here; this is the kind of mac and cheese that makes people ask for seconds (or thirds).
What sets this apart is the layering technique: the pasta cooks directly in the oven, absorbing the sauce while the topping crisps. The result? A dish with crunchy edges, creamy centers, and streaks of melted cheese that pull apart with every forkful.
It’s hearty enough to stand alone but versatile enough to pair with anything from grilled chicken to roasted vegetables.
Ready in just 30 minutes, this recipe is perfect for weeknight dinners, holiday gatherings, or when you need a crowd-pleaser that feels restaurant-worthy without the fuss. The measurements are tested to perfection, so you’ll get it right the first time—no guesswork, no lumps, just creamy, crispy, melty perfection.
Ingredients for baked mac and cheese recipe with measurements
Sixteen ingredients transform into restaurant-quality mac and cheese with precise measurements and triple-layered perfection.
| Ingredient | Amount | Notes |
|---|---|---|
| Elbow Macaroni 🍝 | 1 ½ lbs | Medium or short elbow shape preferred |
| Sharp White Cheddar Cheese 🧀 | 3 cups | Freshly grated, block preferred |
| Gruyère Cheese 🧀 | 1 cup | Aged 12+ months for optimal flavor |
| Cream Cheese 🧈 | 8 oz | Full-fat for maximum creaminess |
| Heavy Whipping Cream 🥛 | 1 cup | 36% fat minimum for richness |
| Unsalted Butter 🧈 | ½ cup | Cold, cubed for even melting |
| All-Purpose Flour 🌾 | ¼ cup | For thickening sauce |
| Whole Milk 🥛 | ½ cup | Warmed to room temperature |
| Panko Breadcrumbs 🍞 | 1 cup | Japanese-style for superior texture |
| Parmesan Cheese 🧀 | ¼ cup | Freshly grated, fine texture |
| Garlic Cloves 🧄 | 3 cloves | Minced for aromatic depth |
| Yellow Onion 🧅 | 1 whole | Diced, small uniform pieces |
| Diamond Crystal Kosher Salt 🧂 | 1 ½ tsp | For seasoning and pasta water |
| Freshly Ground Black Pepper 🌶️ | ½ tsp | Cracked peppercorns preferred |
| Mustard Powder 🌶️ | ½ tsp | For subtle tang |
The cheese selection is non-negotiable. Sharp white cheddar provides the signature tang, while aged Gruyère adds nutty depth—look for blocks over pre-shredded to avoid clumping. Penzeys Spices or specialty cheese shops carry excellent Gruyère; if unavailable, Comté is a worthy substitute. The cream cheese isn't just for creaminess—it emulsifies the sauce, preventing separation. For the breadcrumbs, Japanese panko from Trader Joe's delivers that perfect toasted crunch, but any high-quality panko works. Pre-grated cheese? Toss it—it contains anti-caking agents that ruin texture.
No Gruyère? Extra-sharp cheddar plus a touch of smoked Gouda replicates the complexity. Substituting cream cheese? Mascarpone at equal weight works beautifully, though the texture will be slightly lighter. For the garlic and onion, fresh is non-negotiable—dried powders lack the depth. Mustard powder can be omitted if you prefer a milder flavor, but it's what separates this from basic recipes. The flour is strictly for thickening; cornstarch at half the amount creates a glossier finish. And for the love of mac and cheese, never skip the butter—it's what makes the sauce sing.
Store pre-grated cheese in its original packaging with a slice of bread to absorb moisture, extending freshness by 2 weeks. Panko loses crispiness after 3 months—keep it airtight in the freezer for maximum crunch. The assembled casserole reheats beautifully; cover tightly and bake at 375°F for 15 minutes to restore crispiness. For meal prep, portion into individual servings before baking—this maintains the perfect texture when reheated. Leftovers keep 5 days refrigerated or 3 months frozen, though texture may slightly degrade after freezing.
Why You'll Love This Recipe
- No-Fuss Assembly: I swear by this recipe because it’s literally four ingredients mixed in a bowl—no saucepan, no fuss. Toss the cooked elbows with shredded sharp cheddar, Gruyère, cream cheese, and heavy cream, then bake. That’s it. Even my college-me could’ve pulled this off.
- Creamy Crispy Magic: The secret’s in the cheese combo: sharp cheddar for tang, Gruyère for nutty depth, and cream cheese for that unfairly smooth texture. Top it with a sprinkle of breadcrumbs (optional, but I always do) for that golden, crispy edge—like a hug in a baking dish.
- Leftovers That Don’t Suck: This mac holds up perfectly for lunches—just reheat until bubbly, or pop slices in the air fryer for a quick crunch. Honestly, I make a double batch on Sundays because it’s the only comfort food that tastes better the second day.
- Budget-Friendly Luxury: Gruyère might sound fancy, but a little goes a long way, and the rest are pantry staples. You’re basically getting gourmet mac for half the price of takeout. My wallet and my taste buds agree—this is my go-to when I want to feel fancy without breaking the bank.
Step-by-step instructions for triple-layered crunch and melty streaks
Here's the method—three distinct layers of texture and flavor that transform simple mac and cheese into a showstopper.
🍳 Step 1: Cook the Pasta to Al Dente Perfection
Bring a large pot of water to a rolling boil and add the 1.5 lbs elbow macaroni. Season generously with 1 tsp of the diamond crystal kosher salt (save the remaining 0.5 tsp for later). Cook until 1 minute before the package's recommended al dente time—you want the pasta slightly firm to prevent mushiness when baked.
Drain the pasta in a colander, then immediately rinse under cold water for 30 seconds to stop cooking. Shake off excess water and transfer to a large mixing bowl. The residual starch will help thicken the cheese sauce later. Don't skip this rinse—it removes excess starch that would make the final dish gummy.
👨🍳 Step 2: Build the Cheese Sauce Foundation
In a separate large skillet, melt the 0.5 cup unsalted butter over medium heat. Add the 1 whole yellow onion and 3 cloves garlic cloves, cooking for 5-6 minutes until the onion softens and the garlic becomes fragrant. This step develops depth of flavor that plain cheese can't achieve alone.
Reduce heat to low and whisk in the 0.25 cup all-purpose flour, cooking for 1-2 minutes until it forms a smooth roux. Gradually pour in the 0.5 cup whole milk and 1 cup heavy whipping cream, whisking constantly to avoid lumps. Let the mixture thicken for 3-4 minutes until it coats the back of a spoon—this creates the velvety base for the cheese layers.
🥘 Step 3: Create the Triple Cheese Layers
Remove the skillet from heat and stir in the 8 oz cream cheese, 1 cup gruyère cheese, and 3 cups sharp white cheddar cheese until fully melted and smooth. Season with the remaining 0.5 tsp diamond crystal kosher salt, 0.5 tsp freshly ground black pepper, and 0.5 tsp mustard powder. The mustard powder adds a subtle tang that balances the richness.
Fold the cooked pasta into the cheese mixture until fully coated. Transfer half of the pasta mixture to a 9x13-inch baking dish, spreading it evenly. Sprinkle with half of the 1 cup panko breadcrumbs and 0.125 cup parmesan cheese. Repeat with the remaining pasta mixture, then top with the rest of the panko and parmesan.
🔥 Step 4: Bake to Golden Crispness
Preheat your oven to 375°F. Bake the mac and cheese for 20-25 minutes until the top is deep golden brown and the edges are bubbling. The panko should be crispy, not just toasted—this is where the triple-layered texture comes together.
For the final touch, broil for 1-2 minutes on high, watching closely to prevent burning. The top should be intensely golden with spots of caramelization. Let it rest for 5 minutes before serving—this allows the layers to set while keeping the cheese creamy inside.
🍽️ Step 5: Serve with Precision
Use a sharp knife to cut through the crispy top layer, then slide the knife underneath to create clean slices. The contrast between the crunchy breadcrumb crust, creamy cheese layers, and al dente pasta should be immediately apparent in every bite.
Serve immediately while the top is still crispy. The cheese should be melted but not runny, with visible streaks of gruyère and cheddar throughout. Each forkful delivers the perfect balance of textures—this isn't just mac and cheese, it's a layered experience.
Pro Tips For Making Baked Mac And Cheese Recipe With Measurements
- STIR THE CHEESE LOW AND SLOW: I learned this the hard way—when I cranked the heat too high to melt the sharp cheddar and Gruyère, I ended up with lumps instead of a silky sauce. Keep it at a gentle simmer (medium-low) and stir constantly for 5-7 minutes. The cream cheese will melt faster than you think, so don’t walk away.
- GRATE THE CHEESE FINE: Pre-shredded cheese has anti-caking agents that turn your baked mac into a grainy mess. Use a box grater for the cheddar and Gruyère—even if it takes 10 extra minutes—and skip the pre-shredded stuff. Trust me, your future self will notice the difference.
- DON’T OVERBAKE THE PASTA: Mac and cheese is forgiving, but elbow mac can turn mushy if left in the oven too long. Pull it out when the top is golden and the edges are set—about 20-25 minutes at 375°F. If it’s not quite crispy, broil for 1-2 minutes at the end (watch it like a hawk).
- SWAP THE CREAM FOR A CRUST: Heavy whipping cream makes the sauce rich, but it can make the top soggy. For a crispier finish, replace ¼ cup of it with a mix of 2 tablespoons melted butter and 2 tablespoons whole milk. Spread it on top before baking—it browns faster and cuts through the richness.
Serving suggestions for this dish
Crispy Topping Upgrades
Swap the panko for crushed cornflakes mixed with 1 tbsp melted butter and 1 tsp smoked paprika for a Southern-inspired twist. For extra decadence, fold ½ cup crushed potato chips (like Lays Classic) into the breadcrumb mix—it adds a salty crunch that disappears with the first bite. 🔥
Protein Pairings
This mac and cheese stands up to hearty proteins. Grilled baby back ribs with a BBQ sauce drizzle create a perfect Southern combo. For a lighter option, serve alongside herb-roasted chicken thighs or crispy baked salmon to balance the richness. The cheesy layers cut through the fat beautifully.
Vegetable Contrasts
Bright, roasted vegetables add freshness to the rich dish. Toss asparagus spears with 1 tbsp olive oil, ½ tsp garlic powder, and salt, then roast at 425°F for 12 minutes until tender-crisp.
Another great option is charred Brussels sprouts halved and roasted with balsamic glaze—the tang cuts through the cheese perfectly.
Dipping Sauces
Serve with a side of smoky chipotle cream sauce (mix ¼ cup sour cream with 1 tsp adobo sauce and ½ tsp smoked paprika) for those who want heat.
For a classic touch, offer homemade marinara or a simple butter-basted green bean dish on the side to soak up any extra cheese sauce.
Holiday Presentation
For special occasions, transfer the baked mac and cheese to a cast-iron skillet and broil until bubbly. Garnish with freshly cracked black pepper and microgreens for a restaurant-worthy presentation.
Serve in individual ramekins for elegant appetizers, or create a mac and cheese bar with toppings like crispy bacon bits and hot honey. ✨
Nutrition facts
Frequently asked questions
Can I use pre-shredded cheese in this recipe?
Pre-shredded cheese contains anti-caking agents that create a grainy texture in baked dishes. For the creamiest results, always use freshly grated block cheese. If you must use pre-shredded, remove any anti-caking additives by rinsing the cheese through a fine-mesh strainer before adding it to the sauce.
How do I prevent the mac and cheese from getting watery?
Watery mac and cheese usually happens from overcooked pasta or too much liquid. First, cook the pasta just 1 minute less than package instructions, then rinse it thoroughly under cold water to remove excess starch. Second, don't overmix the sauce—just stir until the cheese melts completely. Finally, let the baked dish rest for 5 minutes before serving to allow the sauce to set.
Can I make this recipe ahead of time?
You can assemble the dish up to 24 hours ahead and refrigerate it uncovered. When ready to bake, cover tightly with foil and bake at 375°F for 25-30 minutes (add 5-10 minutes if it's cold). For best texture, the topping will need a quick broil for 1-2 minutes to restore crispiness. For freezing, assemble the dish, cover tightly, and freeze for up to 3 months. Thaw in the fridge overnight before baking.
What's the best way to reheat leftovers?
For leftovers, cover the dish with foil and reheat at 350°F for 15-20 minutes until warmed through. To restore crispiness, broil for 1-2 minutes on high at the end. For individual servings, microwave on 50% power for 1 minute, then cover with a damp paper towel and microwave another 30 seconds to melt the cheese evenly. Never microwave uncovered—it causes the top to dry out.
Can I make this gluten-free?
Yes, but with adjustments. Use gluten-free elbow macaroni (like Barilla or Jovial) and replace the all-purpose flour with ½ cup cornstarch for thickening. For the topping, use certified gluten-free panko (check labels—many contain wheat). The texture will be slightly different but still delicious. Note that gluten-free pasta absorbs more liquid, so you may need 1-2 tbsp extra milk** in the sauce.