
Main Courses
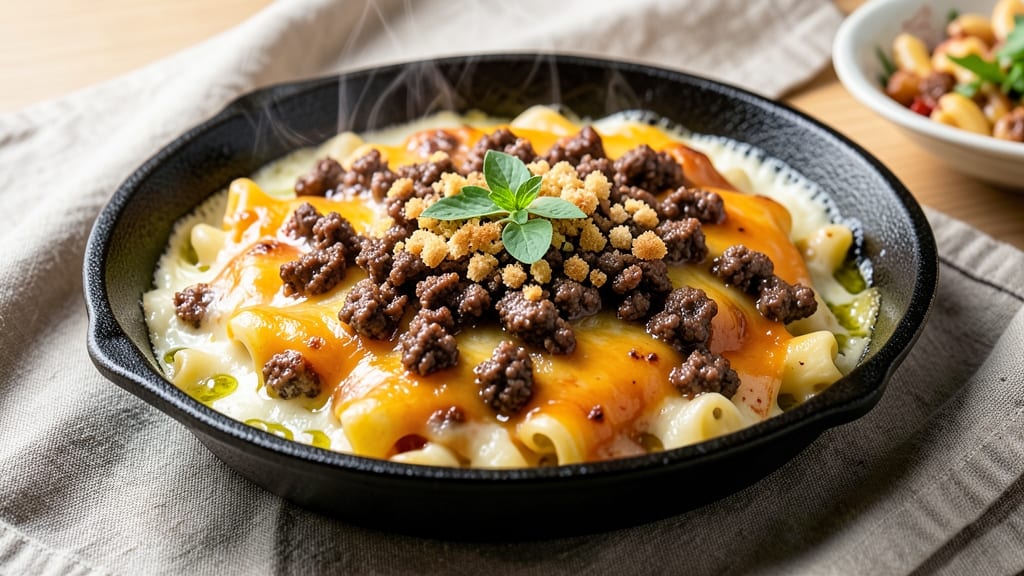
This baked mac and cheese with beef recipe transforms a comfort food classic into a hearty, protein-packed dinner that satisfies every craving. The secret lies in slow-cooked beef that infuses the creamy cheese sauce with deep, savory flavor while keeping the pasta tender and the top crispy.
I’ve perfected this one-pan method over years of testing—no soggy bottoms or dry pasta here. The process starts with browning beef for rich flavor, then simmering it in a velvety cheese sauce that coats every strand of elbow macaroni.
Layering the mixture in a baking dish and topping it with buttery breadcrumbs creates that perfect balance of crispy, creamy, and tender. The result? A dish so satisfying, it’ll become your new weeknight staple.
What makes this recipe stand out is how the beef’s savory notes cut through the richness of the cheese, creating harmony in every bite. The slow cook ensures tender meat, while the baking step delivers a golden, bubbling top that’s impossible to resist.
Serve with a simple side salad for balance, or enjoy it as-is for a meal that feels indulgent yet effortless. Ready in under an hour, this recipe delivers restaurant-quality comfort without the fuss. Let’s get cooking!
Ingredients for baked mac and cheese with beef
Sixteen ingredients for a dish that feels indulgent yet effortless—rich, hearty, and packed with protein.
| Ingredient | Amount | Notes |
|---|---|---|
| Elbow Macaroni 🍝 | 1 ½ lbs | Uncooked, medium or elbow shape |
| Ground Beef 🥩 | 1 ½ lbs | 80/20 fat ratio for flavor |
| Sharp Cheddar Cheese 🧀 | 3 cups | Shredded, block preferred |
| Heavy Cream 🥛 | 1 cup | Full-fat for creamy texture |
| Whole Milk 🥛 | ½ cup | Warmed for smooth sauce |
| Butter 🧈 | ½ cup | Unsalted, melted |
| All-Purpose Flour 🌾 | ¼ cup | For thickening sauce |
| Yellow Onion 🧅 | 1 whole | Diced, medium size |
| Garlic Cloves 🧄 | 4 cloves | Minced, fresh preferred |
| Beef Broth 💧 | 1 ½ cups | Low-sodium preferred |
| Dijon Mustard 🍯 | 1 tbsp | For depth of flavor |
| Panko Breadcrumbs 🍞 | ½ cup | For crispy topping |
| Salt 🧂 | 1 ½ tsp | Adjust to taste |
| Black Pepper 🌶️ | 1 tsp | Freshly ground |
| Dried Thyme 🌿 | ½ tsp | For herby depth |
The beef is where this dish gets its depth. 80/20 ground beef gives you that perfect balance of flavor and tenderness—leaner cuts can get dry in the slow simmer. Look for packages labeled with the fat ratio at Walmart or Costco; they’re usually cheaper in bulk. The cheese matters too—sharp cheddar from a block (like Cabot) melts smoother than pre-shredded, which has anti-caking agents that make it grainy. If you’re short on time, Kraft 2% milk sharp cheddar works in a pinch, but grating your own is worth the extra minute.
No heavy cream? Full-fat Greek yogurt works in a bind, though it’ll be slightly tangier. Swapping the elbow macaroni? Penne or cavatappi hold sauce just as well—just make sure they’re medium-sized so they don’t overcook. The flour is non-negotiable for thickening, but if you’re gluten-free, cornstarch or gluten-free flour blend does the job. For the breadcrumbs, Trader Joe’s sells pre-seasoned ones that cut down on prep time, but plain panko toasted with a pinch of garlic powder is even better. The Dijon mustard adds complexity—if you’ve only got regular yellow mustard, reduce it to half the amount and add a splash of lemon juice for brightness.
Cooked pasta keeps for 2 days in the fridge, but the assembled casserole reheats beautifully—3-4 days max. For leftovers, I like to cover it tightly with foil to prevent drying out. Freezing? Portion into single servings before baking, then reheat at 350°F for 20 minutes. The breadcrumb topping gets crispy again with a quick broil at the end. This dish is even better the next day—let the flavors meld overnight, and you’ll understand why it’s a weeknight staple.
Why You'll Love This Recipe
- One-Pan Magic: I swear by this recipe when I’m too tired to scrub a million dishes—just brown the beef in the same pan you’ll bake it in. No extra pots, no stress, and that rich beefy flavor soaks right into the cheese sauce. (Yes, even on a Tuesday night.)
- Creamy-Meaty Bliss: That first bite? The tender elbow macaroni swimming in a sauce thickened with sharp cheddar and heavy cream, while the ground beef adds a hearty, savory punch. It’s the kind of dish that makes you close your eyes halfway through.
- Lunchbox Hero: Between us, this is my go-to for meal prep—portion it into containers, and it reheats like a dream. Kids (or adults) will actually eat their leftovers because it’s that good. I’ve packed it for work, school lunches, and even potlucks without a single complaint.
- Budget Stretch: Sharp chedddar and ground beef make this dish feel special without breaking the bank. A bag of pasta, a pound of beef, and a block of cheese go a long way, especially when you’re feeding a crowd. Honestly, it’s the kind of meal that makes grocery day feel like a win.
Step-by-step instructions for baked mac and cheese with beef
This hearty one-pan dinner combines rich cheddar, savory beef, and tender pasta for a satisfying meal.
Cook the Ground Beef and Sauté Aromatics
In a large oven-safe skillet, heat the 0.5 cup butter over medium-high heat until melted. Add the 1.5 lbs ground beef and cook, breaking it apart with a wooden spoon, until it loses its raw color and begins to brown—about 5-7 minutes. Drain any excess fat that accumulates.
Push the beef to one side of the skillet and add the diced yellow onion and minced garlic cloves. Sauté for 3-4 minutes until the onions are translucent and the garlic is fragrant. Stir the beef back into the skillet and season generously with 1.5 tsp salt, 1 tsp black pepper, and 0.5 tsp dried thyme. This step builds the flavor foundation for the entire dish.
Prepare the Cheesy Sauce
Reduce the heat to medium-low and stir in the 0.25 cup all-purpose flour, cooking for 1-2 minutes to cook out the raw taste. Slowly whisk in the 1.5 cups beef broth and 1 tbsp Dijon mustard, ensuring no lumps form. Gradually add the 1 cup heavy cream and 0.5 cup whole milk, stirring constantly until the mixture thickens slightly.
Remove the skillet from heat and stir in the 3 cups sharp cheddar cheese until fully melted and smooth. The sauce should be thick but still pourable. If it’s too thick, whisk in a splash of warm milk to reach your desired consistency. This step ensures a velvety, rich sauce that coats every strand of pasta.
Combine Pasta and Assemble the Bake
Cook the 1.5 lbs elbow macaroni according to package instructions until al dente, then drain and rinse briefly under cold water to stop the cooking process. Add the cooked pasta to the skillet with the cheese sauce and stir until fully coated and heated through. The pasta should absorb the sauce evenly, creating a creamy, cheesy mixture.
Transfer the skillet to a baking sheet for stability and top evenly with the 0.5 cup panko breadcrumbs. For extra crispiness, you can lightly brush the breadcrumbs with melted butter or a little milk before baking. This step adds texture contrast and prevents the cheese from becoming too soft during baking.
Bake to Golden Perfection
Place the skillet in a preheated 375°F oven and bake for 20-25 minutes, or until the top is golden brown and bubbly. The edges should be crispy, and the cheese should be fully melted and slightly caramelized. If the top browns too quickly, tent loosely with foil to prevent over-browning.
Once baked, let the mac and cheese rest for 5 minutes before serving. This resting time allows the layers to set slightly, making it easier to slice and serve. The result is a hearty, protein-packed dish with a crispy breadcrumb topping and a creamy, cheesy center that holds together beautifully.
Pro Tips For Making Baked Mac And Cheese With Beef
- CRISP THE PASTA FIRST: I used to bake the macaroni straight from the pot, thinking it’d steam perfectly—wrong. Toss cooked elbows with 1 tablespoon butter and ½ teaspoon salt before mixing with cheese sauce. The extra dryness helps the crust form faster and stick better. (Yes, even if it looks weird at first.)
- DRAIN BEEF WELL: After browning the ground beef, don’t just scoop it out—let it sit in the strainer for 30 seconds. The residual grease in the pan will make your sauce greasy, and the beef will release more moisture into the casserole. Trust me, you’ll taste the difference in the final bite.
- STIR THE CHEESE LOW AND SLOW: Sharp cheddar loves to clump, and rushing the sauce is how you end up with grainy texture. Heat the milk and cream together first, then whisk in the cheese a handful at a time. Keep the heat at medium-low—if it starts splattering, you’re cooking too fast. (I learned this after scraping cheese off my ceiling.)
- BUILD THE CRUST IN STAGES: Skip the single-bake approach: after mixing everything, spread the mac and cheese in the dish, then sprinkle half the breadcrumbs on top. Bake uncovered at 375°F (190°C) for 15 minutes, then add the remaining crumbs and bake another 10–15 minutes. This guarantees a crispy top without burning the edges. (Your oven’s hot spots will thank you.)
Storing and reheating your leftovers
Refrigerator Storage
Store your baked mac and cheese with beef in an airtight container for up to 4 days in the refrigerator. Let it cool completely before sealing to prevent condensation. I like using glass Pyrex containers because they distribute heat evenly when reheating.
The flavors actually deepen overnight, making leftovers even more delicious. Just be sure to press plastic wrap directly on the surface before closing the lid to maintain moisture. ❄️
Freezer-Friendly Tips
This dish freezes beautifully for up to 3 months if properly portioned. After baking, let it cool completely, then transfer to freezer-safe bags or containers, leaving ½-inch headspace for expansion. I recommend freezing individual portions for easy reheating.
When ready to enjoy, thaw overnight in the fridge for best texture. The breadcrumb topping will need a quick broil to restore crispiness. 💫
Stovetop Reheating
For the creamiest results, reheat in a skillet over medium-low heat. Cover with a lid to trap steam and prevent drying. Add 1-2 tablespoons of milk or beef broth to restore moisture if needed.
Stir frequently and reheat for 10-15 minutes until bubbly throughout. This method preserves the crispy edges while gently warming the center. My secret? A splash of heavy cream at the end adds luxurious richness. 🔥
Oven Reheating
Preheat your oven to 350°F and cover the baked mac and cheese with foil before reheating. Place it on a baking sheet for easy handling and heat for 20-25 minutes. For extra crispiness, remove the foil during the last 5 minutes of heating.
This method works best for larger portions that need even heating. The breadcrumbs will regain their perfect crunch this way. ✨
Microwave Shortcuts
When time is tight, use the microwave with caution. Cover loosely with a microwave-safe lid or damp paper towel and heat on 50% power for 2-3 minutes, stirring halfway. Add 1 tablespoon of milk if the dish looks dry.
For a crispy top, transfer to a skillet and broil for 2-3 minutes after microwaving. This two-step method gives you the best of both worlds. 💡
Leftovers Hack
Transform leftover mac and cheese into mac and cheese croquettes by mixing with a beaten egg and breadcrumbs, then frying until golden. Or repurpose it as a breakfast hash by adding diced potatoes and fried eggs.
The possibilities are endless! I love using leftovers for quick lunches or game day snacks by cutting into bite-sized pieces and baking until crispy. 🌟
Nutrition facts
Frequently asked questions
Can I use ground turkey instead of beef?
Ground turkey works beautifully and makes this dish lighter while keeping the same hearty texture. For best results, use a 93/7 lean-to-fat ratio and add 1 extra tablespoon of butter to the beef browning step to compensate for the reduced fat. The flavor will be slightly milder, so consider adding ½ teaspoon smoked paprika to the seasoning for depth.
Why did my mac and cheese turn out watery?
Watery mac and cheese usually happens when the pasta overcooks or the sauce isn't thickened enough. First, always cook pasta al dente (1 minute less than package instructions) and rinse briefly with cold water. Second, ensure your roux (flour + butter) cooks for 2 full minutes before adding liquids. If it's still too thin, remove the dish from the oven, stir in 1 tablespoon of cornstarch mixed with 2 tablespoons of milk, then bake for 5-10 more minutes.
What's the best cheese substitute if I don't have sharp cheddar?
For a similar melt and flavor, try a mix of Monterey Jack and Gruyère (50/50 ratio). Gruyère adds nutty depth, while Monterey Jack melts smoothly. Avoid pre-shredded cheese—it contains anti-caking agents that make the sauce grainy. If you only have mild cheddar, add ½ teaspoon of cayenne pepper to the sauce for a sharper kick.
Can I make this dish ahead of time?
Yes! Assemble the dish up to 24 hours ahead and refrigerate uncovered for 1 hour before baking. This helps the flavors meld. Bake as directed, but add 5 extra minutes to the baking time since it starts cooler. For make-ahead freezer meals, assemble completely, freeze in portions, and bake straight from frozen at 375°F for 35-40 minutes, tented with foil for the first 25 minutes.
How can I make this dish lower in carbs?
Swap the elbow macaroni for cauliflower rice or shirataki noodles to cut carbs dramatically. For cauliflower rice, sauté it until tender (about 5 minutes) before mixing with the cheese sauce. Shirataki noodles need thorough rinsing and boiling for 2 minutes to remove excess sodium. Reduce the heavy cream to ½ cup and add ¼ cup of chicken broth to balance the richness.