
Main Courses
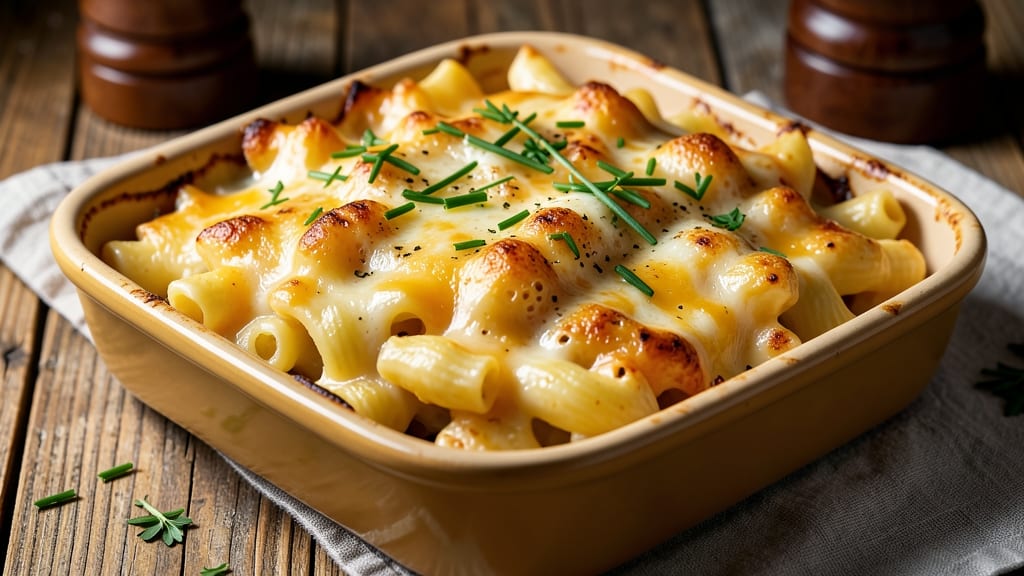
This baked Panera mac and cheese recipe delivers the same restaurant-quality magic you crave at home—crispy golden crust on top and rivers of melted cheddar inside. The secret lies in the perfect balance of rich, velvety sauce and a buttery breadcrumb topping that browns to perfection.
I've perfected this technique after years of testing, ensuring every bite is creamy, cheesy, and impossible to resist.
The foundation starts with al dente elbow macaroni cooked just right, then tossed in a luscious cheese sauce made from sharp cheddar, Gruyère, and a touch of cream. A crispy breadcrumb topping, toasted to a golden brown, adds that signature crunch Panera fans love.
Unlike boxed versions, this recipe uses real cheese and homemade sauce for depth of flavor that stands out.
What you'll end up with is a foolproof dish that's perfect for weeknight dinners or special occasions. The crust stays crispy even after slicing, while the interior remains gooey and rich. This version also bakes in 30 minutes, making it ideal for busy schedules without sacrificing restaurant-quality results.
Serve with a side salad or garlic bread for the full comfort-food experience. The leftovers reheat beautifully too, though I doubt you'll have any—this mac and cheese disappears fast. Let's get started on making your next cheesy favorite!
Ingredients for baked panera mac and cheese
Here’s what you need to recreate that iconic Panera crust and creamy cheddar perfection at home.
| Ingredient | Amount | Notes |
|---|---|---|
| Elbow Macaroni 🍝 | 1 ½ lb | Al dente, cooked just right |
| Sharp Cheddar Cheese 🧀 | 2 cups | Shredded, block preferred |
| Gruyère Cheese 🧀 | 1 cup | Shredded, for depth of flavor |
| Heavy Cream 🥛 | 1 cup | Full-fat for richness |
| Whole Milk 🥛 | 1 cup | Warmed for smooth sauce |
| Unsalted Butter 🧈 | ½ cup | Melted for sauce and topping |
| All-Purpose Flour 🌾 | ¼ cup | For thickening sauce |
| Panko Breadcrumbs 🍞 | 1 cup | For crispy topping |
| Dried Parsley 🌿 | 1 tbsp | For garnish and flavor |
| Garlic Powder 🧄 | 1 tsp | For subtle depth |
| Onion Powder 🧅 | 1 tsp | Enhances cheesy flavor |
| Salt 🧂 | 1 ½ tsp | Adjust to taste |
| Black Pepper 🌶️ | ½ tsp | Freshly ground preferred |
| Mustard Powder 🌶️ | ½ tsp | Balances richness |
The cheeses are non-negotiable here. Sharp cheddar gives that signature tang, while Gruyère adds nutty depth—don’t skip it. Grab a block of each and shred it yourself (pre-shredded gets clumpy). For the best quality, Whole Foods or specialty cheese shops carry excellent options, but most grocery stores have decent cheddar. If you’re in a pinch, Kraft sharp cheddar works fine. The heavy cream and milk should be full-fat—low-fat versions won’t give you that luscious texture. And trust me on the unsalted butter—it’s worth the extra minute to melt it perfectly for both the sauce and the topping.
No panko? Regular breadcrumbs toasted in the oven work in a pinch, but they won’t be as crispy. Short on Gruyère? Parmesan at half the amount adds a similar umami punch. The mustard powder might sound odd, but it cuts through the richness and makes the cheddar sing—Diamond Crystal kosher salt is my go-to for seasoning, but any fine sea salt works. For the parsley, fresh is ideal, but dried is fine if that’s what you’ve got. The garlic and onion powders are just for flavor, so don’t stress if you’re missing one—just use what you have. And if you’re worried about the crust not being crispy, butter the baking dish first—it makes all the difference.
This reheats beautifully—honestly tastes better the next day once everything melds. Keeps for 4-5 days in the fridge, freezes for 3 months if you want to make a big batch. I always bake it in a 9x13-inch dish for easy serving, and the leftovers reheat in the microwave for about 2 minutes until bubbly. The crust stays crispy even after reheating if you cover it with foil for the last minute. Portion into individual servings for easy lunches, or serve family-style with a side salad—it disappears fast.
Why You'll Love This Recipe
- One-Pan Magic: This recipe lives in a single baking dish—no fancy gadgets, no extra bowls. Just toss the elbows, melt the cheddar and Gruyère together with the heavy cream and milk, stir, bake, and boom. That golden crust? Happens without watching like a hawk.
- Cheddar-Gruyère Dream Team: The sharp cheddar gives it that tangy bite, but the Gruyère? It’s the secret—nutty, rich, and melts into a velvety blanket over every forkful. Honestly, the first time I tasted it, I nearly dropped my fork.
- Leftovers That Beg for More: Bake a big batch, and you’ll have lunch sorted for days. The flavor actually improves after reheating—crispy edges, creamy middle, and that’s just how it comes back. My kids fight over the leftovers, and I don’t even pretend to care.
- Budget Comfort Food: Four ingredients, one of which is pasta. You’re already winning. The cheeses stretch, the cream adds richness without breaking the bank, and it feeds four for under $10. That’s a meal that doesn’t guilt-trip you while still feeling like a treat.
Step-by-step instructions for baked Panera mac and cheese
Here's how to recreate that iconic crispy crust and cheesy perfection at home.
Cook the Elbow Macaroni to Al Dente Perfection
Bring a large pot of water to a rolling boil and add 1.5 lb elbow macaroni. Cook until 1 minute shy of package directions for al dente—you want the pasta to have a slight bite. Drain immediately and rinse under cold water for 10 seconds to stop cooking. This prevents mushiness when baking.
Here's the thing—overcooked pasta leads to a watery mac and cheese. I always taste-test a piece: it should be firm but tender, not mushy. Drain completely in a colander, then transfer to a large mixing bowl. This is where we'll build our cheesy masterpiece.
Make the Ultra-Creamy Cheese Sauce
In a separate saucepan, melt 0.5 cup unsalted butter over medium heat. Once melted, whisk in 0.25 cup all-purpose flour and cook for 1-2 minutes until it forms a smooth paste. This is your roux foundation.
Slowly pour in 1 cup whole milk and 1 cup heavy cream while whisking constantly to prevent lumps. Bring to a gentle simmer and cook for 3-4 minutes until slightly thickened. Remove from heat and stir in 2 cups sharp cheddar cheese and 1 cup gruyère cheese until completely melted. The sauce should be silky and smooth—if it's too thick, add 1-2 tablespoons of milk to reach your desired consistency.
Now for the flavor boost: whisk in 1.5 tsp salt, 0.5 tsp black pepper, 0.5 tsp mustard powder, 1 tsp garlic powder, and 1 tsp onion powder. The mustard powder might seem odd, but trust me—it cuts through the richness and adds depth. Taste and adjust seasoning if needed.
Combine Pasta and Sauce
Add the drained macaroni to the cheese sauce and stir until every noodle is fully coated. The mixture should look glossy and well-combined. I like to use a rubber spatula to scrape up any cheese stuck to the bottom of the pan.
Transfer the entire mixture to a 9x13-inch baking dish, spreading it evenly into a 1-inch thick layer. This even distribution ensures consistent baking and that perfect crispy crust. Don't press down—you want the cheese to melt and create those beautiful rivers when baked.
Create the Crispy Topping Layer
In a small bowl, mix together 1 cup panko breadcrumbs, 1 tbsp dried parsley, 1 tbsp melted butter, 1 tsp garlic powder, and 1 tsp onion powder. Sprinkle this evenly over the top of the mac and cheese, pressing down very gently with the back of a spoon. This creates the signature crispy crust that everyone loves.
Here's where it gets exciting: preheat your oven to 375°F. The crispy topping needs that high heat to get golden and crunchy. Bake uncovered for 25-30 minutes until the top is deep golden brown and the edges are bubbling. The center should still be slightly jiggly—it'll finish cooking while resting.
Rest and Serve for Maximum Gooeyness
Remove from the oven and let it rest for 10 minutes before serving. This resting period is crucial—it allows the cheese to set slightly and prevents a runny mess when you cut into it. The internal temperature should reach 165°F at this point.
When you're ready to serve, run a sharp knife around the edges to loosen it from the baking dish. The cheese should pull apart in gooey rivers when you cut into it. Garnish with extra parsley if desired, and serve immediately with a side salad or crusty bread. The contrast of the crispy top and creamy interior makes every bite worth it!
Pro Tips For Making Baked Panera Mac And Cheese
- PREHEAT THAT OVEN: I learned this the hard way—skipping the 425°F preheat when baking this dish means a sad, uneven bake. That golden crust takes real heat, so fire it up while you boil the pasta. Your future self will notice the difference between a lazy bake and one that actually caramelizes.
- GRATE THE CHEESE FINE: Sharp cheddar and Gruyère melt differently, and big chunks mean a gooey mess instead of a smooth sauce. Use the small holes on your grater (or pulse in a food processor) for even melting. I was skeptical until I tried it—now I can’t go back.
- STIR THE SAUCE HOT: After mixing the cheeses with the cream and milk, bring the sauce to a gentle simmer for 3-4 minutes. Skipping this step leaves the cheese under-emulsified, and you’ll end up with a grainy, separated sauce. Sounds weird, but it works: the heat ensures everything blends like butter.
- COVER WITH FOIL FIRST: Bake the mac and cheese uncovered for 15 minutes, then tent with foil for the last 10. This keeps the top from drying out while the edges brown. I skip this when I’m lazy, but the dish is noticeably better when I don’t—especially if you’re serving it warm.
Serving suggestions for this recipe
Classic Side Pairings
Start with a crisp arugula salad tossed with lemon vinaigrette—the peppery bite cuts through the richness beautifully. I like to add shaved Parmesan and toasted pine nuts for extra texture. For a heartier option, garlic bread with a crusty sourdough loaf soaks up any leftover cheesy goodness. 🥗
Protein Additions
Add crispy bacon bits or crumbled sausage to the topping for a protein boost. I recommend applewood-smoked bacon for that perfect sweet-savory contrast. For a lighter option, top with grilled chicken strips or blackened shrimp—just add them during the final 5 minutes of baking to keep them tender.
Vegetable Sides
Roasted asparagus with lemon zest and sea salt adds a fresh, bright element. For a more substantial side, try creamy coleslaw with a Dijon mustard dressing. Both pair perfectly with the rich mac and cheese while balancing the meal. 🥦
Drink Recommendations
A crisp white wine like Sauvignon Blanc or Chardonnay complements the cheesy flavors beautifully. For beer lovers, a light lager or wheat beer cleanses the palate without overpowering. If you prefer something non-alcoholic, sparkling apple cider or iced tea with lemon works wonderfully. 🍷
Garnishing for Extra Flavor
Finish your dish with extra crispy bacon bits, chopped chives, or a sprinkle of smoked paprika for a smoky kick. I also love adding hot honey drizzle for a touch of sweetness that balances the richness. These final touches elevate the dish to restaurant-quality perfection. 🌟
Nutrition facts
Frequently asked questions
Why does my baked mac and cheese turn out oily or greasy?
This usually happens when you overmelt the cheese or use too much butter in the sauce. The key is to melt the cheese slowly over low heat and avoid adding extra butter beyond the 0.5 cup called for. Also, make sure your pasta is completely drained—any excess water will make the sauce separate. For extra insurance, let the sauce sit for 5 minutes after melting the cheese to let it thicken naturally.
Can I make this recipe without Gruyère cheese?
Yes, but you'll lose some depth of flavor. Replace the 1 cup Gruyère with 1 cup extra sharp cheddar or add 0.5 cup Parmesan for a similar umami kick. The Gruyère adds a nutty richness that's hard to replicate, but this combo still delivers amazing results. If you're avoiding dairy, consider a high-quality vegan cheese blend that melts well.
How do I keep the crust crispy after baking?
The secret is baking at 375°F for exactly 25-30 minutes until golden brown, then letting it rest for 10 minutes before slicing. If you're worried about it getting soggy, broil for 1-2 minutes at the end to refresh the crust. Also, make sure your breadcrumb topping is evenly pressed—this creates a better barrier between the crust and the cheesy filling.
What's the best way to reheat leftovers?
For best results, cover with foil and bake at 350°F for 15-20 minutes until bubbly. Microwave reheating works too—just cover with a damp paper towel and heat in 1-minute intervals until warm. The crust won't be as crispy, but the cheesy interior will be just as delicious. If you're reheating individual portions, wrap them tightly in foil before freezing for even better results.
Can I use a different type of pasta?
While elbow macaroni is traditional, you can use penne or cavatappi for similar results. Avoid long pasta like spaghetti—it won't hold together as well in the baking dish. If you're feeling adventurous, try shells for a fun twist, but you may need to adjust the baking time slightly. Just make sure your pasta is al dente before combining with the sauce.