
Sauces & Condiments
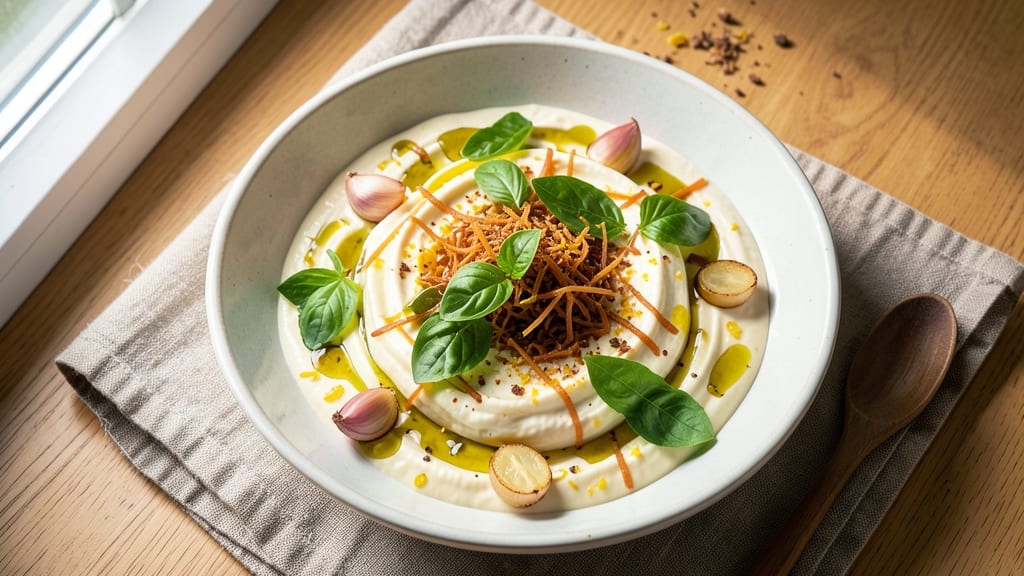
This basil cheese spread recipe transforms simple ingredients into a herby, creamy dip that elevates every bite of fresh bread. The perfect balance of fresh basil and rich cheese creates a velvety texture with bright, aromatic flavors that linger.
What makes this recipe special is how effortlessly it brings restaurant-quality taste to your kitchen table without requiring advanced techniques.
The foundation of this spread lies in the combination of soft cream cheese and sharp cheddar, blended until silky smooth. Fresh basil leaves are finely chopped and folded in just before serving to preserve their vibrant color and bright flavor.
A touch of garlic and lemon zest adds depth, ensuring every spoonful delivers a harmonious blend of creaminess and freshness.
What you'll end up with is a creamy, spreadable dip that's ideal for pairing with crusty bread, crackers, or even as a sandwich filling. The texture is rich yet light, with the basil providing a refreshing contrast to the cheesy base.
This recipe is designed to be made in minutes, making it perfect for last-minute gatherings or a quick snack.
Serve immediately for the freshest flavor, or prepare ahead and store in the refrigerator for up to three days. The flavors only deepen over time, making it an excellent make-ahead option for parties or meal prep.
Let's create this versatile, crowd-pleasing spread that's sure to become a staple in your kitchen.
Ingredients for basil cheese
Rich cheeses meet bright herbs in this velvety, restaurant-worthy dip.
| Ingredient | Amount | Notes |
|---|---|---|
| Cream Cheese 🧀 | 8 oz | Soft room-temperature block |
| Sharp Cheddar Cheese 🧀 | 4 oz | Shredded or block form |
| Fresh Basil Leaves 🌿 | ½ cup | Packed, stems removed |
| Garlic Cloves 🧄 | 2 cloves | Minced or pressed |
| Lemon Zest 🍋 | 1 tbsp | From 1 medium lemon |
| Extra-Virgin Olive Oil 🫒 | 2 tbsp | For creaminess |
| Salt 🧂 | ½ tsp | Diamond Crystal preferred |
| Black Pepper 🌶️ | ¼ tsp | Freshly ground |
| Crusty Bread 🍞 | 1 loaf | For serving (optional) |
The cheeses are the heart of this spread. Cream cheese needs to be soft—microwave it for 15 seconds if it's too firm. For the cheddar, sharp varieties like Cabot or Tillamook give the best flavor. Fresh basil is non-negotiable here—garden-fresh leaves from the grocery store's produce section (not the plastic containers) make all the difference. If you're using a bagged mix, pick one with the brightest green leaves. The olive oil should be extra-virgin—none of that cheap cooking oil. Look for bottles labeled 'first cold press' at Whole Foods or Trader Joe's for the best quality.
No fresh basil? Dried basil at half the amount works in a pinch, though it won't have that same vibrant flavor. Short on sharp cheddar? Parmesan or pecorino add a nice tang. The garlic can be roasted for a milder flavor—just wrap the cloves in foil and bake at 400°F for 10 minutes. For the lemon zest, avoid the white pith—it's bitter. If you don't have a zester, a microplane works perfectly. The olive oil can be swapped for avocado oil if you prefer a neutral taste. For a tangier spread, add 1 tsp of Dijon mustard to the blend.
This spread keeps beautifully in the fridge for 3-4 days—the flavors actually deepen over time. For longer storage, portion into small containers and freeze for up to 3 months. Thaw overnight in the fridge. The texture stays creamy when refrigerated, so no need to worry about it getting grainy. Serve with warm crusty bread, crackers, or even as a sandwich spread. Double the recipe—it disappears fast at gatherings.
Why You'll Love This Recipe
- No-Fuss Spread: I swear by this when I’m staring at an empty fridge at 6:30 PM. Just mix the softened cream cheese with shredded cheddar, fold in chopped basil and minced garlic, then a sprinkle of lemon zest—no baking, no waiting. It’s the kind of recipe that makes me feel like I’ve actually cooked something.
- Bright & Tangy Magic: That lemon zest? It cuts through the richness of the cream cheese and cheddar like a summer breeze. The basil adds freshness, while the sharp cheddar gives it a little bite—it’s creamy but never heavy, and honestly, it’s the kind of flavor that sticks with you.
- Game for Any Meal: Slather it on toast for breakfast, stuff it into grilled chicken for dinner, or serve it with crackers when friends drop by. I’ve even used it as a dip for veggies at potlucks—no one ever asks what’s in it, they just keep reaching for more.
- Leftovers That Don’t Suck: Unlike most spreads, this stuff actually improves overnight. The flavors meld, and it’s still perfect for sandwiches or as a quick snack the next day. Plus, it’s cheap to make—just a few dollars’ worth of ingredients that stretch for days. My wallet and my taste buds thank me.
Step-by-step instructions for basil cheese spread
Here's how to create a perfectly balanced, creamy basil cheese spread that pairs beautifully with crusty bread.
Softened Cream Cheese and Cheddar
Place the 8 oz cream cheese in a mixing bowl and let it sit at room temperature for 10-15 minutes until completely softened but not melted. I press the center gently with my finger—it should leave a slight indent but not spread completely. Add the 4 oz sharp cheddar cheese (grated if using block form) and mix with a hand mixer on low speed for 1 minute until fully combined and smooth.
This step ensures the cream cheese blends evenly with the cheddar, preventing any grainy texture. If the mixture feels too thick, let it sit for another 2-3 minutes to soften further. The goal is a velvety base that will incorporate the fresh herbs beautifully.
Add Garlic and Olive Oil
Add the 2 cloves minced garlic and 2 tbsp extra-virgin olive oil to the cheese mixture. Mix on low speed for 30 seconds until the garlic is fully incorporated. The aroma should be noticeably stronger—this is when the garlic's flavor begins to infuse.
Here's the thing—don't rush this step. The garlic needs time to meld with the cheese before adding the basil. If you notice the mixture starting to separate, use a rubber spatula to gently fold it back together. The olive oil adds richness and helps create that signature creamy texture.
Incorporate Fresh Basil and Citrus
Add the 0.5 cup packed fresh basil leaves (stems removed) and 1 tbsp lemon zest to the mixture. Pulse with a hand mixer on low speed for 10-15 seconds just to chop the basil slightly—you want visible flecks throughout, not a completely smooth texture. The basil should look vibrant and bright green.
This is where the spread gets its signature herby brightness. The lemon zest brightens the flavors and balances the richness of the cheese. If you're using very large basil leaves, give them a quick rough chop with kitchen shears first to make blending easier.
Season and Blend to Perfection
Add the 0.5 tsp salt and 0.25 tsp black pepper to the mixture. Mix on low speed for 30 seconds until fully combined. Taste the spread and adjust seasoning if needed—you might want to add a pinch more salt or pepper depending on your cheddar's sharpness.
For the final texture, I use a rubber spatula to gently fold the mixture for 1 minute by hand. This ensures the basil is evenly distributed without overmixing, which could make the spread too smooth. The perfect consistency should be thick but spreadable, with visible basil flecks throughout.
Chill and Serve
Transfer the basil cheese spread to an airtight container and refrigerate for at least 1 hour before serving. This chilling time allows all the flavors to meld together perfectly. When ready to serve, give it a quick stir to redistribute any separated ingredients.
Serve with the 1 loaf crusty bread, sliced into thick pieces. The contrast between the warm, crisp bread and cool, creamy spread creates an irresistible combination. For extra presentation, garnish with additional basil leaves or a sprinkle of black pepper right before serving.
Pro Tips For Making Basil Cheese
- Sauté Garlic Low: If you burn the garlic, you’ll taste ash—not flavor. Cook it over medium-low heat until just golden, about 3-4 minutes, then remove it before it turns nutty. I learned this the hard way when my first batch tasted like a charred campfire instead of fresh basil and cheese.
- Pulse Cheese Twice: Don’t just hit pulse once on the food processor—stop, scrape the sides, and pulse again. Sharp cheddar and cream cheese clump differently, and skipping this step means uneven texture. (Yes, even if you’re impatient like me.)
- Chill the Mixture: Spread the basil-cheese blend on parchment and refrigerate for 20 minutes before using. It firms up, makes slicing cleaner, and prevents the cream cheese from melting into a sad, greasy puddle. My grandmother swore by this, and she was right.
- Stack Basil Leaves: Instead of chopping basil into tiny bits, stack 3-4 leaves, roll tightly, and slice thin strips. You’ll get more flavor per bite and avoid the sad, wilted look that happens when you just toss it in. (Sounds weird, but it works.)
Essential equipment for perfect results
Mixing Tools
You'll need a hand mixer or stand mixer with a paddle attachment for smooth blending—I recommend a KitchenAid Artisan for its consistent power. A rubber spatula is essential for folding in the basil at the end, ensuring even distribution without overmixing.
For garlic prep, a garlic press or microplane saves time compared to mincing by hand. 🌿
Cheese Prep Essentials
Invest in a fine grater (like the Microplane) for sharp cheddar if using block form—it creates finer, more flavorful shreds. A small mixing bowl (8-10 inch diameter) works best for this recipe's volume, preventing spills during blending.
For lemon zest, a zester or microplane gives you the cleanest, most flavorful strips without the bitter pith.
Storage Containers
Use glass airtight containers (like Pyrex) for refrigeration—they maintain freshness longer than plastic. For freezing, quart-sized silicone molds work perfectly, allowing for easy portioning. Label containers with dates to track freshness—this spread keeps for 3-4 days refrigerated or 3 months frozen. ❄️
Optional Garnishes
A pair of kitchen shears comes in handy for trimming basil stems efficiently. For presentation, keep extra fresh basil leaves and a pepper grinder nearby to garnish before serving. A small offset spatula helps create elegant swirls when plating the spread on bread or crackers.
Temperature Tools
While not required, a small digital thermometer helps verify cream cheese softness—it should reach 60-65°F for perfect blending. For garlic lovers, a small saucepan is useful if roasting cloves (wrap in foil and bake at 400°F for 10 minutes).
These tools elevate the recipe from good to exceptional without being essential. 🔥
Nutrition facts
Frequently asked questions about basil cheese spread
Can I use dried basil instead of fresh?
You can substitute dried basil, but use only 1/4 cup (half the amount) and crush it lightly between your fingers first. Fresh basil adds vibrant color and a brighter flavor that dried basil can't fully replicate. If you must use dried, add it at the very end and fold gently to preserve texture.
What's the best cheese alternative if I don't have sharp cheddar?
Try pecorino romano or Parmesan for extra sharpness, or swap in Gouda for a milder, creamier option. For a tangy twist, feta works well but may alter the texture slightly. Always use 4 oz total of your chosen cheese to maintain the recipe's balance.
Why did my spread separate after refrigerating?
This happens when the cream cheese cools too quickly or gets overmixed. Stir the spread gently before serving, or let it sit at room temperature for 10 minutes to soften. For next time, chill for only 30 minutes before serving, or add 1 tsp Dijon mustard to help bind the mixture better.
Can I make this spread without a mixer?
Use a sturdy spoon or wooden spatula to mix by hand. Work in a small bowl and fold vigorously for 3-4 minutes until completely smooth. The key is patience—let the cream cheese soften fully first, and mix in short bursts to prevent overheating from your hands.
How can I make this spread spicier?
Add 1/4 tsp cayenne pepper or 1/2 tsp red pepper flakes when mixing the seasonings. For heat with depth, fold in 1 tbsp chopped jalapeño (seeds removed) along with the basil. Start with small amounts—you can always add more, but you can't remove spice once it's mixed in!