
Snacks
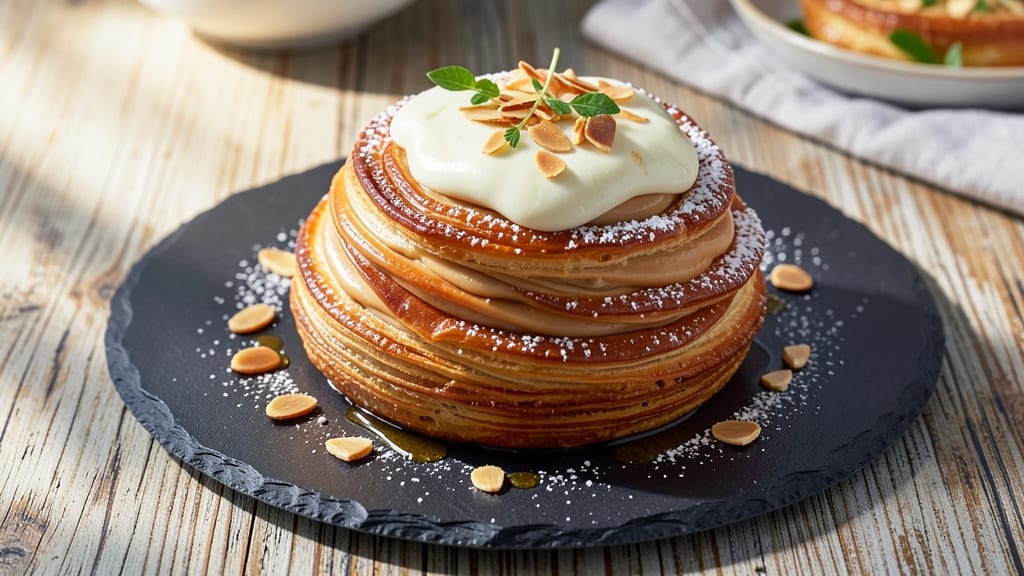
This almond cheese danish recipe delivers the perfect balance of flaky, buttery layers and rich, nutty sweetness that rivals bakery versions. 💛 The secret lies in a well-proofed laminated dough and a creamy almond filling made with almond paste and cream cheese, creating a texture that's both tender and crisp.
I've perfected this recipe over years of baking, ensuring every bite offers that signature Danish experience—without the fuss of professional equipment.
The process begins with a simple yet precise dough that's rolled and folded multiple times to create those coveted flaky layers. While it requires patience (especially during proofing), the result is worth every minute—golden, crisp edges that give way to a soft, airy interior.
The almond filling is where the magic happens: a blend of almond paste, cream cheese, and a touch of vanilla creates a filling that's rich, smooth, and packed with nutty flavor.
Once baked to a perfect golden brown, the danishes are brushed with a light almond glaze for extra shine and a subtle crunch. The contrast of the flaky pastry with the creamy, nutty filling makes each bite irresistible.
Whether you're baking for a special occasion or treating yourself to a homemade indulgence, this recipe delivers restaurant-quality results with a touch of homey charm.
Ready in about 3 hours (including proofing time), this recipe is ideal for weekend baking projects. The dough can be made ahead and refrigerated overnight, making it a convenient option for busy schedules.
With just a few simple ingredients and a bit of technique, you'll have danishes that look and taste like they came straight from a European bakery.
Ingredients for almond cheese danish
Sixteen ingredients for bakery-style danishes with crisp layers and velvety almond filling.
| Ingredient | Amount | Notes |
|---|---|---|
| Unsalted Butter 🧈 | 1 ½ cups | Cold, cubed for dough layers |
| All-Purpose Flour 🌾 | 4 cups | Plus 2 tbsp for dusting |
| Granulated Sugar 🍚 | ¼ cup | For dough enrichment |
| Instant Yeast 🍞 | ½ tsp | Active dry works too |
| Salt 🧂 | ½ tsp | Diamond Crystal preferred |
| Almond Paste 🥜 | 1 cup | High-quality, smooth texture |
| Cream Cheese 🧀 | 8 oz | Full-fat, softened at room temp |
| Vanilla Extract 🍯 | 1 tsp | Pure extract preferred |
| Large Eggs 🥚 | 1 whole | Room temperature |
| Powdered Sugar 🍚 | ½ cup | For glaze |
| Almond Extract 🥜 | ½ tsp | For glaze flavor |
| Milk 🥛 | 2 tbsp | For glaze consistency |
The butter is non-negotiable—European-style unsalted like Plugrá or Kerrygold creates the best flakiness. If you can't find it, Land O'Lakes European Style works in a pinch. For the almond paste, Trader Joe's or Ghirardelli are reliable brands—avoid the canned kind with water, which makes the filling gummy. The cream cheese should be full-fat (none of that low-fat nonsense), and I always buy Philadelphia brand because it's consistent. Keep your yeast in the freezer until needed—it stays potent for years that way.
No almond extract? Vanilla bean paste adds depth without the same intensity. Short on almond paste? Mix finely ground almonds with powdered sugar (1:1 ratio) for a quick substitute, though texture won't be identical. The dough calls for all-purpose flour, but if you're feeling fancy, King Arthur Bread Flour gives a slightly chewier texture. For the glaze, powdered sugar from a sealed container prevents clumping—those little shakers at the grocery store are a baking fail waiting to happen. And if you're making these ahead, the dough can be refrigerated for up to 48 hours before shaping.
Store the baked danishes in an airtight container at room temperature for 2 days—they're best eaten fresh, but the filling stays creamy for that time. For longer storage, freeze the unfrosted danishes for up to 3 months. I like to portion them individually in freezer bags, then thaw at room temperature for 1-2 hours before serving. The glaze will soften slightly, but a quick broil for 30 seconds brings back that subtle crunch. And if anyone asks, these taste better the next day—proof that patience pays off in baking.
Why You'll Love This Recipe
- No Yeast Struggles: I’ve made enough stiff doughs in my life to know this isn’t one of them. The instant yeast here wakes up fast—just mix, let it sit for 10 minutes, and you’re rolling. No waiting for a slow rise or kneading until your arms give out.
- Buttery Crisp Magic: That first bite? The flaky layers crackle like a fresh pastry should, all thanks to cold butter cut into the flour. It’s not just any old danish—it’s got that right texture: crisp edges hugging a tender, chewy center. (Honestly, I’ve been known to eat them straight from the pan.)
- Breakfast or Snack Star: Make a batch on Sunday, and you’ve got something for every moment: a quick breakfast with jam, a midday pick-me-up with coffee, or even a fancy-ish dessert when you’re hosting. The dough’s forgiving enough that I’ve even used it for cinnamon rolls—no one’s complained.
- Pantry-Friendly Luxury: You’re probably already stocked for this. Butter, flour, sugar—basic stuff that doesn’t scream “special occasion.” Yet somehow, it feels like a treat. And if you bake extra? They freeze like a dream, pulling straight from the fridge to the oven when you need a fast win.
Step-by-step instructions for almond cheese danish
Master the art of flaky layers with this precise method for golden, nutty perfection.
👨🍳 Step 1: Prepare the Dough for Maximum Flakiness
In a large mixing bowl, combine the 4 cups all-purpose flour, 0.25 cup granulated sugar, 0.5 tsp instant yeast, and 0.5 tsp salt. Whisk gently to distribute the dry ingredients evenly. Cut in the 1.5 cups cold cubed unsalted butter using a pastry cutter or your fingers until the mixture resembles coarse crumbs with pea-sized butter pieces remaining.
This cold butter technique is critical—it creates steam pockets when baked, giving those signature flaky layers. If the butter melts too soon, chill the dough for 15 minutes before proceeding. Add 1 whole large egg and mix until just combined, then shape into a disk, wrap in plastic, and refrigerate for at least 2 hours (overnight is ideal).
🍳 Step 2: Roll and Layer the Almond Cheese Filling
On a lightly floured surface, roll the chilled dough to a 12x16-inch rectangle (about ¼-inch thick). Spread the 8 oz softened cream cheese evenly over the dough, leaving a ½-inch border. In a small bowl, mix the 1 cup almond paste with 1 tsp vanilla extract until smooth, then spread this mixture over the cream cheese layer.
Roll the dough tightly into a log, sealing the edges well. This prevents filling from leaking during baking. Wrap the log in plastic and refrigerate for 30 minutes to firm up before shaping into danishes. Here's the thing—don't skip the chilling. Warm dough spreads unevenly, ruining that perfect flaky texture we're after.
🥘 Step 3: Shape and Proof the Danish
Cut the chilled log into 6 equal pieces and shape each into a crescent. Place them on a parchment-lined baking sheet, spacing them 2 inches apart. Cover with a clean kitchen towel and let proof in a warm place for 1-1.5 hours until puffed about 50% larger. The edges should look slightly rounded—not flat.
Preheat your oven to 375°F while the danishes proof. This temperature gives you that perfect balance of golden browning without over-baking. If your kitchen is cold, proofing may take longer. A quick test: gently press a finger into the dough—it should spring back slowly, not immediately.
🔥 Step 4: Bake to Golden Perfection
Bake the danishes for 18-22 minutes until they're deep golden brown with a crisp exterior. Rotate the baking sheet halfway through for even browning. The centers should still feel slightly soft—they'll firm up as they cool. Don't overbake; these should be tender inside with that signature flaky crust.
For extra shine, brush the warm danishes with a simple glaze made by whisking together the 0.5 cup powdered sugar, 0.5 tsp almond extract, and 2 tbsp milk until smooth. Let the glaze set for 10 minutes before serving. This step isn't just for looks—it adds that professional finish that makes all the difference.
Pro Tips For Making Almond Cheese Danish
- Chill the Dough Twice: Danish dough needs patience—let it rest in the fridge for 24 hours, then shape and proof again. Skipping the first rest makes the final rise uneven, and the texture will be dense instead of flaky. (Yes, it’s tempting to rush, but the flavor and layers are worth the wait.)
- Use Cold Butter Blocks: Cut your unsalted butter into 1-inch cubes and keep them ice-cold when mixing into the dough. Warm butter = tough, greasy layers. Cold butter creates those melt-in-your-mouth flakes you actually want. (I learned this the hard way after making a batch that tasted like a biscuit.)
- Don’t Overproof the Danish: The dough should double in size during its final proof—no more, no less. Overproofing means a collapsed, gummy mess when baking. Test by gently pressing a finger into the dough; if it springs back slowly, it’s ready. (Your future self will thank you for not guessing.)
- Brush with Egg Wash Early: Whisk 1 egg with 1 tablespoon water and brush it on the shaped danish right after shaping, then again before baking. This seals the surface for a golden crust and prevents cracking. (Sounds weird, but it works—especially if you’re rolling out the dough in a humid kitchen.)
Dietary considerations for almond cheese danish
Gluten-Free Adaptation
For a gluten-free version, replace the 4 cups all-purpose flour with a 1:1 gluten-free flour blend like King Arthur Measure for Measure. Add 1 tsp xanthan gum to improve elasticity, as gluten-free doughs lack natural structure.
Chill the dough longer—3-4 hours—since gluten-free flours absorb moisture differently. The filling remains the same, but expect slightly denser layers due to the lack of gluten development. 🥜
Dairy-Free Options
Swap the 8 oz cream cheese for 8 oz dairy-free cream cheese like Kite Hill Almond Milk Cream Cheese. Use 1 cup almond paste and 2 tbsp coconut cream for binding instead of eggs.
The glaze can be made with powdered sugar and almond milk instead of dairy milk. The texture will be slightly less rich, but the nutty flavor remains intact.
Vegan Modifications
For a fully vegan version, replace the 1 whole egg with 1 tbsp ground flaxseed mixed with 3 tbsp water (let it sit for 5 minutes to thicken). Use vegan butter** like Miyoko's for the dough, and ensure your almond paste is vegan-certified.
The filling stays the same, but the dough will be more tender. Proofing time may extend to 2 hours due to the lack of gluten elasticity.
Nut-Free Alternative
If almonds are a concern, replace the 1 cup almond paste with a 1:1 mixture of sunflower seed butter and powdered sugar. Use 1 cup sunflower seeds finely ground to mimic almond paste texture.
The flavor will be subtly different but still rich and creamy. The dough and other ingredients remain unchanged, ensuring a safe yet delicious option for nut-free diets.
Lower Sugar Options
Reduce the 0.25 cup granulated sugar in the dough to 0.125 cup and use monk fruit sweetener for half the amount to maintain sweetness without excess sugar. In the glaze, replace 0.5 cup powdered sugar with 0.25 cup erythritol or monk fruit powdered sweetener.
The filling can stay the same, but the overall sweetness will be noticeably lighter while keeping the same creamy texture.
Nutrition facts
Frequently asked questions
Can I make this almond cheese danish without almond paste?
Mix 1 cup finely ground almonds with ½ cup powdered sugar to create a homemade almond paste substitute. For extra richness, add 1 tbsp melted butter to the mixture. The texture won't be as smooth as store-bought, but it'll still deliver that delicious nutty flavor in the filling.
Why did my danishes turn out dense instead of flaky?
Dense danishes usually mean the butter melted too soon during dough prep. Keep everything ice cold (even your mixing bowl) and avoid overworking the dough. Another common mistake is skipping the 2-hour chilling time—this step is crucial for developing those flaky layers. If your kitchen feels warm, chill the dough longer or proof in a cooler spot.
How can I make these danishes ahead of time?
You can prep the dough up to 48 hours in advance and store it wrapped tightly in plastic in the fridge. Shape and proof the danishes 24 hours before baking, then store them unbaked in the fridge. When ready to bake, let them sit at room temperature for 30 minutes before popping them in the oven. The filling stays creamy when baked fresh, but you can also freeze unbaked danishes for 3 months.
What's the best way to store leftover almond cheese danishes?
Keep them in an airtight container at room temperature for 2 days maximum—the filling softens over time. For longer storage, freeze the unfrosted danishes in a single layer before transferring to a bag. Thaw overnight in the fridge, then reheat in a 350°F oven for 5-10 minutes to restore crispness. The glaze will need reapplying after reheating.
Can I use this dough for other pastries?
Yes! This same dough works beautifully for cinnamon rolls or twists—just swap the almond filling for your favorite sweet or savory mixture. The laminated technique creates perfect flaky layers for any shape. For savory options, try a herb cheese filling or spinach and feta combination instead of the almond mixture.