
Breakfast & Brunch
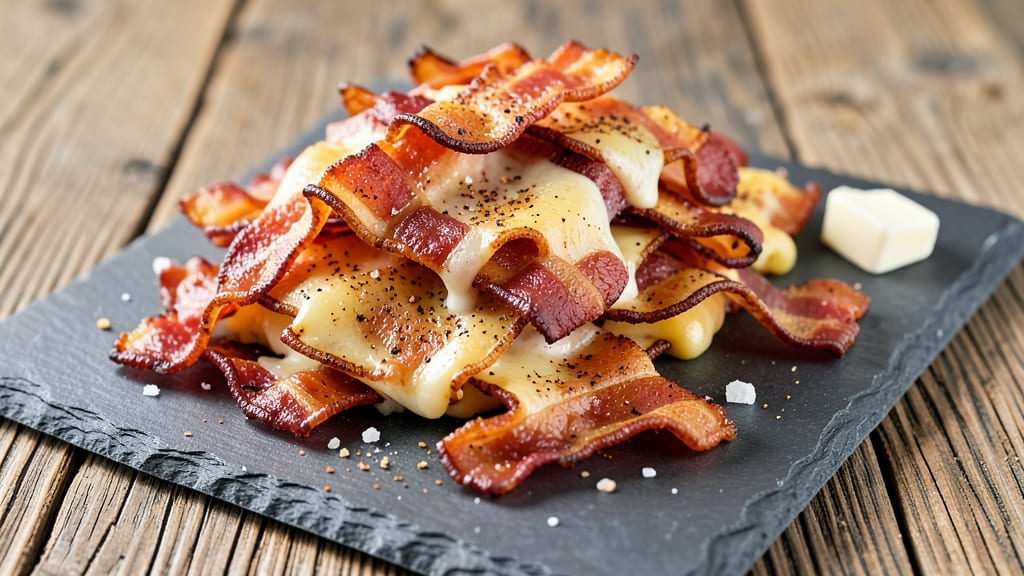
This bacon cheese crisps recipe delivers the perfect balance of smoky, salty crunch and gooey, pull-apart cheese corners that disappear in seconds. 🔥 The secret lies in crisping the bacon first—its rendered fat creates a flavorful canvas for the melted cheese, while the high-heat baking transforms everything into addictive, shatteringly crisp bites with pockets of molten goodness inside.
What makes these crisps truly special is their simplicity: just three core ingredients—thick-cut bacon, sharp cheddar, and a touch of cream cheese—come together in under 20 minutes with minimal effort.
The bacon forms a crispy lattice that holds the cheese in place, while the baking sheet ensures even browning and that satisfying crunch you can't resist. No fancy equipment needed, just a baking sheet and your favorite cheeses.
By the time they emerge from the oven, you'll have a plate of golden, crispy rectangles with caramelized edges and gooey centers that pull apart dramatically. The smoky-salty bacon flavor pairs perfectly with the rich, tangy cheese, creating a snack that's impossible to stop eating.
These crisps are ideal for game day, movie nights, or as a protein-packed breakfast side.
For extra flavor, try adding a pinch of smoked paprika or garlic powder to the cheese mixture, or swap out cheddar for pepper jack for a spicy kick. Serve with marinara sauce, ranch dressing, or even honey for dipping—whatever suits your craving. Let's get crisping!
Ingredients for bacon cheese crisps
Three core ingredients plus a few secret boosters—this is all you need for irresistible crispy bites.
| Ingredient | Amount | Notes |
|---|---|---|
| Thick-Cut Bacon 🥓 | 8 oz | Thick-cut for best crispiness |
| Sharp Cheddar Cheese 🧀 | 1 cup | Shredded, aged for tanginess |
| Cream Cheese 🧀 | 4 oz | Room temperature for blending |
| Garlic Powder 🧄 | ½ tsp | Optional for extra flavor |
| Smoked Paprika 🌶️ | ¼ tsp | For smoky depth (optional) |
| Unsalted Butter 🧈 | 2 tbsp | Melted for cheese mixture |
| All-Purpose Flour 🌾 | 1 tbsp | For crispy texture (optional) |
| Kosher Salt 🧂 | ½ tsp | Enhances all flavors |
| Black Pepper 🌶️ | ¼ tsp | Freshly ground preferred |
The bacon is non-negotiable here—thick-cut makes all the difference for that perfect crunch. Grab the thickest bacon your store carries (usually labeled 1/4-inch or thicker). Oscar Mayer or Costco brands are my go-tos, but any name brand works. For the cheese, sharp cheddar is essential—it melts beautifully and has that perfect tang. If you're feeling fancy, grab a wedge from the deli counter instead of pre-shredded (it melts so much better). The cream cheese adds that gooey pull-apart texture—just make sure it's room temperature before mixing.
No thick-cut bacon? Regular bacon cut into strips works, but they won't be as crispy. Swap cheddar for pepper jack or gouda if you want different flavors—just adjust the heat level to your taste. Out of smoked paprika? Garlic powder or onion powder gives a similar boost. The butter and flour combo is optional but creates a lighter, crispier crust—skip it if you prefer a simpler version. Pro tip: line your baking sheet with parchment paper for easy cleanup (and no sad, stuck crisps).
These crisps are best served fresh out of the oven, but they reheat beautifully in a 200°F oven for 5-10 minutes. Store leftovers in an airtight container for up to 3 days—though they rarely last that long. For extra flavor, toss them with a pinch of everything bagel seasoning before serving. Freezing isn't recommended since they lose their crispiness, but you can freeze the cheese mixture ahead of time if you're prepping for a party.
Why You'll Love This Recipe
- Two-Ingredient Core: I swear by the combo of sharp cheddar and cream cheese—it’s that perfect salty-tangy balance that makes these crisps ridiculously good. The cream cheese keeps them from getting too greasy while the cheddar melts into gooey pockets of flavor.
- Crispy Without Fuss: No flaky pie crust, no rolling dough—just thick-cut bacon layered with cheese, baked until golden. Honestly, the only "work" is spreading the cheese mix, and even my lazy Sunday mornings can handle that.
- Game for Any Occasion: These disappear at game day, but they’re also my go-to for lazy weeknights when I’m craving something rich without the effort. (Yes, even on a Tuesday night.) Serve them with burgers, toss them in salads, or just eat them straight from the pan.
- Budget-Friendly Crunch: A single package of bacon and a block of cheese stretch far beyond one batch. I’ll be real: my family fights over the leftovers, but I always save a handful for my next snack attack—because they’re that good.
Step-by-step instructions for bacon cheese crisps
Here's how to make crispy, gooey bites that'll disappear faster than you can say "double down."
🍳 Step 1: Cook the Bacon Until Crispy
Preheat your oven to 400°F and line two baking sheets with parchment paper. Place the 8 oz thick-cut bacon on the sheets in a single layer—don't overlap or it won't crisp properly. Bake for 12-15 minutes until the edges are deep golden brown and the bacon is fully crispy.
Here's the thing—thick-cut bacon is key for that perfect crunch. If you see any pieces starting to curl, press them down gently with a spatula. Remove the bacon from the oven and let it cool for 5 minutes before handling. This resting time makes it easier to crumble without losing that crispy texture.
👨🍳 Step 2: Make the Cheese Mixture
While the bacon cooks, melt the 2 tbsp unsalted butter in a microwave-safe bowl in 30-second intervals, stirring between each, until fully melted. Add the 1 cup sharp cheddar cheese, 4 oz cream cheese, 0.5 tsp garlic powder, 0.25 tsp smoked paprika, 0.5 tsp kosher salt, and 0.25 tsp black pepper to the melted butter.
Microwave for another 30-45 seconds until the cheeses are completely melted and the mixture is smooth. If it looks too thick, add 1 tablespoon water to help it blend. Stir in the 1 tbsp all-purpose flour—this creates that perfect crispy texture when baked. The mixture should be like a thick, spreadable paste.
🥘 Step 3: Assemble the Crisps
Using your hands, gently crumble the cooled bacon into small pieces—about ¼-inch size. Mix the crumbled bacon into the cheese mixture until evenly distributed. The mixture will be sticky, so work quickly but thoroughly. I like to use a silicone spatula to scrape up any cheese stuck to the bowl.
Scoop the mixture into 1-tablespoon portions and roll them into balls. Place them on the same baking sheets you used for the bacon, spacing them about 1 inch apart. They'll spread slightly as they bake, so don't crowd them. For extra crispy edges, you can flatten each ball slightly with your palm before baking.
🔥 Step 4: Bake to Golden Perfection
Return the baking sheets to the 400°F oven and bake for 12-15 minutes until the tops are deep golden brown and the edges are crispy. You'll see the cheese pull away from the edges slightly—that's your signal they're ready. If you're worried about burning, check them at the 10-minute mark.
For the ultimate texture, broil for 1-2 minutes at the end. Watch them like a hawk—they go from perfect to burnt in seconds. Remove from the oven and let them cool on the baking sheet for 3-5 minutes. The centers will be gooey and warm, while the edges stay crispy—this is where the magic happens.
Pro Tips For Making Bacon Cheese Crisps
- CHOP CHEESE SMALL: I used to cube the cheddar like ice dice, but that’s how you end up with uneven melts and gooey pockets. Aim for pea-sized pieces—no bigger than a nickel—so every crisp gets that perfect chewy-cheese pull. (Yes, even if it looks like you’re making a puzzle.)
- COOL THE CREAM CHEESE: Skip the room-temp shortcut—cream cheese straight from the fridge blends smoother and doesn’t turn greasy when mixed with the shredded cheddar. Let it sit in the fridge for 10 minutes first, or just pop it in the freezer for 5. Trust me, your crisps won’t turn into a sad, oily mess.
- USE A COOL SKILLET: I learned this the hard way—hot pans = burned bacon, melted cheese puddle. Heat your skillet over medium-low until it’s just warm to the touch (about 325°F), then add the bacon. Too hot, and the cheese will glom into a sticky blob before the bacon crisps. Patience here = crispy perfection.
- PRESS THE CRISPS FLAT: This isn’t the prettiest method, but it’s the tastiest. After adding the cheese mixture to the bacon, use a fork or spatula to press it down firmly—like you’re trying to flatten a pancake. It ensures even cooking and stops the cheese from oozing out like a sad, melted snowman. (Your future self will thank you.)
Storing and reheating your bacon cheese crisps
Room-Temp Storage
Keep your crispy bacon cheese bites at room temperature for up to 2 hours before serving—no refrigeration needed for this short-term storage. I like to store them in a paper towel-lined container to maintain crispiness.
These are perfect for parties or game day spreads where you want everything ready to serve immediately. Just make sure they're completely cooled before storing to prevent condensation from making them soggy. 💫
Fridge Preservation
For longer storage, transfer cooled crisps to an airtight container lined with parchment paper. They'll stay fresh in the fridge for 3-4 days, though I've never had leftovers last that long! Reheat in a 350°F oven for 5-7 minutes until crispy again.
The key is to store them in a single layer—not stacked—to preserve that satisfying crunch. I like using Glasslock containers because they keep things fresh longer than plastic.
Freezing Limitations
While these crisps aren't ideal for freezing (they lose their crispy texture), you can freeze the unbaked cheese mixture for up to 1 month if you're prepping ahead. Portion it into 1-tablespoon balls on a baking sheet, freeze solid, then transfer to a freezer bag.
Thaw overnight in the fridge before baking as directed. The texture won't be quite the same as fresh, but it's better than nothing for last-minute cravings. 🧊
Reheating Secrets
For the best results, reheat directly on the baking sheet at 350°F for 5-7 minutes—no need to cover. If using the air fryer, cook at 350°F for 2-3 minutes to restore crispiness. The oven method works best for batches, while the air fryer is perfect for individual servings.
Add a spritz of water before reheating if they seem dry, then cover loosely with foil for the first minute to help them crisp back up.
Dip Pairings
Serve with your favorite dips to enhance flavor and extend the snacking experience. I love spicy honey mustard (mix 2 tbsp honey with 1 tbsp Dijon mustard and ½ tsp cayenne) or classic ranch dressing.
For something sweet, try chocolate-dipped crisps—just melt 2 oz dark chocolate and dip the cooled crisps halfway. The contrast of salty and sweet is amazing! 🍯
Nutrition facts
Frequently asked questions
Can I use regular bacon instead of thick-cut?
You can, but thick-cut bacon is ideal for maximum crispiness. If using regular bacon, cut it into ¼-inch strips and bake for 10-12 minutes at 400°F until fully crispy. The texture won't be quite as sturdy, but it'll still work! For best results, press down any curling pieces with a spatula during baking.
Why did my crisps turn out greasy instead of crispy?
Greasy crisps usually happen when the cheese mixture is too wet or the oven isn't hot enough. Make sure your cheese is fully melted and the mixture is thick enough to hold its shape. Also, spread the crisps 1 inch apart on the baking sheet to allow proper airflow. For extra crispiness, broil for 1-2 minutes at the end.
What's the best cheese substitute if I don't have cheddar?
Gouda, Monterey Jack, or pepper jack work beautifully! For extra flavor, try a mix of ½ cup cheddar + ½ cup gouda. If you want something creamier, swap the sharp cheddar for mozzarella (but reduce the cream cheese to 2 oz to balance the moisture). Just remember, sharper cheeses melt better and add more depth of flavor.
Can I make these in an air fryer instead of the oven?
Cook the bacon in the air fryer at 375°F for 8-10 minutes until crispy, then crumble and mix with the cheese. Form the crisps and air fry at 375°F for 6-8 minutes, shaking the basket halfway. The air fryer gives slightly different (but still delicious) results—expect a more concentrated crunch in smaller batches.
How do I make these extra crispy?
For maximum crunch, chill the formed crisps in the freezer for 10 minutes before baking. This firms up the cheese mixture. Also, spread them ½ inch apart on the baking sheet and bake on the middle rack for even heat. For the final touch, broil for 1 minute at the end—watch them like a hawk to avoid burning!