
Main Courses
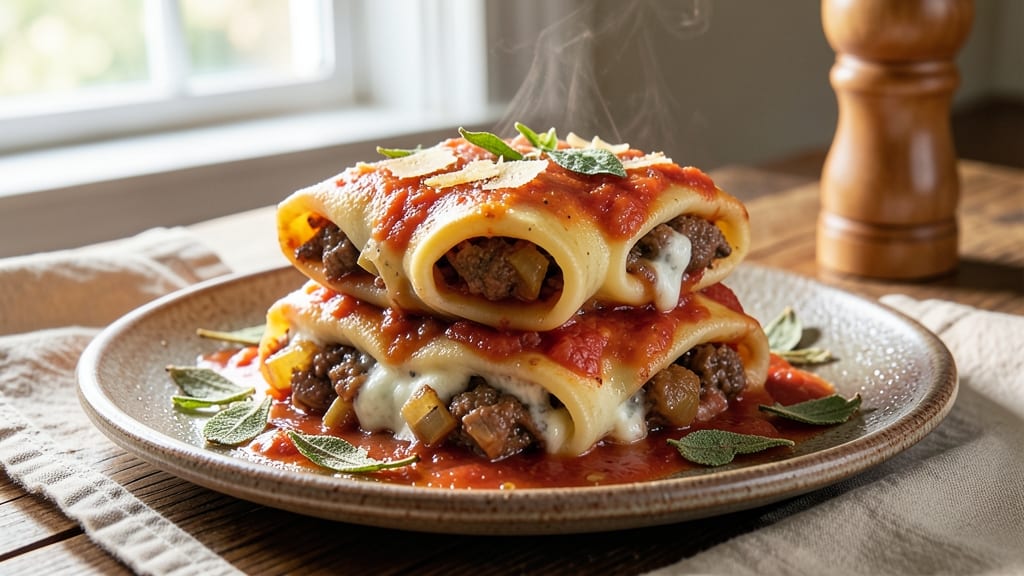
This beef and cheese cannelloni recipe delivers restaurant-quality Italian comfort food with triple-layered pasta that's impossible to resist. The secret lies in a rich, savory filling of perfectly seasoned ground beef and melted cheese, all encased in tender pasta sheets that bake to golden perfection.
I've refined this recipe over years to ensure the filling stays moist while the pasta achieves that ideal balance of crispy edges and tender centers.
The process begins with browning ground beef and building flavor through sautéed aromatics, then combining it with a blend of cheeses for a filling that's both creamy and substantial.
Assembly is where the magic happens—rolling the pasta sheets, layering the filling, and sealing the edges to create those iconic cannelloni rolls. This method works beautifully with both store-bought and homemade pasta sheets, giving you flexibility based on your skill level.
Baking transforms these assembled rolls into a dish that's rich, hearty, and satisfying in every bite. The combination of tender pasta, flavorful filling, and optional tomato sauce creates a meal that's perfect for family dinners or special occasions.
What makes this recipe stand out is its adaptability—whether you prefer a classic marinara sauce or a creamy béchamel topping, the possibilities are endless.
The result is a dish that's elegant yet approachable, with layers of texture and flavor that will impress even the most discerning eaters. Serve with a simple side salad or crusty bread to complete the meal. Let's get started on creating this timeless Italian classic!
Ingredients for beef and cheese cannelloni
Perfectly balanced ingredients for triple-layered cannelloni with rich tomato-beef filling.
| Ingredient | Amount | Notes |
|---|---|---|
| Ground Beef 🥩 | 1 ½ lb | 80% lean for best flavor |
| Yellow Onion 🧅 | 1 whole | Medium size, finely chopped |
| Garlic Cloves 🧄 | 4 cloves | Freshly minced for aroma |
| All-Purpose Flour 🌾 | ½ cup | For thickening sauce |
| Tomato Paste 🍅 | ½ cup | San Marzano preferred |
| Whole Milk 🥛 | 1 cup | Full-fat for creaminess |
| Ricotta Cheese 🧀 | 15 oz | Part-skim for balance |
| Parmesan Cheese 🧀 | 1 cup | Freshly grated from block |
| Mozzarella Cheese 🧀 | 8 oz | Fresh, sliced thin |
| Cannelloni Pasta Sheets 🍝 | 12 pieces | Store-bought or homemade |
| Marinara Sauce 🍅 | 2 cups | Homemade or quality jarred |
| Extra-Virgin Olive Oil 🫒 | 2 tbsp | For sautéing aromatics |
| Salt 🧂 | 1 ½ tsp | Kosher or sea salt |
| Black Pepper 🌶️ | ½ tsp | Freshly ground preferred |
| Dried Oregano 🌿 | 1 tsp | Italian blend preferred |
The ground beef is non-negotiable here—80% lean gives you that perfect meaty flavor without excess fat. Costco or Whole Foods carry excellent quality, but any reputable grocery store's ground chuck works. Look for bright red color and avoid pre-ground packages that sit near the meat counter too long. The ricotta should be creamy but not watery—part-skim gives you that ideal texture without making the filling too heavy. Freshly grated Parmesan makes all the difference; pre-grated gets clumpy and lacks depth. For the pasta sheets, De Cecco or Barilla are my go-to brands—they're reliable and widely available.
No San Marzano tomato paste? Any quality canned tomatoes will work—just make sure it's unsweetened. Short on ricotta? Cottage cheese blended with a splash of milk mimics the texture. Want to skip the mozzarella? Add an extra 4 oz of ricotta for creaminess. The marinara can be homemade (simmer crushed tomatoes, garlic, and oregano) or store-bought—Rao's or Bertolli are solid choices. For a richer sauce, stir in 2 tbsp of the pasta water at the end. The oregano should be Italian blend—Penzeys carries an excellent variety if you want to splurge.
Store the uncooked pasta sheets in an airtight container between sheets of parchment paper to prevent sticking—keeps for 1 month. The cheese filling can be prepped a day ahead and stored in the fridge, covered tightly. Bake within 24 hours for best texture. Leftover cannelloni reheats beautifully—cover with foil and bake at 375°F until warmed through. Portion into single servings before freezing for 3 months—this makes it perfect for meal prep.
Why You'll Love This Recipe
- Same recipe, different vibes: toss it in the oven for a quick weeknight dinner or bake it in a cast-iron skillet for a showstopper at your next gathering. (Yes, even on a Tuesday night.) The filling reheats beautifully, so it’s always a win.
- No Fuss Filling: The beef mixture comes together in one pan—no fancy steps, just browned ground beef, sautéed onions, and a splash of tomato paste thickened with flour. Honestly, I’ve made it while scrolling through emails, and it still tastes like I slaved over it.
- Cheesy-Garlicky Magic: That crispy flour coating on the filling? It soaks up the melted cheese like a dream, while the garlic and onion base adds depth. Between us, it’s the kind of flavor that makes you pause mid-bite—even my picky husband asks for seconds.
- Weeknight to Party: Same recipe, different vibes: toss it in the oven for a quick weeknight dinner or bake it in a cast-iron skillet for a showstopper at your next gathering. (Yes, even on a Tuesday night.) The filling reheats beautifully, so it’s always a win.
Step-by-step instructions for beef and cheese cannelloni
Here's the professional method for creating restaurant-quality cannelloni with perfect texture and flavor.
Prepare the Beef Filling
In a large skillet, heat the 2 tablespoons extra-virgin olive oil over medium-high heat. Add the 1.5 pounds ground beef and cook, breaking it apart with a wooden spoon, until it's no longer pink and the edges are beginning to brown. This should take about 5-7 minutes. Real talk: don't overcrowd the pan or the beef will steam instead of brown.
Push the cooked beef to one side of the skillet and add the 1 whole yellow onion, finely chopped. Cook for 3-4 minutes until softened and translucent. Add the 4 cloves garlic cloves, minced, and cook for an additional 30 seconds until fragrant. Here's where it gets good—stir in the 0.5 cup tomato paste, 1.5 teaspoons salt, 0.5 teaspoon black pepper, and 1 teaspoon dried oregano. Cook for another 2 minutes until the mixture darkens slightly and the raw tomato flavor disappears.
Create the Cheese Mixture
Transfer the beef mixture to a large mixing bowl. Let it cool for 5 minutes—this prevents the ricotta from curdling when mixed. While it cools, combine the 1 cup whole milk and 1 cup grated parmesan cheese in a separate bowl and whisk until smooth. This creates a creamy base for our filling.
Add the 15 ounces ricotta cheese to the beef mixture and gently fold together using a rubber spatula. The ricotta should be fully incorporated but still maintain a slightly lumpy texture—this is ideal. Now stir in the milk-parmesan mixture until completely combined. The filling should be thick but spreadable. If it's too thick, add 1 tablespoon whole milk at a time until it reaches the right consistency. This ensures perfect filling that won't leak when baked.
Assemble the Cannelloni
Preheat your oven to 375°F. Boil a large pot of salted water and cook the 12 cannelloni pasta sheets according to package instructions until al dente. Drain immediately and spread them on a clean kitchen towel to prevent sticking. Here's the thing—don't overcook them or they'll become too soft for assembly.
Working quickly, spread about 2 tablespoons of the beef-cheese filling onto each pasta sheet, leaving a ½-inch border at the top. Roll each sheet tightly, starting from the wide end, and tuck in the sides as you go. Place the filled cannelloni seam-side down in a 9x13-inch baking dish. The reason we leave space between rolls is to allow the sauce to circulate and coat each piece evenly during baking.
Layer and Bake
Spread 1 cup marinara sauce evenly over the assembled cannelloni, coating each piece completely. Sprinkle the remaining 1 cup marinara sauce on top. Now for the cheese topping—arrange the 8 ounces mozzarella cheese, sliced thin, on top in an overlapping pattern. This creates a beautiful golden crust while keeping the filling moist. The final layer is crucial: sprinkle the 0.5 cup all-purpose flour evenly over the mozzarella. This might seem weird, but trust me—it creates a crispy, breadcrumb-like top that adds amazing texture.
Bake uncovered for 25-30 minutes until the top is golden brown and bubbly, and the sauce is thickened. You'll know it's done when the edges of the mozzarella are crispy and the filling is heated through. Let the cannelloni rest for 10 minutes before serving—this allows the filling to set slightly and makes slicing cleaner. Serve with additional marinara sauce on the side if desired.
Pro Tips For Making Beef And Cheese Cannelloni
- Sear the Beef First: Before mixing anything, break the ground beef into small chunks and brown them in a cold, dry skillet over medium-high heat. I used to skip this step—big mistake. The beef loses flavor and the filling stays greasy. Once it’s browned, drain most of the fat (leave about a tablespoon) before adding onions and garlic.
- Salt the Onions: Dice the yellow onion extra fine and toss it with a pinch of salt before cooking. This softens the texture and draws out moisture, so it caramelizes faster. I learned this the hard way—raw onion chunks in the filling make every bite taste like you’re chewing on a crunchy afterthought.
- Mix the Filling Cold: Once the beef mixture cools to room temperature, stir in the cheese (mozzarella or a mix) and tomato paste. Cold ingredients bind better, and the cheese won’t melt into a soupy mess before you even bake it. I used to add cheese hot—disaster. The filling oozes out of the pasta like a sad lasagna.
- Pre-Bake the Pasta: Boil the cannelloni tubes for 2 minutes less than package instructions, then drain and toss them in a little olive oil. This prevents them from turning mushy when they hit the oven. I was skeptical until I tried it—now I never skip it. The edges stay firm, and the filling doesn’t turn to soup.
Regional styles of this beef and cheese cannelloni
Classic Italian Style
In Italy, cannelloni is often a Sunday family affair, where the filling is simpler but packed with flavor. The Romans and Venetians traditionally use ricotta and mozzarella as the cheese base, with béchamel sauce instead of marinara for a creamier finish.
I've made this version with 1 cup heavy cream replacing milk and ½ cup grated Pecorino Romano instead of Parmesan for a tangy twist.
The pasta is boiled just until al dente and assembled with 1 egg wash on the edges to seal tightly before baking at 350°F for 35 minutes. 🍝
Texas-Style Twist
Southern cooks put their own spin on cannelloni by adding smoked cheddar and ground chorizo to the beef filling. I like using 8 oz sharp cheddar and 4 oz chorizo (removed from casing) for a smoky, spicy kick.
The Texas version often tops with green chiles and a cheddar-mozzarella blend before baking. Serve with sour cream and pickled jalapeños for that true Lone Star flavor profile. 🌶️
California Fusion
West Coast chefs love to incorporate local ingredients like sun-dried tomatoes and goat cheese into their cannelloni. For a California-style version, I blend ½ cup chopped sun-dried tomatoes into the beef filling and swap 4 oz goat cheese for half the ricotta.
Top with balsamic glaze and arugula after baking. This version pairs beautifully with a Pinot Noir and garlic-roasted Brussels sprouts. 🍷
New York Diner Classic
Big Apple diners prefer their cannelloni with a rich meat sauce and extra mozzarella for that gooey, indulgent texture. I use 1 lb Italian sausage mixed with the ground beef and add ½ cup heavy cream to the sauce.
The New York style often includes a brown butter drizzle before serving. This version is perfect for feeding a crowd and pairs well with crusty garlic bread and a simple side salad. 🥖
Vegetarian Adaptation
For a plant-based version, I replace the beef with 15 oz lentils (cooked until tender) and 8 oz mushrooms (finely chopped and sautéed). The cheese filling remains the same, but I add 1 tbsp nutritional yeast for a cheesy flavor.
Top with marinara sauce and vegan mozzarella (like Miyoko's) for a satisfying vegetarian option. This version works beautifully with roasted eggplant and balsamic reduction. 🌱
Nutrition facts
Frequently asked questions
Can I use store-bought cannelloni pasta sheets instead of homemade? Store-bought sheets work perfectly and save time. Look for De Cecco or Barilla brands—they're designed specifically for cannelloni and hold their shape well during baking. Just
Why does my filling leak when baking?
Leaky filling usually happens when the ricotta mixture is too wet or the pasta isn't sealed properly. First, ensure your filling is thick but spreadable—add 1 tablespoon milk at a time if needed. Second, roll the pasta sheets tightly and press the edges firmly to create a seal. If leaks persist, try using 1 egg wash on the pasta edges before rolling.
What's the best way to reheat leftover cannelloni?
Leftover cannelloni reheats best in the oven to maintain texture. Cover with foil and bake at 350°F for 15-20 minutes until warmed through. For microwave reheating, cover with a damp paper towel and heat in 30-second intervals on medium power, stirring between each interval to prevent drying. Never reheat in the microwave without covering!
Can I make this recipe ahead of time?
Yes, but with some key adjustments. Assemble the cannelloni and refrigerate unbaked for up to 24 hours. When ready to bake, add 10 minutes to the baking time (about 35-40 minutes total) since it starts cold. For freezing, bake completely first, then cool before wrapping tightly in foil and freezing for up to 3 months. Reheat from frozen at 375°F for 25-30 minutes.
What's the secret to crispy top edges?
The flour topping is the game-changer! Sprinkle ½ cup all-purpose flour evenly over the mozzarella before baking—it creates a crispy, breadcrumb-like texture. For extra crispiness, broil for 1-2 minutes at the end of baking (watch closely to avoid burning). This technique works especially well with the 375°F baking temperature in this recipe.